
DIY photo ledges for just $15

Our living room was boring.
More specifically, I was bored with the white floating shelves that had been hanging in our living room for a good three years, maybe four? I’d decorated them with black and white photos in black frames with white mats and what seemed “classic and modern” at the time now felt stale.

Now, I’m a person who likes a lot of visual interest on the walls. Bring on the gallery walls, the statement pieces, the 3D elements — I love it all. The trouble with being this kind of person is that your walls are constantly being patched and repainted because there are so many frickin’ holes.
Because I’d committed myself to a black-and-white theme, I never changed out the photos or added anything colourful to those (really dusty) shelves. It just seemed like too much effort, so our neatly-arranged family photos remained frozen in 2012.
The obvious solution, once I thought about it, was to make it easier for me to swap out pieces and keep the walls (somewhat) intact.
On a whim last weekend I took down the floating shelves, patched the living room walls and repainted the wonky areas. (The light blue wall colour is CIL’s Bear Run and I still love how it pops against the white trim and accessories.)
Now, these floating shelves were kind of pricey (for our DIY-loving budget, at least) so I’ll use them somewhere else. But the crazy thing is how cheaply I was able to make the photo ledges that replaced them. Are you ready? Fifteen dollars for two four-foot ledges, including the hardware!
The ledges themselves were incredibly easy to build, too. I took two 1×2” boards (each 8’ long) and used my mitre saw to chop them in half, giving me four 4’ sections of 1×2” (which are less than $2.50 each, if you buy them that way).
Then I just held one board so it was standing upright against the edge of a board that was lying flat (making an L) and screwed them together, making two long ledges.

I gave each ledge a quick sand and painted them with two coats of white paint (Fusion Mineral Paint in “Casement”).

Then I screwed an L-bracket on each end and secured the ledges to the wall, one above the other, making sure to leave lots of room in between for large canvases or frames …
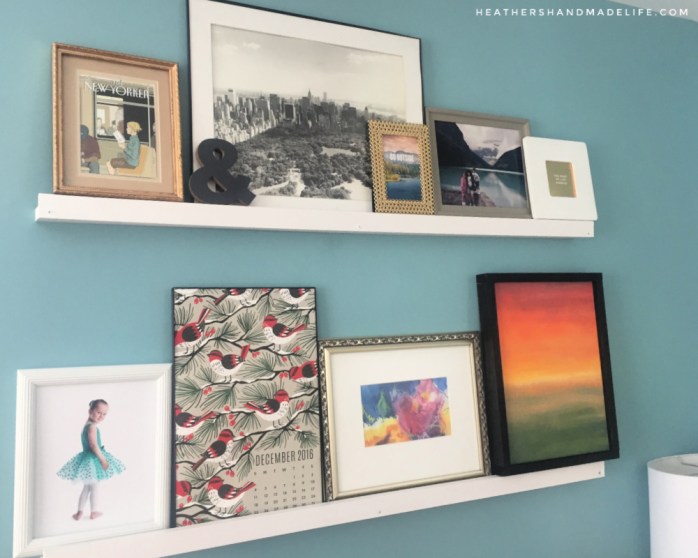
Grey ampersand: Michaels
Grey frame: Yard sale find painted with Fusion Mineral Paint in “Algonquin”)
Gold frame: Winners (on clearance for $4 because the glass is missing)
My ballerina beauty: Taken by Portraits by Johanna
Calendar art: Rifle Paper Co. calendar framed in a glass-less Walmart frame
Watercolour: Original by Halifax painter Susan Hubley
Sunset painting: Made by me, handmade frame (tutorial coming soon)
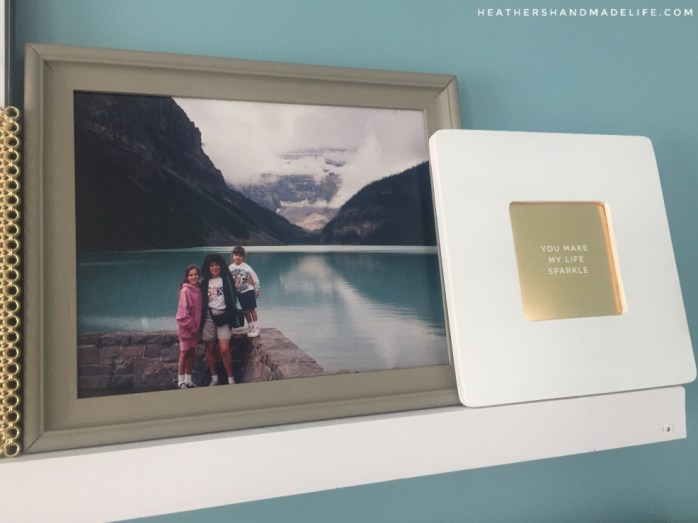
(Full disclosure: I can only use frames that are fairly slim, otherwise I’m worried they might tumble off the front of the ledges. If I were to do this project again, I’d make the ledges a little deeper — likely using 1×3” boards. Then I could have larger frames and they’d have plenty of room to lean back safely against the wall.)
Filling up those ledges was SO much fun as I figured out the best way to display the paintings, photos and prints. I can change them as often as I want without worrying about more holes in the wall, and mixing and matching frames has given me a lot of breathing room.

It’s a more casual look and I’m loving it!
*** UPDATED in 2019 ***
I still love these skinny ledges in our living room, and I’ve made them for other people’s homes, too.
Here they are in Sylvia’s master bedroom …


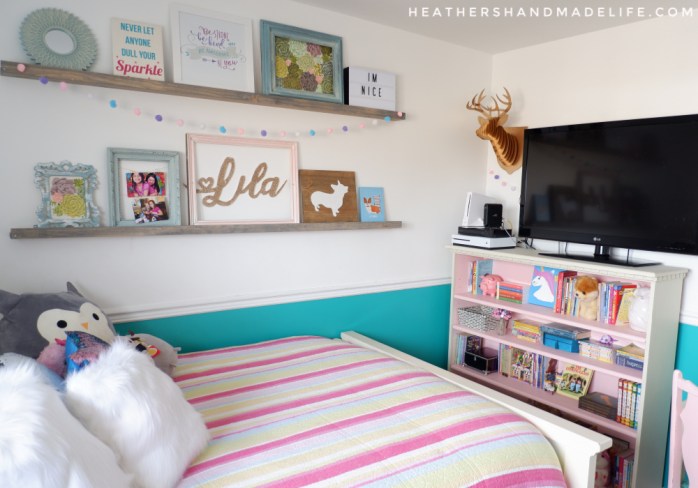
And in Lila’s bedroom …
And then I decided to branch out into making LARGER ledges that could hold more than frames …
I built them the same way — one “front” board screwed into a “flat” board — except I made the flat board deeper, usually around 6″, like these ones for Laurel’s bedroom …


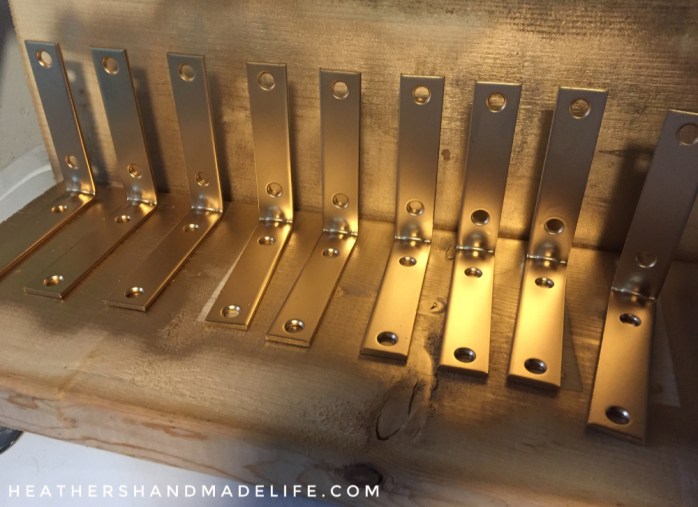
Because the ledges are thicker — and much heavier! — my Handy Husband insisted on using chunky brackets that would support their weight, and putting them UNDERNEATH each ledge so they’re properly load-bearing.
I didn’t love that idea — usually the brackets are hidden behind the items on the ledges — but spray-painting them gold did make me feel better. 😉
We made a similar set of wide ledges for Katie’s bedroom, and they look fantastic there, too …

Making thicker ledges increases the cost because the brackets are more expensive and so are the thicker boards.
However, you’re able to load them up with plenty of items — making them a good idea for rooms with a lot of “stuff” that needs an organized home, like piggy banks, books, plants, dolls, stuffed animals, LEGO sets, and just about anything else.
But if you’re just looking to display photos in slim frames, scroll up to the top and follow the instructions for skinny $15 photo ledges. They’re classic, super affordable, and easy to put together.
Happy building!
xo
For those of us who don’t love Christmas

Admitting you don’t love Christmas is sometimes like saying you hate puppies — especially the really fluffy ones — or that you think Caillou is just misunderstood. (Wrong and wrong.)
But for some of us, Christmas is NOT the most magical time of the year. It’s a glitter-sprinkled month (or more) of extra stress or anxiety or frustration or *insert other annoying feelings here.*
Not only do you feel THAT, but you have the added irritation of people trying to MAKE you feel things you can’t/won’t/don’t want to feel.
(People are serious about Christmas and they want you to be, too.)
I don’t hate Christmas but I don’t love it, either. It’s hard for me every year.
The shopping stresses me out. I put a ton of pressure on myself to be done really early so I don’t have to go out in December when the stores are crazy. (We have a gift system so I don’t stress about how MANY gifts to buy, luckily.)
I had to go out for gift cards and a few final stocking stuffers last weekend and my anxiety was terrible, even though I went alone and tried to relax. I don’t get that excited-and-happy Christmas buzz that others seem to get from a decorated mall playing cheerful holiday music. Nope, nope, NOPE.
I don’t like routine changes so the “vacation” aspect of Christmas is difficult. I still have to work, but the kids are home (and totally nuts with excitement). Sometimes I don’t have to work, but still feel that I should.
The visiting and travelling and scheduling make everything “off” for two solid weeks and, oh, did I mention THE BIG DRY NEEDLE-DROPPING THING THAT I AM SO TIRED OF STARING AT in our living room? I’m itching to put the room back to “normal” and if that makes me a Grinch, oh well.
Most of all, I think, I don’t like the pressure and the build-up of ONE! BIG! DAY! because there is such a letdown when it’s all over.
It’s the biggest case of The Sunday Blues ever, times a million.
Even Christmas morning, after the presents are opened, I feel like it’s all over. There are still hours left in the day, and dinner and visiting and everything, but my favourite part is seeing everyone open their gifts and stockings. When that’s over, it’s like … Oh. Well. That’s done for another year.
In exactly the same way I’m always desperate to see summer vacation come to an end, I’m looking forward to gettin’ on with this season of joy and fudge and rumballs.
In the meantime, of course, I’m doing all of the baking and cleaning and prep work that you’re supposed to be doing as an adult on Dec. 23. I’m changing the sheets for company and cleaning out the fridge and putting away the toys. I’m taking deep breaths and reminding myself no one will look at the state of the baseboards. (Please don’t.)
I’m finishing my last few assignments (until Monday when I’ll definitely be back in the office, clamoring to feel normal again). I’m taking deep breaths and reminding myself that it’s OK to take a couple of days off, that everything has slowed down for a while, and that we will not be penniless if I step away from the keyboard.
I’m singing with the kids and helping D finish his latest Lego creation (mostly because we need the table back for Christmas dinner). I’m trying really hard to be patient with the kids + their constant chatter.
I’m taking deep breaths and reminding myself that this is a really special time and I have to get into it.

I don’t love Christmas but I’m trying. I’m trying for my kids and for my husband and for our families. I’m going to take my own chalkboard-ed advice and try to calm the eff down and enjoy it as much as I can.
I see you, too, not loving Christmas. I see the split-second flash of panic in your eyes when people ask that CONSTANT December question of “You ready for Christmas?” I see the eyerolls at the over-the-top merriment because you’re just looking forward to a Netflix marathon (that sounds amazing BTW). I see the pressure to show everyone you’re OK — you’re having a good Christmas, really! — and no, you don’t need to accept their pity invite.
We don’t have to love Christmas. We don’t even have to like it. But we should, however, figure out the things that are going to make it a good day for us.
For me, that’s spending time with my family, eating mashed potatoes with gravy, playing board games, eating my mom’s famous home fries for breakfast morning breakfast, and seeing everyone’s faces as they open their presents.
(Yes, I also noticed that two of my favourite parts include potatoes.)
If you’re not a Christmas-lover, don’t feel guilty or like something is wrong with you. Do what you can to make it an OK day, whatever that means. Consider this a virtual fist-bump as we take lots of deep breaths and look forward to getting back to normal.
xo
Dreaming up a new bedroom for our little girl


COLOURS
C wants a “purple and pink” colour scheme. I do not like purple (it pained me to paint her nightstands purple, although she insisted) so I’m going with lavender and blush with little touches of super-soft aqua and grey. And lots of white, of course!
She has beadboard on the lower half of her room, which we’ll keep white, and the top half will likely be a soft grey so we can have fun with the next step …
FURNITURE
We’re going to build her a massive loft bed (!!!) that has a raised play area, and it will have a large play area underneath (probably structured to look like a little house) for playing Barbies,
We’re also going to paint the hand-me-down wooden dressers a custom-mixed shade of Fusion Mineral Paint (pink!) and add gorgeous white rose hardware from Phillips and Chestnut.
We might also take the desk from D’s room (he’s got his own room makeover in the works, too) and turn it into the “makeup table” she’s been begging for.
LIGHTING
We’re taking out the ceiling fan (not a good idea to have one of those with a loft bed!) and replacing it with this stunning flush-mount light with crystals from Kent. C is obsessed with the fact that she’s getting a new “chan-da-weer” for her bedroom, and I can’t wait to see it installed!
ACCESSORIES
I’ve been dying over this pillow ever since I first pinned in, so I think it’s inspired the whole room without me even realizing it.
 |
| [ source ] |
I also want to DIY the light switch plates and outlet covers with lots of glitter for a fun touch, and do a new gallery wall in the soft tones of her new palette.
***
So that’s the plan — I think! It could change if the little miss keeps pinning new things every day. I’ve creating a mini Pinny monster! 😉
DIY stage backdrop for our little performer


I had a wooden dowel leftover from another project, and it was three feet long, so that’s how wide I decided to make the backdrop.
The rest of backdrop is built with three 1×2″ boards from Kent (each six feet long). That’s it! Each board is $3.30 so the framework is about $10. Pretty great!


I plan on setting it all up on Christmas Eve, once the kids are asleep, so C sees her brand-new popstar “stage” when she comes down on Christmas morning. I know she’s going to love it!

So who’s inspired to build one now? Let me know if you do — I want to see photos!

The (4th annual) corporate Christmas party for a work-at-home freelance journalist

Sitting in my little basement office, eating appetizers and playing games with myself … while all dressed up?
Yeah, that’s something I’ve been doing for FOUR YEARS NOW. (See the very first one, the second one, and last year’s party.)
 |
| Last year’s party was off the chain … whatever that means! |
 |
| The only party where I had some actual guests! |
 |
| The one that started it all |
When I presented at BlogJam Atlantic, it was crazy to meet other bloggers and find out that my weird little stay-at-home party was actually … a good idea?
Anita from Twirp Communications suggested we get together and host a bunch of self-employed Christmas parties on the same day, so here we are! Let’s get started … and be sure to read all the way to the end for the giveaway because PRIZES!
So here we go!


 |
| There were some real studs at this year’s party! |
 |
| The mashed potato bar was mmmmmmmmmm! |
 |
| And this is the ULTIMATE dessert! How’d they know?! |

 |
| Twelve bloggers peeing! Four gambling birds! Lolololol! |

 |
| FOUR YEARS IN A ROW! This is unprecedented! Time for presents! |


 |
| We love a good dance party! |


 |
| Thank you to all of my clients, sponsors and editors for a fantastic year. Have a safe and happy holiday season, and I can’t wait to work with you in 2017. |
I’m giving away a $25 Chapters Indigo electronic giftcard to one lucky reader who comments on this post. That’s all you have to do — just comment, and make sure you’re either logged in (so I can reach out) or you leave your email address in your comment.

Thanks for attending my self-employed Christmas party, and I hope you have a wonderful holiday season, lovely readers!
xo
If you’ve enjoyed my solo Christmas Party, I’m sure you’ll enjoy the other solopreneurs who have joined me in this fun, new tradition. Please visit all of the blogs and leave them a comment. Not only will you make them feel good, you could win some other awesome prizes.
Next up on your tour is Anita at Twirp Communications.









As featured on …