How to support your friend who blogs

So you have this friend and they blog. You’re not completely sure why or how or if they make any money from it, but you try to be a good friend and read their blog.
(Your friend really appreciates it!)
But did you know there are so many OTHER really easy things you could do to support that friend who blogs? Ten things, in fact.
I decided to write this post not because I’m trying to give my own friends instructions (really!) but because I often will offer up a tidbit about what it’s like living in the blogosphere and my friends are like “REALLY? I didn’t know it helped if I commented on the Facebook post?!”

So here are some easy ways you can really, really HELP your friend / neighbour / relative who blogs …
1. Like their* posts on Facebook.
No, not their status about it taking two hours to get home. Their bloggy posts!
It takes half a second to click “like” and you know what? It can make a HUGE difference. Because you clicking “like” might mean that your own Facebook friends (people who don’t follow the blogger or even know who they are) might see “Jane Smith liked a post by This Super Cool Blogger.” Those friends will be able to see the post (with the same photo/headline you saw) and they might decide to read it and like it, too. The blogger might even get a new follower!
*If they have a page for the blog, try to like THAT post — not the one they shared on their personal page. The more eyes on their “official” Facebook page, the better.
2. Leave a comment!
Facebook comments are great because other Facebookers can see them and it gets conversations — sometimes even debates! — going, which gets more eyes on the posts. It doesn’t have to be long or anything. Even a simple “Really enjoyed this!” means a lot, or a well-timed “Haha!”
Commenting on blog posts themselves is also nice because it’s “forever,” unlike a Facebook comment that will fade into the timeline sunset after a day. That blog post might go viral months or even years down the road, and it’s impressive to have a bunch of comments/questions below it.
3. Share/retweet their posts.
If you really enjoy a post or relate to something your friend has said, share that shiz!
Sharing a blogger’s posts is a HUGE high-five because it’s automatically going to put all of your Facebook friends’ eyes on it (whereas with a “like” it’s only a possibility that their friends will see it). Same with Twitter — everyone will see it. This is a great compliment to your blogger friend because sharing = caring.
4. Like/follow all of their accounts.
Never post on Twitter, but you have an account anyway? FOLLOW YOUR FRIEND! It won’t matter to you if you never use it, but it could really help them.
“Like” their page on Facebook and HIDE IT if you really have to, but at least it’s still “liked.” (And, come on, I’m sure you’re not really going to hide it, right?)
Bloggers need to hit certain numbers of followers in order for brands to consider them for paid campaigns and sponsored content, so numbers are very important!
5. Double-tab those Instas!
Every “like” is like giving the blogger a nice warm smile. They feel good when they see them roll in, and having a lot of likes on a photo can help them land more opportunities. Which brings me to my next point …
6. Pay special attention to anything sponsored.
Clients and brands really want to see interactions on a sponsored post, whether it’s a simple Tweet or Instagram photo or a blog post. If the blogger seems to have drummed up a lot of interest for their product or service, they’re more likely to hire that blogger again. Engagement is everything!
So enter the giveways. Like and comment on those posts. (“That looks great!” “Ooh, I want one!”) Your friend will appreciate it a lot.
7. Tag them!
Share the awesomeness of your blogger friend with someone else by tagging a friend beneath one of the blogger’s Instagram photo (“Hey @friend you would love this account!”) and maybe snagging them a shiny new follower.
Tag them on Twitter as you quote one of their tweets, and the retweets could turn into MANY new followers.
8. Pin their photos.
If your blogger friend is trying hard to make their content known on Pinterest (aren’t we all?) it helps a lot to pin their photos, tutorials, projects, designs, etc.
Go to their blog’s Pinterest account and look around for a minute. If you see something you like, pin it to your own board — making the pin appear in the timeline of everyone who follows you on Pinterest,
9. Support their advertisers.
Blog ads have special customized links so the advertiser knows exactly where their traffic is coming from (i.e. “Blog ABC sent us 4,618 new customers this year,” or “Wow, Blog ABC encouraged a lot of people to buy our scotch-guarded underwear!”). Every click counts.
Don’t go crazy clicking on every banner ad and affiliate link they have (you know, unless you want to?) but if you see something that interests you as you’re reading their posts, click it! They might not earn anything unless you make a purchase, but they might earn a little something (fractions of pennies) just because you clicked on it — you never know.
10. Tell them you enjoy their blog.
Even without a single click, you can make a blogger’s day by telling them what they’re doing matters. That you read it! That you liked it! That you laughed at the headline and maybe you didn’t get around to reading the full post yet, but you can’t wait to see down and read it.
Sometimes bloggers get so caught up in clicks and numbers and analytics that we forget about the real people in our lives who are regularly, quietly reading our work … and just not being public about it. When we hear from you, it makes our hearts grow three sizes. Thank you!
I’m a taekwondo mom … and I love it!

In six years of parenting, our kids’ extracurricular activities have included gymnastics, soccer, T-ball, Beavers, swimming, cheerleading and ballet. It sounds decent in a single sentence, but a lot of their friends have tried all of that along with piano, basketball, tennis, skating and hockey.
Our son and daughter are very social but not particularly “sporty,” so the only activity that’s stuck has been ballet for our daughter (and swimming for them both, only because it’s a life skill). Our son’s enjoyed everything he’s attended, for the most part, but he hadn’t found anything that really, truly clicked. I sold him the idea of taekwondo because he loves the Power Rangers — all eleventy-billion seasons of it — and he started in September.
I didn’t know much about it going in, other than it was likely going to be quieter than Beavers (shudder) and that sounded pretty great. We have friends who have all three of their kids in taekwondo and they absolutely love it.
Well, our six-year-old just wrapped up his first term and I can say with confidence that we’ll be back for more. It’s brand-new to us and we’re still figuring it all out, but so far it’s been interesting (and quiet!) to watch, and our son loves every minute of it.
To give you an idea of what it’s like watching, here are 40 thoughts that run through my head during my kid’s taekwondo class:

1. We’re not late! And I’m only slightly sweaty from rushing here. Success!
2. I hope he remembered to bow when he entered. What’s the gym called again? A dojang? Or is that what the outfit’s called? I’d better not say “dojang” until I know.
3. Hmm. That girl’s uniform is really grey. Is ours going to get all grey?
4. I guess I should wash it eventually?
5. It’s not like he’s crawling around on the floor in it. Or going outside.
6. Maybe if I’m really careful and make him take it off immediately after every class, it won’t get very dirty?

7. I think I did a decent job tying the belt tonight. They probably won’t even have to …
8. Oh wait, they’re retying it. What am I doing wrong?! I’ll have to YouTube it next week. If we’re not running late.
9. It’s adorable that little kids CANNOT do jumping jacks. LOL.
10. They’re just hopping up and down and flailing their arms.
11. How old do you need to be to do a proper jumping jack? Is this something we should be working on at home?
12. I love that it’s so quiet here.
13. Way better than Beavers with all the screaming and running around.
14. It’s all about respect! It’s genius! Exactly what these kids—
15. Oh wait, now there’s yelling.
16. Not a lot though. It’s a nice controlled yell.
17. I have no idea what they’re yelling but everybody looks very official.
18. What language is it? Korean, I think. Must look that up. (Yup, Korean.)
19. They all stand on coloured circles. What do the colours mean?
20. The armless rubber guy looks like he gets into a lot of bar fights. He’s angry looking.
21. He kind of stops at the waist. I guess because you’re not supposed to hit below the belt, literally?
22. Oh, look. They’re so cute running around in those white uniforms.
23. The WiFi is weak. Is it worth using my data to look at grey paint colours on Pinterest? (Yes, obviously.)
24. Awww, they’re playing tag and chasing their instructor. That’s cute. They really — yikes, they’re going to stop before they smash into the parents, right?
25. How many stripes until they get a coloured belt? Is there a cheat sheet?
26. It’d be cool to have a black belt. I wonder how long it takes.
27. I don’t think I’m up for it. Not just for the sake of saying I have it.
28. Little kids in mouthguards are so cute. It’s like they shoved a hockey puck up under their gums.
29. It’s good they’re all wearing cups. Their kicking is a little … erratic.
30. Ohhhh they’re counting to three! I think?
31. Something, something, and what sounds like Spanish for three. Tres? (Nope … Google says “se.”)
32. I wonder if he could count to three in Korean at home if I asked? That’s kind of cool.
33. Wow that uniform is REALLY grey. Did it come that way?
34. Maybe it’s a different brand and it’s supposed to be grey … and short.
35. Or was it just washed with, like, a million loads of dark blue jeans? In hot water?
36. I’m terrible at laundry. It’s why I don’t buy anything white.
37. Which kid is mine?
38. Seriously, where’d be go? All of the boys here look the same. Is dark blonde/light brown the universal colour of six-year-old boy hair?! Did he–
39. Oh, there he is. He’s so cute when he kicks.
40. I love it here.
xo
DIY charging station

We lost power twice this week, and both times my phone was nearing the end of its battery life … and I was on deadline. Without my phone to provide an emergency hotspot internet connection for the (also-dying) laptop, well, you can imagine how this left me.
As long as there’s snow and ice (and wind and rain, apparently), I’m going to be better about keeping everything charged. For my work, you see … not just because the kids were whining about the darkness and needed the warming glow of the iPad to soothe themselves.
I’d been planning to make a charging station for a long time because I was sick of the mess of cords across the kitchen counter. (The mess included receipts, pens, junk mail and containers of bubbles, too, but let’s focus on the cords.)
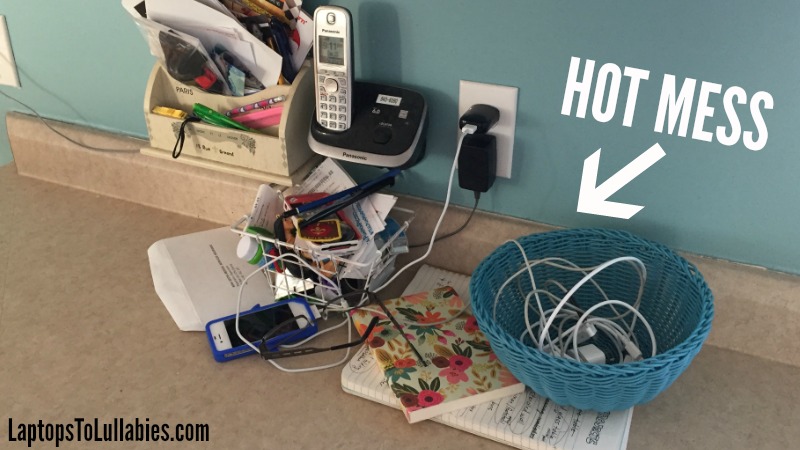
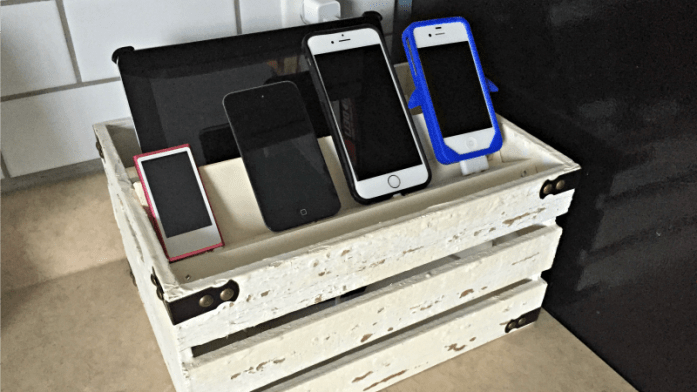
Months ago, I picked up a decorative white wooden crate from Michaels that was perfectly distressed with little brass details on the corners. Normally I’d try to DIY something like that, but it was absolutely perfect — and I scored it for 40 per cent off with a coupon.
I’d been planning to build a charging station from scratch, but decided this little crate was perfect in almost every way. It just needed some kind of dividers or compartments for the different-sized devices. I bought a special plug with extra outlets — including USB ports — and then … the project stalled.
The crate sat on the counter and we heaped the devices, cords and headphones inside of it, behind it and in front of it. Because the crate was always messy, certain people (ahem, like the one I married) felt it was cool to drop random items in there. When I was cleaning it out, I found four different pairs of his sunglasses!
This week, however, I decided it was time to finish what I’d (barely) started. I grabbed a couple of 1×2 scraps and held them in front of the crate, deciding what exactly I was going to do. The trouble with dividing the crate was that the little iPods would be hidden at the bottom, and there needed to be lots of room for the chunky second-gen iPad.
I decided to screw three small pieces of wood together to make a ledge for the littler devices — it’s basically a wooden doll-sized couch, if you want to get technical. I didn’t even screw the ledge into the sides of the crate because it fit in snugly when I wedged it inside.
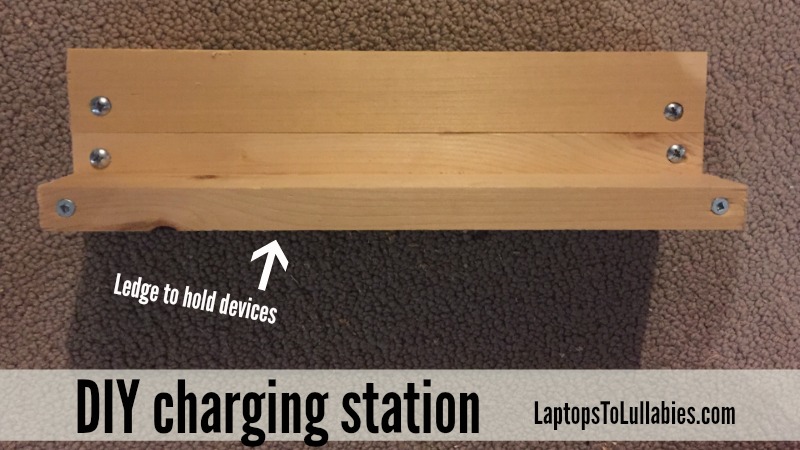
I painted the ledge with the closest match I had on hand (“Limestone” by Fusion Mineral Paint) and brushed a bit of it over the crate, here and there, so the colours blended. Once the paint was dry, I distressed the ledge with a bit of sandpaper and drilled four hours for charging cords.
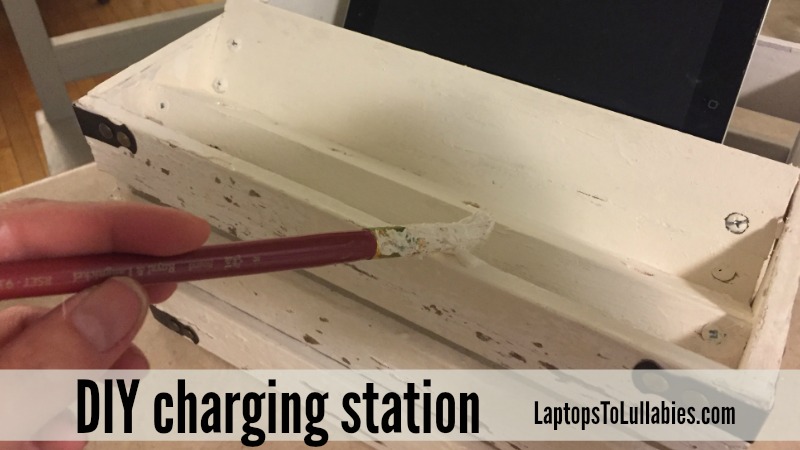
(My biggest drill bit wasn’t very big, so just picture me swirling it around trying to make the holes bigger — like I was scraping the last bit of whipped cream out of the mixing bowl.)
I popped the cords through the holes, strung them through a crack at the back of the crate, plugged everything into the wall, and I was done!
The ledge holds our iPhones and the kids’ iPods, and our iPad fits nicely in the space at the back. Because the ledge is completely removable, I can tweak the charging station as our devices change or even use the crate for something else down the road. I also store any extra chargers and sets of earbuds in there so it’s a one-stop shop for that stuff.
Now if only all of the counter clutter was managed so easily!
 |
House tour: Upstairs

Wall colour: Benjamin Moore’s Staffordshire Blue
Twin beds: Similar to these
Red, blue, and white twin bedding: HomeSense years ago (it’s also here)
Gallery wall: Tutorial here
Gold house number: Kent
“The best things” poster: Scholar’s Choice, but similar here
Canvases: Painted myself, with canvases from Michaels


Run DMC T-shirt (which was made into a pillow): H&M
Blue lamp: Walmart
Teddy bear quilt: Handmade a zillion years ago, tutorial here
Nightstand: $2 at a yard sale, tutorial here


Canadian fabric art: Tutorial here
Rain gutter bookshelves: Tutorial here


Our daughter’s aqua and pink bedroom with rainbow decor …

Wall colour: CIL’s Bali Hai
Wooden twin bed: Secondhand (similar here)
Wooden posts for canopy: Tutorial here
Chevron quilt: Handmade by me, tutorial here
Two nightstands out of one end table: Tutorial here
Faux flower lamp: Lamp originally from Walmart, tutorial here


Rain gutter bookshelves: Tutorial here
Hanging poms: Tissue paper + tutorial here


Gallery wall: Tutorial here
Wooden letters: Michaels
Canvas art: Handmade, tutorials here
Recovered lamp shade: Tutorial here


Our Revere Pewter master bedroom with red accents …

Wall colour: Benjamin Moore’s Revere Pewter (details here)
Curtains: No-sew, tutorial here
Pelmet boxes: Tutorial here
Throw pillows: Handmade, tutorial here
Lamps: Yard sale finds I painted, tutorial here
Skinny end table: DIY, tutorial here
Black photo frames: Walmart
Grey coverlet: Similar
Huge $2 engineering print art: Staples, tutorial here


Our upstairs hallway …

Wall colour: CIL’s Bear Run
Mirror: Free from the side of the road! Tutorial coming soon.
Mirror’s paint: Fusion Mineral Paint’s “Casement”
Mirror’s finish: Miss Mustard Seed Milk Paint Antiquing Wax
Console’s paint: Fusion Mineral Paint’s “Ash”
White porcelain rose hardware: Phillips and Chestnut (similar)

Check back soon for tours of the main level + the basement!
How to make your jeans fit perfectly (when you have a big butt)


Start by putting your jeans on and pinching the excess fabric (no, not excess skin) at the waist and seeing how much you need to take them in. For me, it was a good one-inch-pinch on either side, which actually takes four inches off from the total waist.
Take the jeans off, turn them inside out, and use safety pins to mark off a rough triangle that will curve the waist inward.


With your jeans still inside-out, hand-stitch them back together with your new, snugger waistband. It doesn’t have to be fancy. I just whip-stitched all the way up and then back down to be sure it was going to hold.

Flip your jeans right-side out, and you can barely tell they’ve been modified!
The best part is trying them on again …


So all my home girls with the big butts, shakin’ it like you’re at a strip club? I feel you. It’s tricky.
Give this a try and let me know how it works! #bigbuttsunite








As featured on …