
Hear we go again

We took her in for the long-awaited hearing test on Saturday.
She didn’t pass. (Sound familiar?)
It wasn’t even surprising. Her hearing’s been terrible for months now.
At first it was for an unspeakably gross reason: wax build-up (!!!) plugging her ears. We dutifully dropped olive oil into her ears a few times a day for a week or two, and then we took her back to the ENT to get them suctioned. Once they were cleared out, he said she’d likely be fine.
She wasn’t.
Her hearing didn’t improve. We were all frustrated from constantly repeating ourselves. From shouting at our poor girl because it was the only way she could hear basic instructions to brush her teeth or put on her PJs or ANYTHING that needed to happen.

I called her ENT back but he was on a (length) vacation. I called private clinics to see if I could pay to get her hearing tested while he was away, but they “don’t do children.” If she was 60? Heck yes, same-day!
I called Nova Scotia Hearing & Speech and explained the situation, and they put her on a list. They warned me the wait could be six months or even a year. Finally, her ENT returned, I called and pleaded my case, and we scheduled the hearing test.
In the meantime, she kept getting mad at me because I’d grab her ponytail in a parking lot, but it was only because she wasn’t hearing me telling her to stop because PEOPLE IN PARKING LOTS ARE CRAZY. Lunging forward to grab the tip of somebody’s ponytail isn’t cool, but it’s better than getting hit by a car.
Just like her brother has done many times before, she sat in the booth and they shut the door. The audiologist held a piece of paper over her mouth (so C couldn’t read her lips, which she’s gotten very good at) and asked her to say certain words. She played tones in C’s headphones and asked her to raise her hand when she heard them.
 |
| Two kids, four busted ears. |
D and I sat nearby in chairs, and we could see glimpses of C’s grinning face as she sat proudly in that booth. We heard high-pitched chirps and whirrs and beeps, clear as day, from our seat across the room.
Sometimes she happily raised her hand, and the audiologist nodded encouragingly.
Other times, she stared straight ahead for a long time.
Sometimes she just shook her head apologetically, like, Sorry, I’ve got nothin’.
Then she was coming out of the booth and getting a sticker. D got a sticker too. The audiologist confirmed she had moderate hearing loss — the same diagnosis as D, all those years ago.
We saw our ENT shortly after, and I signed the same ol’ consent form for tube surgery that I’ve signed twice before.
“You make deaf babies! LOL!” my sister texted me after the appointment.
And she’s right, sort of.
 |
| Cute kids. Sucky hearing. |
It’s strange that BOTH of our kids have had such messed-up ears, but not any ear infections (which is usually the reason kids need tubes).
But while D experienced his problems early (ages 1-4), C’s only started when she was 4 1/2. According to our ENT, there are two different phases when these ear issues can happen — D got the first phase, and C got the 4-7-year-old phase. Something to do with how the ears grow and develop. He mentioned adenoids, too, but at this point I’m just like “Tubes, please! Thanks! K bye.”
We’re grateful that C’s hearing issues happened during this second phase, to be honest, because it did such a number on D’s speech when he couldn’t hear during that critical 12-24 month period.
I look back at old posts sometimes and I can’t believe how little he could say. He said like FIVE WORDS when he was 18 months old (when he was supposed to be saying 20 words, at least). He could sign a ton of words, but speaking out loud? Nope.
C seemed like a little genius in comparison, but she could hear. I just saw a video in my Facebook “memories” the other day where she was chattering away at 16 months. Even now, her speech still seems fine to me, which is a blessing.
She’ll hopefully get in for her surgery sometime in May, but it could be June. Either way, she’ll be all fixed up — and hopefully hearing great — before she starts Primary in the fall.
In the meantime, we’ll keep speaking extra-loud, tapping her on the shoulder to get her attention, and tugging her ponytail in busy parking lots if she’s about to dart behind a car.
Ironically, we have bought her a little piano for her fifth birthday in a few weeks.
Sometimes you just have to laugh.
xo

Quilts from baby clothes

This project has been sponsored by Atlantic Fabrics’ six locations across Nova Scotia, including the newest store on Parkland Drive.
Back in January I wrote about how I’d finally decided to purge the (very large) plastic bins of “special” baby clothing in our closets. I finally got around to turning some of the most meaningful pieces into a baby clothes quilt, so today I’m going to walk you through exactly how to make your own, with the help of my good friends at Atlantic Fabrics.
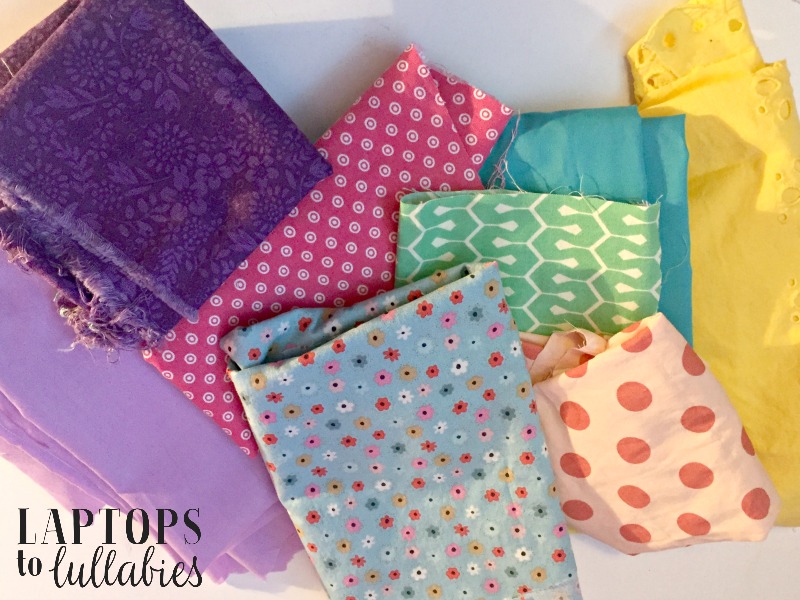
1. Start by sorting.
Go through your bins — all of them — and put everything into one of three piles: keep, cut or donate.
My “keep” pile was extremely small and included a few outfits to pass down to my sister, a few outfits for the kids to keep (for my future grandchildren) and a few items for me to cry over in my nursing home someday. My “cut” pile was all of the clothing that I wanted to preserve in the quilts, including a few baby blankets, bibs and pairs of socks, and everything else was donated.
Because I’d sewn about half of my daughter’s special outfits, I was able to cut the squares from leftover material and spare the actual dresses, so they got handed down to a lovely friend who can use and appreciate them.

2. Cut out squares.
This part takes the most time, but it’s pretty mindless and you can do it while binge-watching Riverdale on Netflix. Pick up a onesie or shirt, cut up the sides (so you’re only dealing with the front layer), trace a square with a marker, cut it out and repeat.

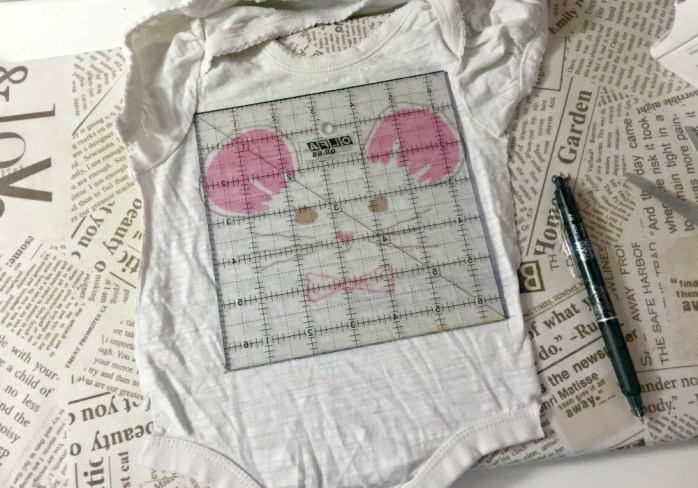
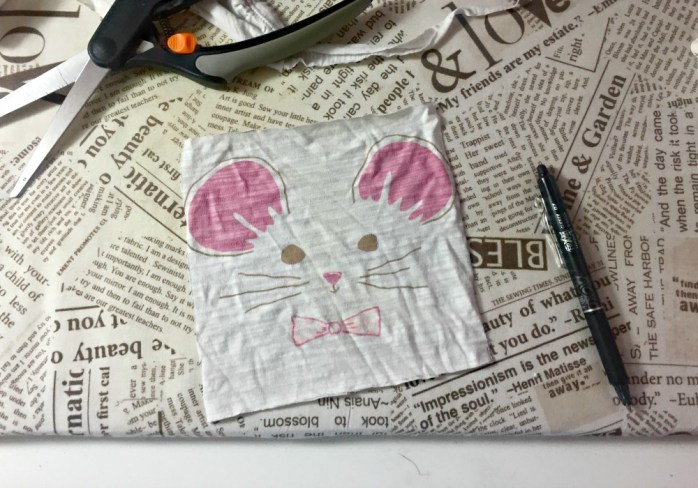

With sleepers, you’ll want to cut your square from the back where there isn’t a zipper or snaps. For tiny pairs of pants, cut up the side seams and open them up to get a big enough area to trace a square.

To preserve tiny pairs of socks and bibs, I just sewed them onto an extra square (usually cut from the plain back of a shirt).


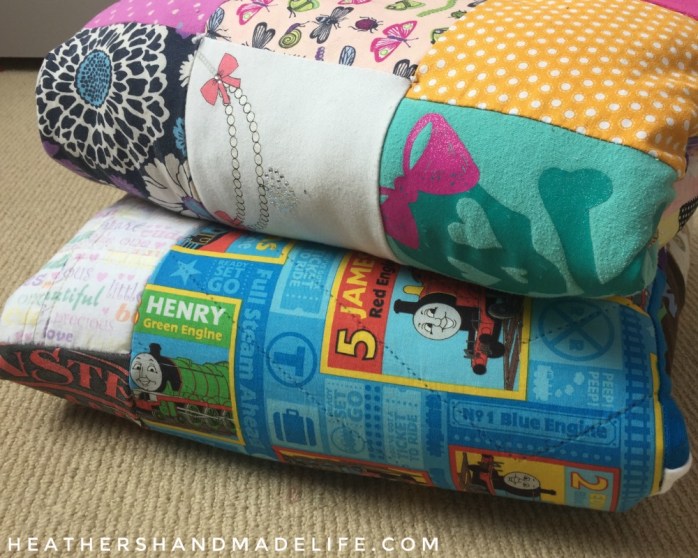
You can make your squares any size and even make your own cardboard template, but I used my 6.5-inch clear square ruler to cut 120 squares, giving me a quilt that was 12 rows tall and 10 rows wide (slightly smaller than a twin-sized quilt). I had fewer saved items for my son’s quilt, so I swapped 16 squares for four larger squares cut from a special Thomas the Tank Engine blanket.
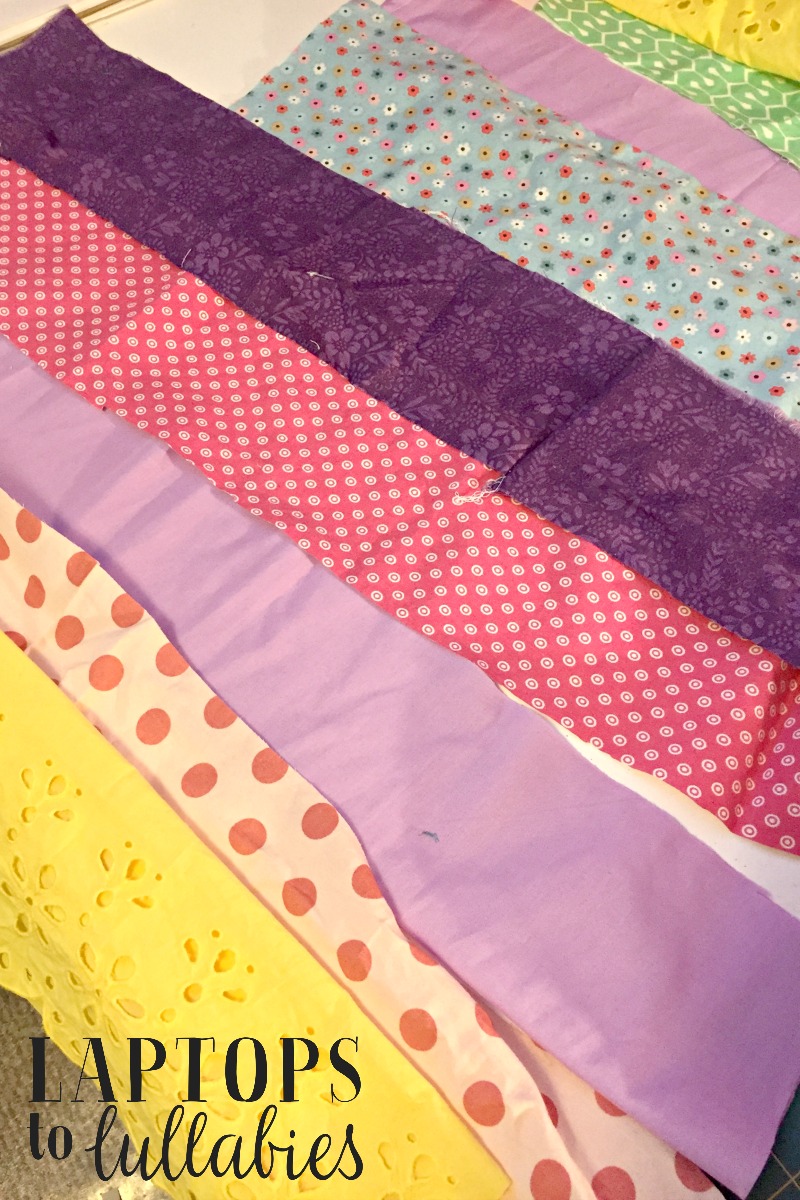
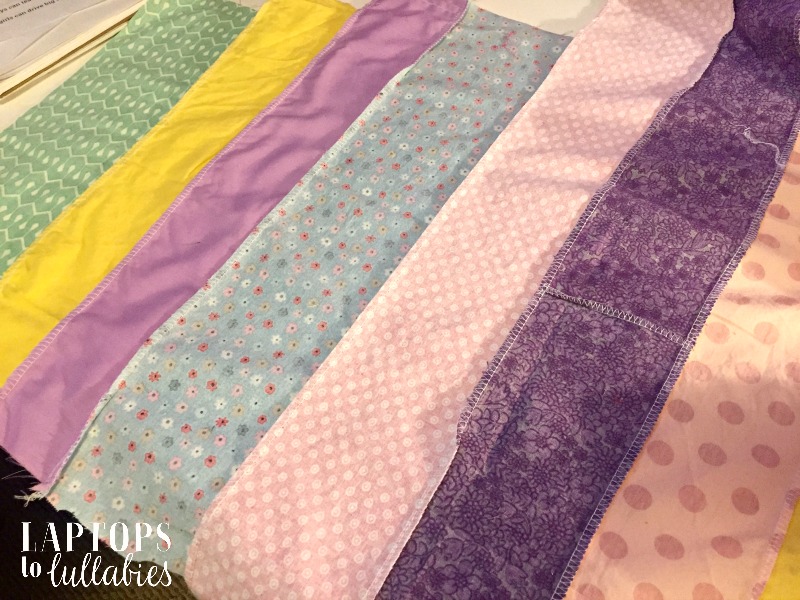
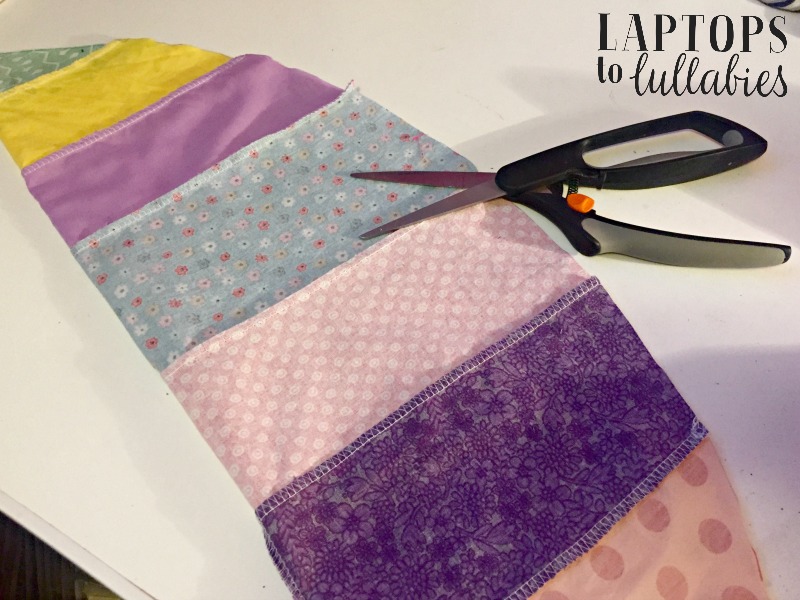
3. Sew your quilt top.
Once you have enough squares, arrange them on the floor to make sure you’re happy with the order. Then carefully pick up each row and sew the squares together (right sides together) to make long strips. Sew all of your strips together and then you have a quilt top.

4. Make your quilt sandwich.
Take your quilt-top into Atlantic Fabrics so they can measure it and determine how much to cut for your quilt backing (the part that’s against your skin). I picked a pretty white and grey floral cotton backing for my daughter’s quilt and decided to back my son’s quilt with one of the soft jersey bed sheets he’s had since he was a year old.
Wash and dry your backing fabric once you get home, so you don’t have to worry about it shrinking down the road when you wash the quilt. Then spread a large section of 100 per cent cotton quilt batting on the floor, and then gently put your backing fabric on top — right side up — smoothing out any wrinkles.

Finally, add your quilt top (right side down) to complete the sandwich. Use lots of pins to keep your three layers together, trim away all of the excess around the edges, and sew most of the way around the quilt.

Stop before you close it up completely, turn it right-side-out, and then stitch the opening shut. Now you have the backing on the bottom, the cotton batting in the middle where it belongs, and the pretty side of your quilt-top on top.
5. Tie it up.
Normally when I make a quilt, I either hand-quilt or machine-quilt the blocks, but there was no way I was trying to quilt a bunch of random, stretchy fabrics. “Tying” a quilt means you use a needle and yarn or embroidery thread (I used perle cotton) to make knots that go through all three layers. It doesn’t take long at all, so I tied a knot at the corner of every block. This prevents the cotton batting from shifting around inside and it gives you that cosy “quilted” feeling.
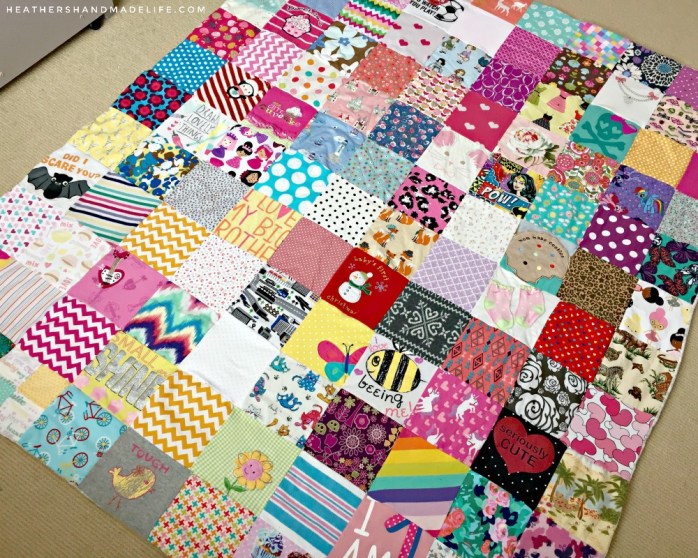
The kids absolutely love their new baby-clothes quilts and we all have fun looking at the different squares and talking about the stories behind the outfits. They run their fingers over the soft, well-worn sleepers and onesies and claim they remember wearing them. They point to outfits they wore to preschool and gymnastics camp and T-ball.

I show them the squares cut from the outfits I’d bought when I found out what we were having (an airplane onesie for our son and a heart-printed sleeper for our daughter). I point to the pairs of pyjamas they wore until they fell apart and the sweatshirts I didn’t like at the time but felt sad when they outgrew.

The quilts both have a square of the white, pink and blue flannel blankets that bring back so many memories from the kids’ arrivals at the IWK Health Centre. They both contain little sections of beloved baby blankets and first birthday T-shirts and soccer uniforms and itty-bitty socks.
The squares may not all line up perfectly and the edges are a bit wobbly, but these quilts are still one of the most perfect projects I’ve ever made.

Easy DIY sofa tables


… we splurged during a Boxing Day sale and bought the grey sectional I’d wanted for ages.

We’ve spent the last few months without a coffee table, since our old one no longer fit in the space, and it left us . . . well, really lacking a place to put down a drink.
 |
| Tutorial for the farmhouse coffee table here |
I still haven’t decided what kind of coffee table I’ll make for our living room, but there was no question that we needed some kind of table close to the sectional. Inspired by a modern slide-under-the-couch table I saw on Pinterest, I thought I’d try building my own version.
//pagead2.googlesyndication.com/pagead/js/adsbygoogle.js
(adsbygoogle = window.adsbygoogle || []).push({});
The materials list for this project is really basic: a couple of 2×2 boards and a small piece of wood to serve as a small tabletop. Since I had some scrap wood on hand, I was able to build two of these tables for about $15.
For tools, I used the RYOBI 7.25-inch miter saw and RYOBI drill-driver I got for my birthday.
 |
| My drill/driver! |
 |
| My saw! |
(Nerdy woodworking note: Remember how I once said 1×2 boards were my favourite and I was building everything out of them? Well, now I’m obsessed with 2x2s. They don’t split like 1x2s are prone to do, they’re stronger and they have a nice chunkiness to them.)
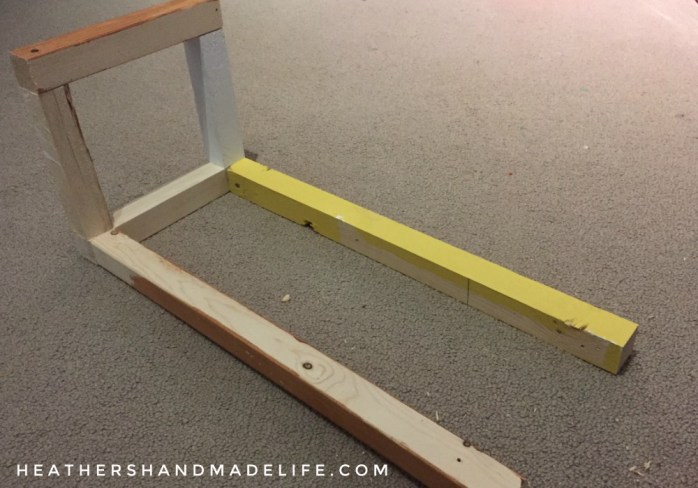
I made up the ‘plans’ as I went along, and there is almost no measuring required. I just cut down a 2×2 into eight short lengths (half approximately seven inches and half about nine inches) and screwed two ‘longs’ and two ‘shorts’ together to make two wooden squares.

Once I had two squares of wood — a table base and the support for a tabletop — it was time to make the legs of the table.
I was quite scientific about this part. I carried both pieces upstairs, stuck one square under the edge of the sectional, held the other square where I wanted it to be. Then it was just a matter of measuring how long the “joiner pieces” (a.k.a. table legs) needed to be.
(I built one table sofa-arm height, and the other table was designed to fit over the arm of my husband’s gaming chair, so the only difference in their construction is the height of the legs.)
I cut two long lengths of 2×2 to be the two legs, and screwed them into the squares on one side. By adding two legs — instead of four — the table base can slide under a couch or chair, which puts the tabletop snugly over the arm.

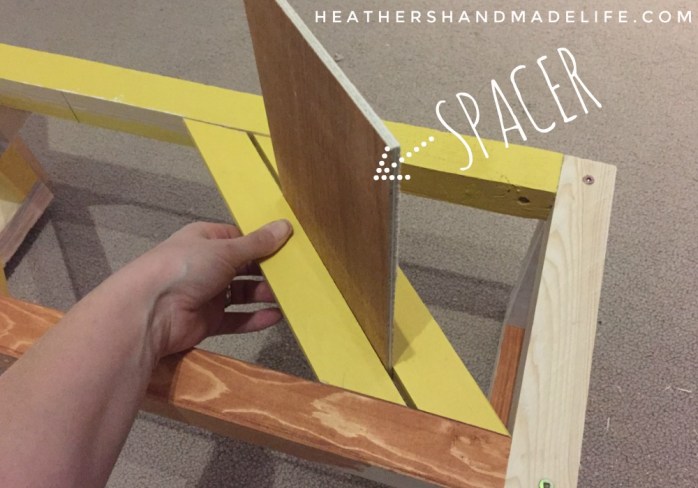
The final step was screwing on a square of wood — slightly larger than the original squares, but it doesn’t matter if there’s much overhang — to be the top of the table.
Then I decided to get a little creative and mess around with angled cuts to make some ‘decorations.’ I clicked my mitre saw over to 45 degrees and cut a few scraps to nestle between the legs on an angle, and then screwed them in place.
I painted my first table a pretty blue and then changed my mind once I’d built a second. Now they’re both painted with a soft greige (Fusion Mineral Paint’s Putty) with warm stained tops (Minwax’s Early American). I wanted them to look rustic, so I grabbed the nearest dark paint (Fusion Mineral Paint’s Midnight Blue) and lightly dry-brushed along the edges. I love the effect!

Because these tables will pretty much exclusively be used for cold and hot drinks — hello, ugly condensation rings — I slathered four coats of polyurethane on the tops to protect my staining job.
The new tables are super convenient and I find myself using them multiple times a day for drinks, remotes or the laptop. I love that they’re neutral but still have unique touches — not to mention an indestructible tabletop, no matter how many glasses of ice-cold Diet Coke sit on the surface.


YOU MIGHT ALSO LIKE …

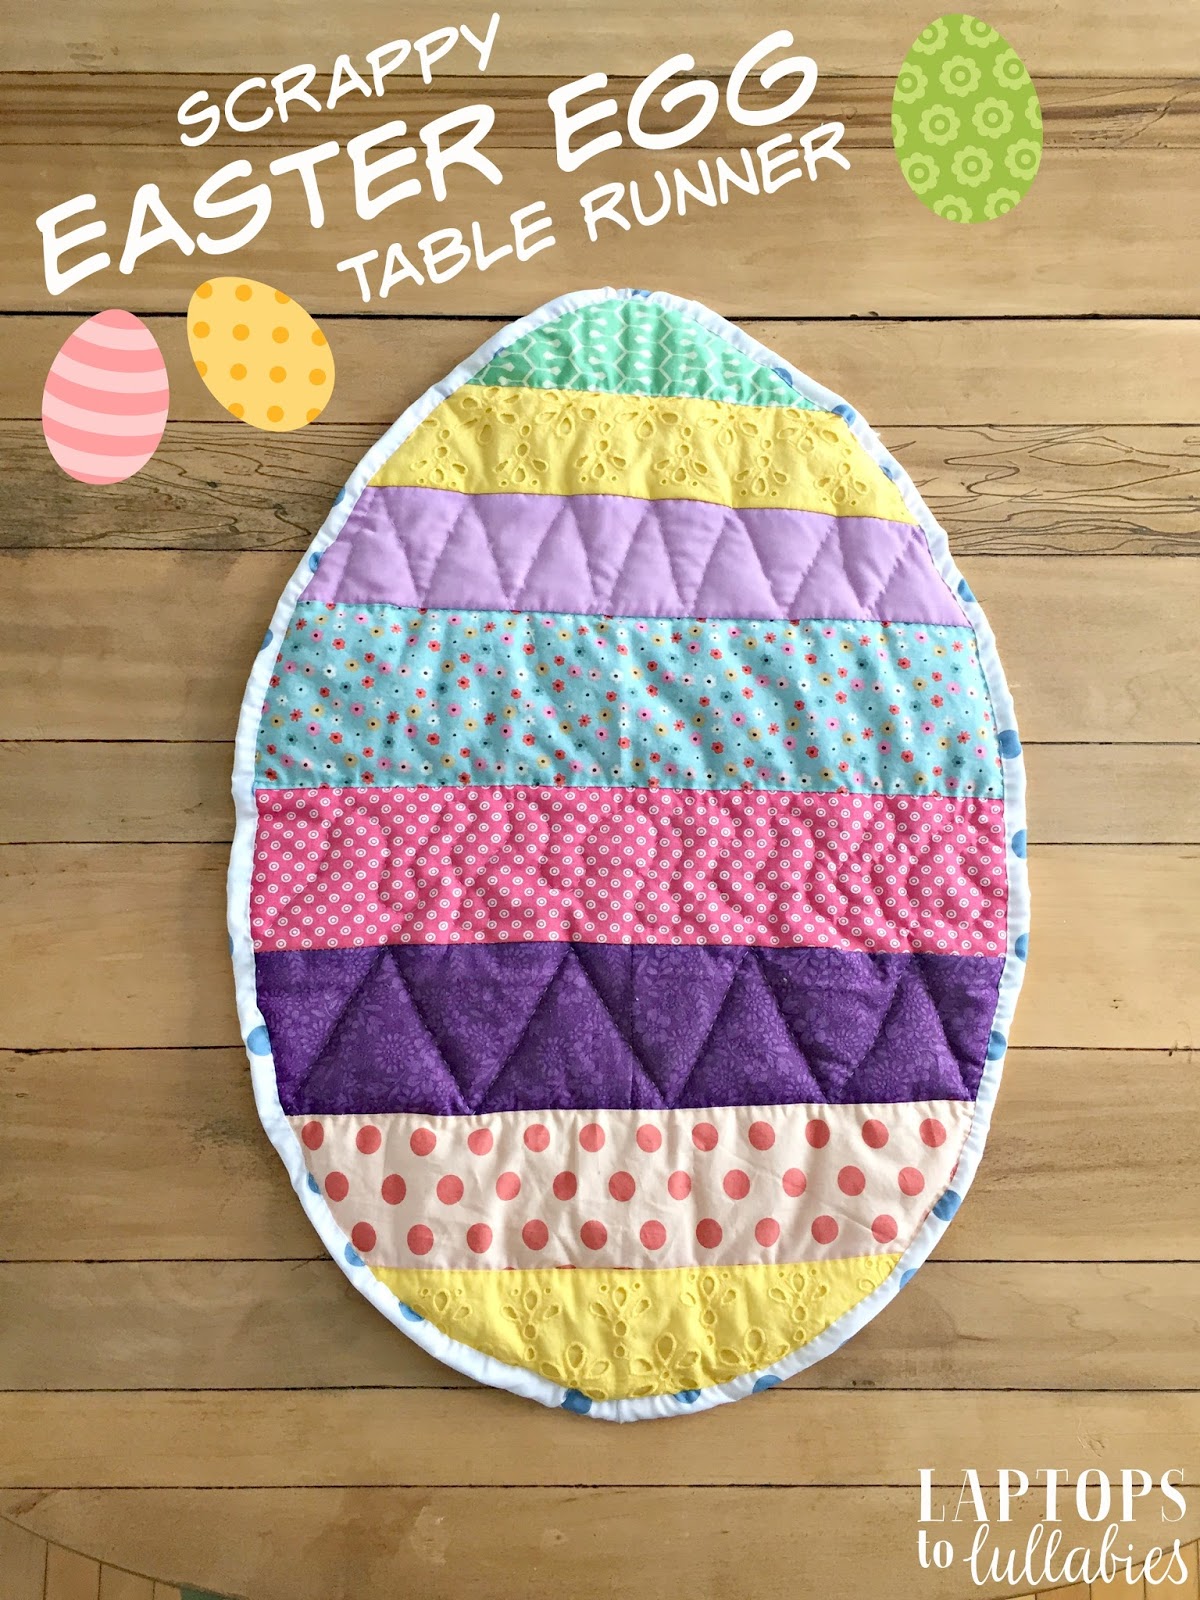
Scrappy Easter egg table runner


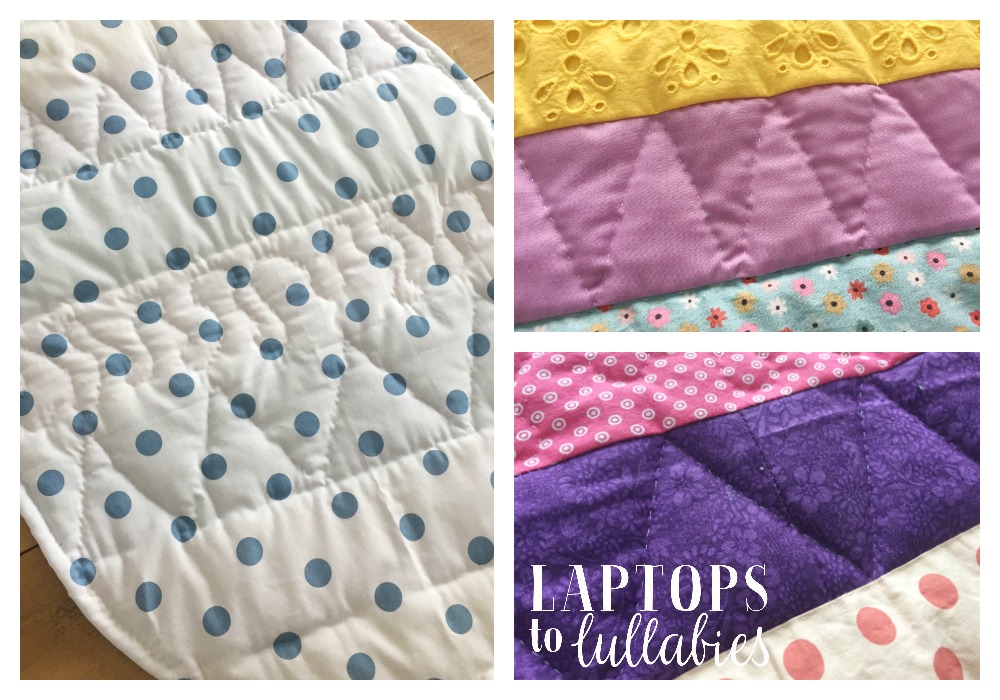
The first step was cutting long strips out of the colours and arranging them in an order I liked. Some of my scraps were too short, so I quickly sewed the ends together to make them long enough.
Once I was happy with the order, I sewed all of the strips together on my serger (just because it’s faster — a sewing machine would have been perfectly fine).
I didn’t care about matching up any ends or measuring anything (naturally) because I knew it would all be trimmed anyway.
 |
| Here’s the back |
Once I had all of the strips attached, I had a big wobbly-looking striped rectangle. I’d purposely used the shortest strips at the top and bottom, so I knew they’d be cut the smallest (since eggs are pointy-ish on the ends).
I folded my hot mess in half (right sides together) and just freehanded a curve so I had what looked like half an egg.
Then I took my egg-shaped creation, cut out a piece of cotton batting the same size, cut out a piece of backing fabric that was a few inches larger, all around, than my egg (this blue and white dotted fabric was perfect), and sandwiched the three layers together — as if I was making a quilt.
I wrapped the backing around the edges to the front and did my favourite “cheater binding” method (where your edge is back from the backing), and then I just quilted random lines, zig-zags and swirls through all three layers.
I was planning to do this on my sewing machine, but I ended up doing it by hand while watching TV for a few evenings. (Since I’m awful at watching TV without working on a project at the same time.)
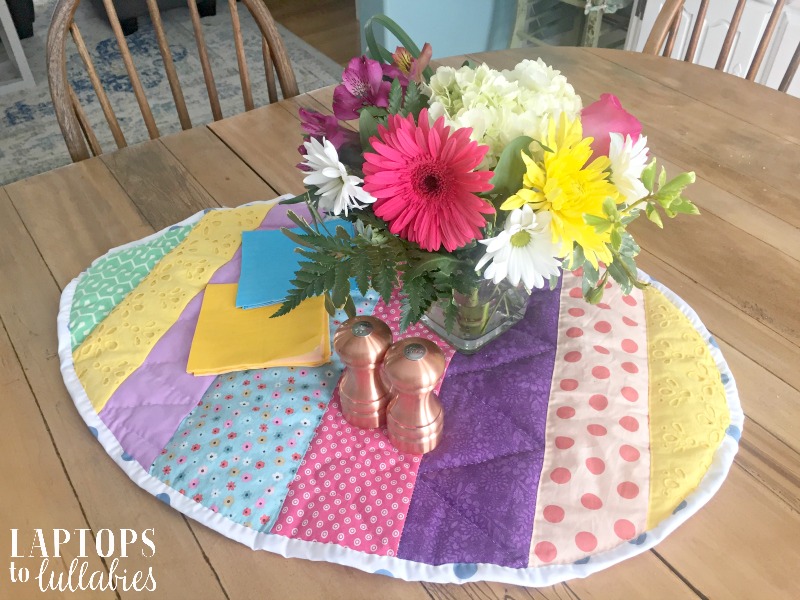
The finished product was a cute Easter egg table runner made entirely from scraps!
We’ve had it on our table for a couple of weeks now, and the kids love it. I think I might make a table runner for some other holidays, too — like when I made those felt banners that we STILL use every single holiday, back when I was pregnant with D a million years ago.
https://static.inlinkz.com/cs2.js Be sure to check out what Easter egg projects my lovely friends are sharing today!
xo

Weekly wrap-up: Scrap wood + Easter Bunny + obsessing

It’s been a busy week, so here’s a quick look at what I’ve been up to on the ol’ interweb …
MONDAY
I shared the FREE cutlery divider I built for our kitchen drawer out of scrap wood. It’s still a novelty to open up that drawer, as I do fifty-million times a day, and see the pretty blue paint and neat lines of everything having its own spot.
 |
| Easy-to-build cutlery divider from scrap wood |
TUESDAY
I lamented how I used to love shopping for birthday parties and now I hate it — partially because our beloved locally-owned toystore closed, but also because I’m just sick of trying to figure out what these children (whom I don’t usually know very well) would like to receive.
We actually attended a couple of birthdays the weekend after I wrote that column, and I gave one of the kids a Cineplex giftcard and candy — woohoo! I had looked and looked for a toy I wanted to get him (he’s a neighbour and I really wanted to get him something he’d like) but couldn’t find anything that felt right. So movie money + candy it was, and — wow — what an easy gift to buy.
 |
| Buying presents sucks and here’s why |
Over on Instagram, I shared my awesome new smartphone photo printer that I WON at our East Coast Moms blogging workshop on Sunday: the Fujifilm Instax Share Smartphone Printer SP2.
It’s the coolest thing ever to select a photo on my phone, click print, and see a photo pop out of the printer sitting next to it — all via the magic of wifi.
//platform.instagram.com/en_US/embeds.js
WEDNESDAY
Just a quick post about my favourite sewing pattern (for adults, that is — not including the zillions of patterns for children’s clothing I have hoarded) and how I made a new top in less than 20 minutes. It’s seriously comfy and probably going to wear it again this weekend.
 |
| Easiest shirt ever + so comfortable |
THURSDAY
I’d never heard of baking hamburgers in the oven, but according to the comments + tweets that have been rolling in, a lot of you HAVE heard of it. How did I make it 33 years without knowing this trick? Anyway, I’m glad I know it now, because those were the best burgers I’ve ever made.
 |
| How to bake hamburgers in the oven |
FRIDAY
We took the kids to our local mall last night to see the Easter Bunny, so I shared the hilarious photo over on Instagram this morning. The kids are almost-five and almost-seven now (*sobs*) so they are fully aware that it’s “a person in a costume,” but they happily humour me because they know I love adding a new photo to my collection.
We’ve gone to Santa and the Easter Bunny every single year since D was a baby, and although there have been years where one of them was melting down, we always got at least ONE of them in the photo.
I really hope they’ll still do this when their teenagers. I think that would be epic. Maybe I can bribe them with the digital tokens we’ll be using as currency by then?
It’s a rainy day here, and the kids and I are heading into Halifax later today. I’m taking my mom to opening night of ONCE at Neptune Theatre and I can’t WAIT to see it.

I’ve been obsessing over it since I first saw the ad. It’s won a zillion awards (Tonys, a Grammy, an Oscar) and I’ve been listening to the soundtrack on repeat for weeks.
Listen to this song and TELL ME you don’t get chills! SERIOUSLY!
C is also scheduled for a hearing test + check-up with the ENT because her hearing is still an issue, so I’ll report back once we know more about that.
Hope everyone has a wonderful weekend!
xo


As featured on …


