
Quilts from baby clothes

This project has been sponsored by Atlantic Fabrics’ six locations across Nova Scotia, including the newest store on Parkland Drive.
Back in January I wrote about how I’d finally decided to purge the (very large) plastic bins of “special” baby clothing in our closets. I finally got around to turning some of the most meaningful pieces into a baby clothes quilt, so today I’m going to walk you through exactly how to make your own, with the help of my good friends at Atlantic Fabrics.
1. Start by sorting.
Go through your bins — all of them — and put everything into one of three piles: keep, cut or donate.
My “keep” pile was extremely small and included a few outfits to pass down to my sister, a few outfits for the kids to keep (for my future grandchildren) and a few items for me to cry over in my nursing home someday. My “cut” pile was all of the clothing that I wanted to preserve in the quilts, including a few baby blankets, bibs and pairs of socks, and everything else was donated.
Because I’d sewn about half of my daughter’s special outfits, I was able to cut the squares from leftover material and spare the actual dresses, so they got handed down to a lovely friend who can use and appreciate them.

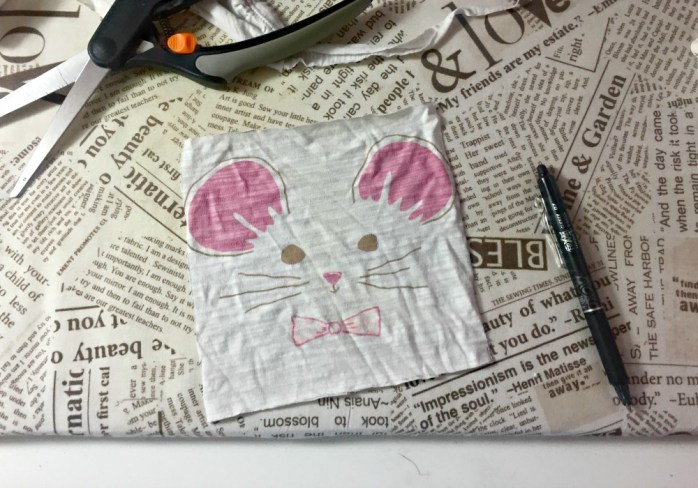
2. Cut out squares.
This part takes the most time, but it’s pretty mindless and you can do it while binge-watching Riverdale on Netflix. Pick up a onesie or shirt, cut up the sides (so you’re only dealing with the front layer), trace a square with a marker, cut it out and repeat.

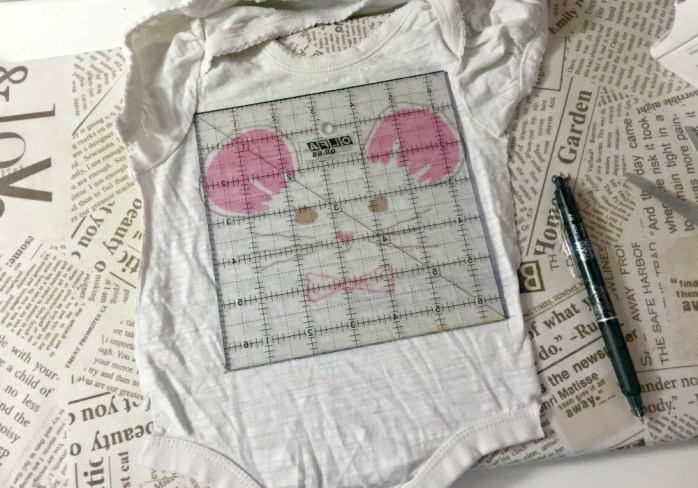

With sleepers, you’ll want to cut your square from the back where there isn’t a zipper or snaps. For tiny pairs of pants, cut up the side seams and open them up to get a big enough area to trace a square.

To preserve tiny pairs of socks and bibs, I just sewed them onto an extra square (usually cut from the plain back of a shirt).


You can make your squares any size and even make your own cardboard template, but I used my 6.5-inch clear square ruler to cut 120 squares, giving me a quilt that was 12 rows tall and 10 rows wide (slightly smaller than a twin-sized quilt). I had fewer saved items for my son’s quilt, so I swapped 16 squares for four larger squares cut from a special Thomas the Tank Engine blanket.
3. Sew your quilt top.
Once you have enough squares, arrange them on the floor to make sure you’re happy with the order. Then carefully pick up each row and sew the squares together (right sides together) to make long strips. Sew all of your strips together and then you have a quilt top.

4. Make your quilt sandwich.
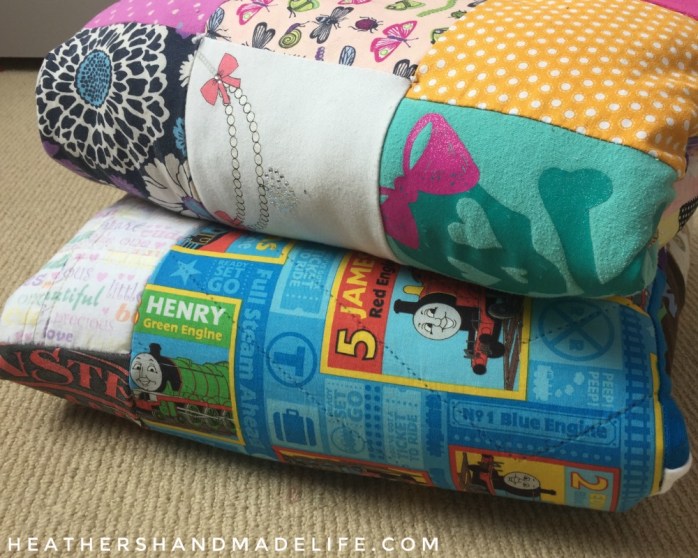
Take your quilt-top into Atlantic Fabrics so they can measure it and determine how much to cut for your quilt backing (the part that’s against your skin). I picked a pretty white and grey floral cotton backing for my daughter’s quilt and decided to back my son’s quilt with one of the soft jersey bed sheets he’s had since he was a year old.
Wash and dry your backing fabric once you get home, so you don’t have to worry about it shrinking down the road when you wash the quilt. Then spread a large section of 100 per cent cotton quilt batting on the floor, and then gently put your backing fabric on top — right side up — smoothing out any wrinkles.

Finally, add your quilt top (right side down) to complete the sandwich. Use lots of pins to keep your three layers together, trim away all of the excess around the edges, and sew most of the way around the quilt.

Stop before you close it up completely, turn it right-side-out, and then stitch the opening shut. Now you have the backing on the bottom, the cotton batting in the middle where it belongs, and the pretty side of your quilt-top on top.
5. Tie it up.
Normally when I make a quilt, I either hand-quilt or machine-quilt the blocks, but there was no way I was trying to quilt a bunch of random, stretchy fabrics. “Tying” a quilt means you use a needle and yarn or embroidery thread (I used perle cotton) to make knots that go through all three layers. It doesn’t take long at all, so I tied a knot at the corner of every block. This prevents the cotton batting from shifting around inside and it gives you that cosy “quilted” feeling.
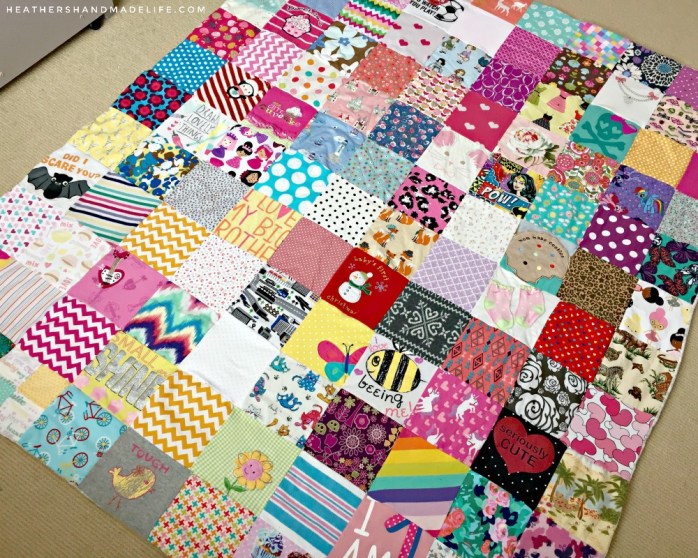
The kids absolutely love their new baby-clothes quilts and we all have fun looking at the different squares and talking about the stories behind the outfits. They run their fingers over the soft, well-worn sleepers and onesies and claim they remember wearing them. They point to outfits they wore to preschool and gymnastics camp and T-ball.

I show them the squares cut from the outfits I’d bought when I found out what we were having (an airplane onesie for our son and a heart-printed sleeper for our daughter). I point to the pairs of pyjamas they wore until they fell apart and the sweatshirts I didn’t like at the time but felt sad when they outgrew.

The quilts both have a square of the white, pink and blue flannel blankets that bring back so many memories from the kids’ arrivals at the IWK Health Centre. They both contain little sections of beloved baby blankets and first birthday T-shirts and soccer uniforms and itty-bitty socks.
The squares may not all line up perfectly and the edges are a bit wobbly, but these quilts are still one of the most perfect projects I’ve ever made.

11 Comments on “Quilts from baby clothes”
So what do you think?


As featured on …


Woww, this is another interesting post. I like how you described the whole process, so amazing. Love
LikeLike
Thanks, Frieda! I do love how these turned out.
LikeLike
Really enjoyed reading about your process with this – & loved seeing the finished quilts 👏 I’m just about to try making a baby clothes quilt pillar case cover xxx
LikeLike
Thanks so much, Dianne! A pillow case cover is a great idea.
LikeLike
I love this so much! I’ve finally found something to make with our mountain of baby clothes that I can’t part with.
We’re not having more, I’ve donated as many as I could part with but the youngest is almost 2 and it’s time to do something with the teeny clothes!
LikeLike
I felt the same! So hard to part with the clothes, and this makes it a bit easier.
LikeLike
These are beautiful and perfect! I have been scouring the internet for dance costume quilts or memory blanket ideas and dug deep…your blog came up 🙂 Honestly, these simple squares are just what I envision for my daughter’s dance costumes. She’s dance since she was 3…she graduates high school in 2023. Planning ahead 😉 I’ve been dreaming of making this quilt for years. I’m embarrassed to say, I’ve never used a sewing machine in my life, and I suck at sewing. Do you think it’s too big of a job to tackle for a first timer?
LikeLike
What an amazing idea! My daughter’s danced since she was three, too. I think this would be a great project, with nice simple (large) squares. The only snag (literally) might be if some of the costume fabrics have sequins, etc. that make it trickier to sew through them.
LikeLike
Pingback: Precious Memories (What To Do With Old Baby Items)
I notice you didn’t use any interfacing or stabilizer……. Would this technique work with t shirts? Much simpler NOT to use interfacing!!
LikeLike
I am working on new clothing quilts for the kids, and this time I’m using iron-on interfacing on the thinner/stretchier clothes.
This worked fine without it, but the squares aren’t perfect lined up because of the stretchy nature of most of the fabrics.
LikeLike