
Why I absolutely love, love, LOVE parent-teacher night
 |
| Me + my guy at Neptune Theatre for a little date |
I came prepared with my little list of questions and was the first one sitting on the chair outside the classroom door.
My mom always said she loved going to parent-teacher night because it was lovely to listen to teachers tell her what wonderful daughters she had. (It’s true.)
I totally get that now. As a parent, this is a magical night where you get to finally ask all of the questions you’ve been thinking about since the start of the school year — things that aren’t worth bothering the teacher about with an email or a phone call, but things you want to know. Do they listen well? Are they polite? Are they kind? Do they pay attention?
It’s a glorious 10-minute window when you get to find out exactly how your child is when they’re away from you for five hours every weekday.
Mine flew by all too quickly. I could have sat there all night, dreamily listening to how my little boy is “a joy” and that he’s kind and polite and cheerful and attentive. I really should have recorded it, actually. Then I could have played it back whenever I felt like a less-than-stellar parent.

But there is a point in every parent-teacher conference when you have to discuss the thing they need to work on. There’s always a thing. You just hope it’s something easy (like remembering to raise their hand) and not something really serious (like peeing in the water fountain) …
Continue reading in my weekly parenting column, The Mom Scene …
Painting closet doors black

There was the time I painted it a too-bright “grellow” and then added red storage bins to accidentally give it a hideous Christmas effect. I repainted and added hooks and it looked much better, but then the shelves got cluttered too quickly and the hooks were overloaded.

I’m not surprised I’m still tweaking it, five years into this house, because this closet has a big job to do: holding coats, shoes, mittens, hats, backpacks, purses and miscellany for four people. Thanks to Canada’s unpredictable weather, this means each person often needs three different jackets in a single week — not to mention different footwear, splash pants, snow pants and maybe an umbrella.

The latest installment had me using white laundry baskets on the shelves to hold overflow jackets and shoes, and the adult shoes were jumbled together on the floor. I finally decided enough was enough. The hooks were working, but I needed to drop a bit of cash in order to take it to a more “completed” level.
I took out the hodgepodge of storage baskets and laundry baskets and upgraded to a matching set of dark rattan baskets — one for each family member — that would fit across the main shelf. (I actually used a tape measurer and everything so I could buy the largest possible bins, which is kind of hilarious since I don’t measure anything for woodworking projects.) I also bought a coordinating set of smaller lined baskets for the top shelf.
Our son and daughter each have bins installed on the side walls of the closet for their shoes, as well as a bin each for hats, mittens and sunglasses (and random whistles, I discovered one day). That solution was working perfectly, but there wasn’t a shoe area for me and my husband — other than kicking ’em off and shutting the closet doors. I bought a $20 white shoe rack to give our shoes a resting spot, but this might be a temporary solution. I’m still brainstorming something prettier.
With the inside of the closet taken care of, it was time to jazz up the outside. I’d been dying to paint the inside of our front door (it’s just white metal at the moment) because I think black doors are striking. But with a little puppy scratching at it to be let outside, I figured the paint job would be ruined before anyone could admire it.
Painting the closet doors black was a happy compromise, since they’re directly across from the front door. I lifted them off their tracks, carried them onto the porch, and started painting (“Coal Black” by Fusion Mineral Paint).

I didn’t sand or prime so the first coat was pretty streaky, but the second coat covered beautifully — despite it being a freezing cold day! I carried them back inside a couple of hours later and re-hung them, and let them continue to dry overnight in the warmth.
I couldn’t believe the difference every time I walked by or even just saw the doors out of the corner of my eye. They were so bold! So fancy! I’d swapped out the builder-basic brushed nickel knobs with beautiful white ceramic knobs with brass leafing, and they looked so posh against the matte black.
Full disclosure: I thought I might like the doors a bit distressed, to go with the urban farmhouse feel of our place. But as soon as I tried sanding the edges of one of the panels, I knew the doors were better solid black. They looked like damaged new doors rather than worn old doors, so I repainted that area.
Our entryway doesn’t have any furniture or even much wall space, but the newly painted closet doors add some drama and interest when you walk in. Now I’m itching to paint more doors black! You should totally try it. (Really.)


Products used in this column:
Five reasons you need a breadmaker (that have NOTHING to do with loaves of bread)

We have a breadmaker and we NEVER use it to make bread. Ever. We tried it once or twice, and the loaves are funny-shaped and too tall for the toaster and it’s a pain to cut. Delicious with butter, yes, but not worth it.
But we use our breadmaker every single week, at least once — sometimes twice — for making dough. Delicious fluffy, perfectly-risen dough for lots of different things.
Breadmakers are soooo easy that even I never screw up a recipe (and I am really terrible cook). You dump in the ingredients, turn it on, and walk away from it. When it beeps, your dough is ready. Sometimes you plop it on the counter to rise a little more, and sometimes it’s already perfect (depends on what you’re making).
(Stuff never rises “naturally” in our house because it’s, um, chilly. The breadmaker is nice and warm, and dough likes that.) We have an older version of this one and we love it.
So if you’re looking for a Christmas gift or you’ve been toying with the idea of getting a breadmaker, here are five reasons you’re gonna want to get one. Really.
1. Cinnamon buns.
These are delicious and the most “work” of any breadmaker recipe because you have to roll the dough into a rectangle, brush the dough with melted butter, cover it with cinnamon and sugar, roll it up, and use thread to cut it into little buns before baking them. Not a lot of work, and really worth it.
2. Fluffy warm rolls.
I make these for holidays and everybody dies over them (mostly me). They are fluffy and buttery and freaking amazing. (I use this Betty Crocker recipe.)
(Sometimes I’ll also make hamburger buns, but they’re so good that I hate to sully them with a hamburger patty and condiments.)
3. Tea biscuits.
https://www.instagram.com/p/BBP7iLlNIUP
I love a good tea biscuit. These actually do NOT require the breadmaker, but I couldn’t leave them out of this carb-y lineup. They’re everything.
4. Garlic fingers.
We started making these recently on Pizza Friday because our son loves ordering “garlic pizza” at school. (I have no idea what that really is, except that it’s probably garlic fingers cut into pizza slices … possibly sprinkled with gross jarred bacon bits?) They are AMAZING and just as easy as making the next item …
5. Pizza.
https://www.instagram.com/p/BDG7rbUNIco/
https://www.instagram.com/p/BASp2v4NIcX/
https://www.instagram.com/p/-UdYdYNIQo/
It seems like my whole Insta feed is nothing but photos and videos of our weekly Friday Night Pizza, and I don’t even care because it’s THAT GOOD.
Take dough from breadmaker. Break it into three chunks. Spread each chunk of dough on a pizza pan and “decorate” with sauce, cheese, pepperoni, etc. DONE. And basically the same amount of work as buying pre-made dough? (We used to use a mix where you add water and stir it up with a fork and it was pretty awful, now that I think about it.)
I apologize now for the extra lbs. you may gain from your new breadmaker. But it’s worth it. OMG IS IT WORTH IT.
10 steps to a work-at-home snow day

1. Be grateful you don’t have to rush around getting everybody dressed and into snowpants and making breakfast and lunch and packing schoolbags.
2. Oh … but all that rushing around is your ticket to freedom (well, two hours of it while the littlest one is at preschool). Silently mourn the notion that you were going to be able to do your work IN PEACE for at least a little while today.
3. Serve popcorn for breakfast while you watch a movie together because it’s only 7 a.m. and damnnnn it’s gonna be a long day. Plus, you’re going to want to show them you can be a Fun Mom Who Does Fun Stuff before OMG-I’m-on-deadline-Mom makes an appearance in a couple of hours.
//platform.instagram.com/en_US/embeds.js
4. Dress everybody in snow gear and shoo them outside. Set up the laptop so you can somewhat keep an eye on them while they run around the backyard. Begin working.
5. Panic when the power goes off three minutes before a very important phone call. Your cordless phones are all dead and your iPhone has 42% battery life. Thank God you have a rotary phone (mostly for looks, partially so your kids can easily phone 911 when you fall down the stairs or pass out from paint fumes).
6. Set your iPhone to low power mode and shut all apps so you can savour what remaining battery life is has. Who knows how long this $#@% outage is going to ruin your day?! Close all unnecessary tabs on the laptop and pray it doesn’t die while you take notes on your call. But internet! You do need internet to file that story, don’t you? Turn on your phone’s hotspot and panic again. What is the hotspot cost, like $80 per second?! Does anyone even know?! It can’t be good.
7. Ignore children banging on the back door because you can’t walk over to them while glued to the rotary phone. There’s a CORD! Pray they will give up banging because it’s possible your caller can hear this and thinks you’re a heartless toad.
8. Hang up, throw on a pair of rainboots (no annoying laces like snowboots) and trudge into the backyard to pick up screaming four-year-old who keeps losing her boots (and her shit). Drag her into the house, strip off her wet snow gear, send her up to her room to calm down, and run back to the dying laptop.
9. The power is back on!!! Rush around plugging in devices to soak up that sweet, sweet power. What if it goes off again?! Microwave cups of hot chocolate for the near-frozen children and then shoo them off to play Lego.
10. File your first assignment of the day. Check the clock and see it’s barely 11 a.m. Weep because there are many, many hours to go.
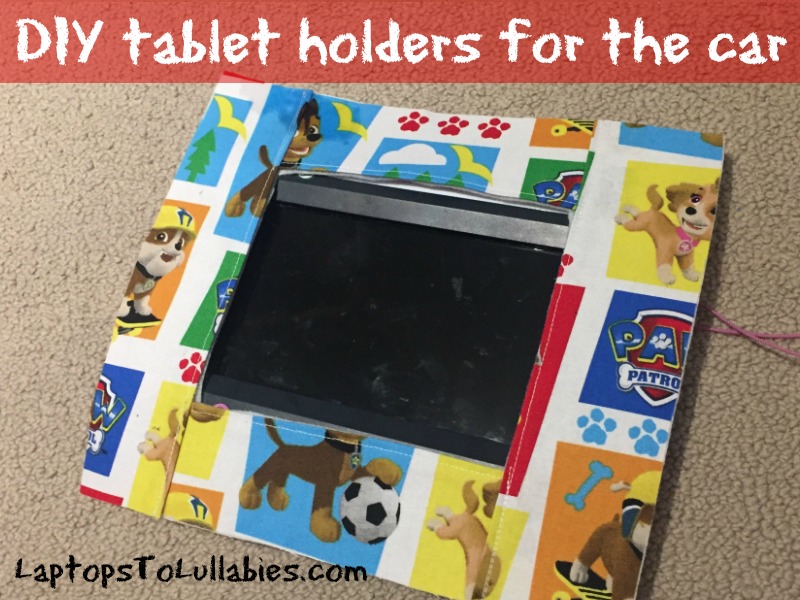
DIY tablet holders for the car

As much as I’d like to claim our kids are little angels on long car trips … they’re not. Even on the hour-long drive to Halifax, they whine and ask how much longer and decide they need to use the bathroom (they don’t) because they’d like to get out now, please.

Our solution has been to hand them their devices — two LeapPad tablets with the ever-important headphones — and then bask in the beautiful silence as we zoom along the highway. They know this is only for long drives, so they’re always happy to play a game or watch a video. Sometimes I’ll wear my headphones if my husband is driving and then we’re really the picture of family togetherness.
These little kiddie tablets have been sooooo helpful, except for one tiny detail. Did I mention the kids suffer from motion sickness? Their little arms get tired of holding the tablets up to eye level, so before long somebody’s looking down at the screen on their lap and then …
“Look out the window! You’re fine! LOOK OUT THE WINDOW! Here, I’ll roll your window now! NICE FRESH AIR! YOU’RE FINE!”

(I don’t handle barf well, so I’m especially panicked when someone announces — as we’re going 110 km/hour — that they don’t feel well.)

I’d been meaning to sew up a couple of tablet holders for ages now and I finally got around to it this past weekend. It took less than 0.5 metres of fabric for each one, and the kids loved getting to pick out fun “character fabric” at Atlantic Fabrics.

If your kids also suffer from The Dreaded Car Sickness Technology Woes, here’s how to make your own tablet holders for the car …
Continue reading in my weekly parenting column, The Mom Scene …
 |
| Full tutorial |


As featured on …


