
On freelance life + Hollywood
 |
| Me, back in my entertainment reporter days. |
If I were to list my Top 5 Annoyances relating to my job as a freelance writer, do you know what they’d be?
1. People who don’t think I “really” work.
No, I don’t think I’m automatically the best person to organize that fundraiser / plan that playdate / drive that carpool just because my office is in my house.
(Although I am, possibly, the best person for it because I’m organized. JUST NOT FOR THE WORK REASON OK?)
2. People who think I’m a stay-at-home parent who maybe dabbles at writing.
The stuff you guys see? The stuff I share on Facebook? That’s just the tip of the iceberg.
3. Waiting months to get paid sometimes.
Argghhhhh so poor. (But sometimes yayyyy rich!)
4. Panicking I won’t have enough work.
(This has yet to actually happen.)
5. People who think freelancing is easy.
So not easy. Really.
***
So I’ve come up with this theory.
It’s that having a “normal job” — with a steady paycheque, reasonably regular hours, stability, and maybe even the chance to get raises and/or promotions — is like bring on a TV show. Yes, you could still lose your job at any point — getting written off the show — but it’s still pretty stable.
For some freelancers, it’s like working in the movies. You jump from movie to movie, sometimes working on two at once but usually focusing on one huge project at a time.
When the project is almost over, there’s panic and you’re wondering about your next role. You might have a drastically better or worse role next time. The pay might be higher or lower. Your co-stars could be awesome or awful. You just don’t know.
For other freelancers, it’s more like the life of a working not-that-successful actor in Hollywood. You’re juggling lots of different projects — maybe a few commercials, a small part on a TV movie, some voiceover work — and you’re never sure what’s around the corner.
You need to be organized so you’re always in the right place, doing the right work, and not double-booking yourself. You know that any of your projects could disappear without notice, and that keeps you in a constant state of nervous hustle.
Sometimes the hustle leads to bigger and better projects. Actors can become famous, and freelancers … well, maybe we can become famous in our fields? That’s the “free” part of freelancer: the endless possibilities. The chances. The dreams.
Money can be tricky when you’re an actor — a struggling one, at least — and it’s no different for freelancers. We have great months when we’re getting paid for projects and it’s no problem to pay the bills + tuck some away.
And we have awful months where it doesn’t matter how hard we work, the money simply isn’t coming in yet. Cheque’s in the mail, accounting person’s on vacation, client hasn’t paid on the other end — you name it, we’ve heard it.
There are so many good things about being a freelancer, like the freedom of setting your own work hours (uh, based completely around my husband’s work schedule and my children’s school/preschool schedule, of course).
But there is also the panic, the hustle, the unknown, and the struggle.
So the next time you’re tempted to think what we do is laze around in our PJs or “a hobby” “not really work,” please think of us as struggling actors — chasing our dreams and working very hard to do it.
How to knit a hat on a loom

Yesterday I chatted about how EASY and fun it is to knit hats on a loom with your child …

… so today I’m sharing the detailed instructions that couldn’t fit in my newspaper story. (That’s the nice thing about blogs — unlimited space to ramble.)

Our set of looms (slightly different from the set above) came with pretty terrible instructions (just printed on the back of the box without a lot of detail), so I’m going to try to be more specific — and use pictures!
So here are my hopefully-clear instructions on how to use a loom to make a knitted hat:

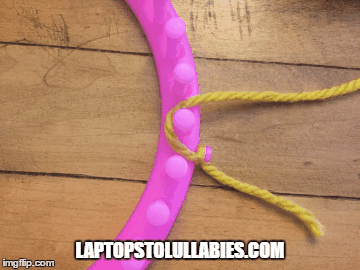
1. GETTING STARTED.
There’s a single peg that bumps out from the side of your loom. That’s called the anchor peg. Tie a slip-knot on it and leave a couple of inches’ worth of tail dangling down.

2. CASTING ON.
To “cast on” (which, don’t worry, is much easier on a loom than on slippery knitting needles), take your yarn, wrap it loosely around the first peg clockwise (to the right of the anchor peg) and then move to the next peg and wrap it clockwise. Keep doing this until you’ve moved around the whole circle and are back to where you started. Do this one more time (making two rows) and then you’re officially “casted on.”
3. USING THE HOOK.
Now that you have two rows on your pegs, slide your hook underneath one of the bottom loops and gently lift it over the top loop. Do this all of the way around the loom until you’re back where you started.


4. BACK TO THE WRAPPING.


Put down the hook and pick up the yarn again, and start loosely wrapping it clockwise around all of the hooks (just like you did while casting on).Take the hook and lift the bottom loop over the top loop again, all the way around the circle.
Repeat a zillion times. You’re doing it! You’re knitting a hat!

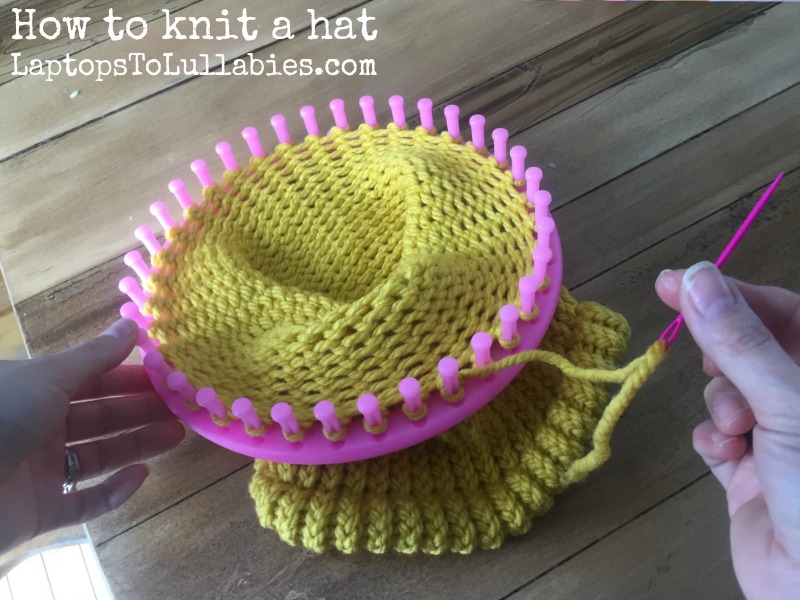
5. TIME TO DECIDE ON THE BRIM!
As you continue to wrap pegs and lift loops, you’ll see a little yarn circle inside the loom growing bigger and bigger. It really does look like the beginnings of a hat.

You can keep going until it’s hat-sized and then skip to Step No. 7, or (if you want to make a nice thick brim for your hat, follow Step No. 6.
Personally, I like a nice thick brim on my hats! It makes them look fancier, and it barely takes any extra time (or yarn.)
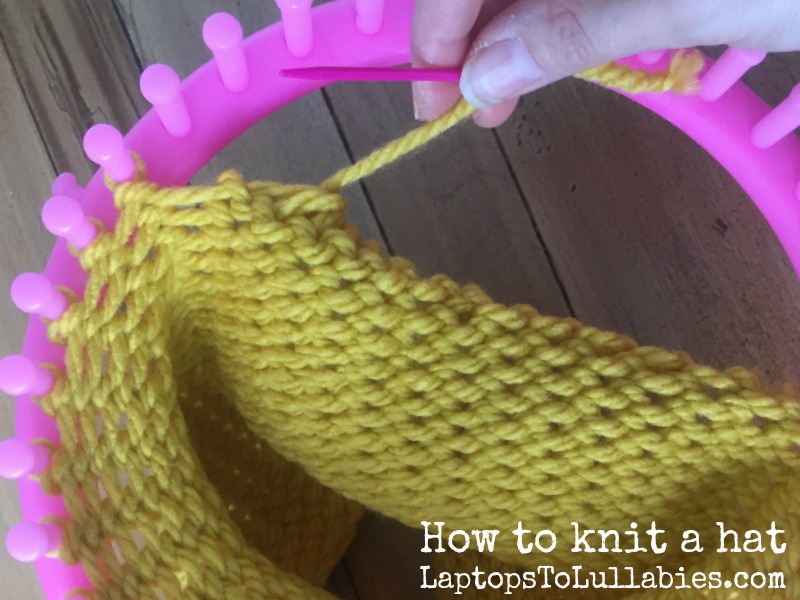
6. MAKING A BRIM.
If you’ve knit about 3-4 inches and you want to make a brim for your hat, you’re basically going to take everything you’ve knit so far, fold it in half, and then continue to knit the rest of your hat.
See the part you’ve already knit that’s hanging down inside your loom, like a wide knitted tube? It has little loops around the very bottom of it.
Take those loops and carefully bring them back up to the loom, sliding each one on the closest peg. This doubles up what you’ve made so far (which makes the brim nice and thick).Then continue knitting as usual (Steps No. 3 and 4) to make the rest of your hat.


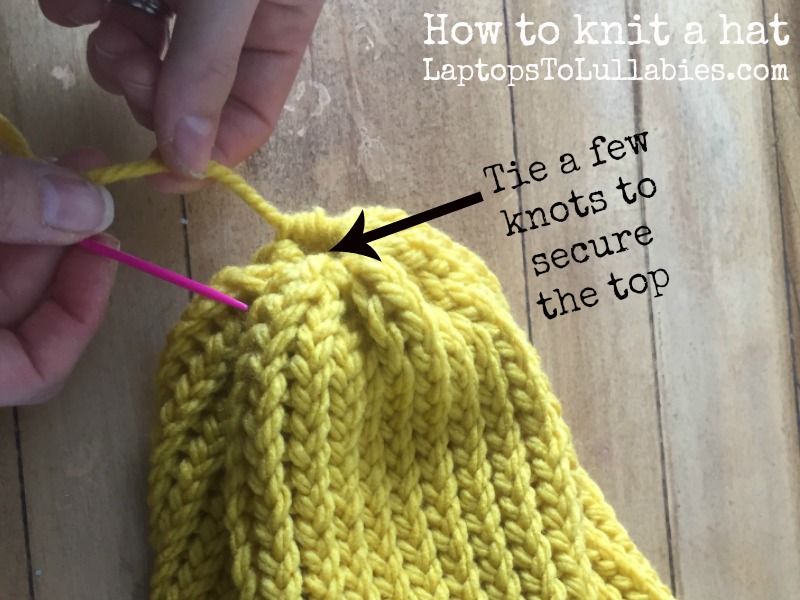
7. FINISHING YOUR HAT.


Does it look like a hat and you’re ready to finish it? I had no idea how this was going to work because our first hat was a giant tube that wasn’t getting any narrower, but apparently you “close” the hat by gathering all of the stitches around the top and pulling it tight.
Cut your yarn, leaving about 12 inches, and thread it through the plastic needle that came in your kit.

8. Then go all the way around the loom, using the needle to lift up those loops and gathering them on the needle.


 The top of the hat starts closing in on itself …

… and when it’s nice and snug you can just tie a couple of knots to finish it.
OPTIONAL BONUS FUN: If you want to make one of those cool “bun hats” that have a hole at the top for your hair, just gather until there’s a round hole (big enough for your bun!) and tie your knots.
Trim the excess yarn …
… and you’re done!


Why your child needs a knitting loom

Our six-year-old son had tried knitting in the past. We’d bought him knitting needles and the turquoise yarn* he wanted. I’d YouTubed how to ‘cast on’ and vaguely remembered my grandmother’s instructions from a long, long time ago.
I think the plan was to make a scarf, but he never finished it. The needles were difficult for his little hands to maneuver and the tension was always off. We couldn’t figure out how to keep the yarn from getting a death-grip on those needles — so tight that we couldn’t sneak the second needle under the loop.
Every few months he’d discover it and try again … until he got frustrated (again).
But then we learned our 11-year-old neighbour had been knitting hats for years, and they were flawless — different colour combinations and styles with nice, thick, stretchy brims. She insisted it was really easy, but I was hesitant. I told her about the abandoned scarf (a.k.a. skinny yarn strip of broken dreams) sitting in our craft cabinet in the dining room.

No, she assured us. You don’t use needles. You use a loom!
You just wrap the yarn around the pegs and lift up the loops, basically like the Rainbow Loom bracelets my kids love to make. No eye-pokey needles? I was sold and our son was desperate to give it a try. He actually started talking about opening a hat store.
I headed to my home-away-from-home, Atlantic Fabrics, and picked up a set of four hat looms* (all different sizes) for around $20. It included a little plastic needle (which is only needed for a minute at the very end of the project) and a hook, similar to a Rainbow Loom hook.

I headed to the cash with an armload of turquoise wool (my boy’s favourite colour) but they kindly told me one skein (less than $4) was more than enough for a child-sized hat. Yarn is cheap, and there are so many pretty colours! I could see myself building a yarn stash to rival my fabric stash.
I’m still learning about yarn, but what I know so far is that it comes in different thicknesses and No. 6 is a good thickness for hats. This is the yarn we used for his first hat.*

My boy was thrilled when he got off the bus and I told him I’d picked up what he needed to start making hats. We tore open the box and I was surprised there wasn’t a page of instructions. Nope — just a few notes printed on the back of the box, interspersed with typos.
After two false starts where I wrapped the yarn too tightly (that’s my thing, apparently), we were off and running. I demonstrated the steps to my son and he excitedly took over. I couldn’t believe how easy it was — despite the not-great instructions. The ball of yarn was turning into an actual, wearable hat. It felt like magic!
Want to try it with your child? Click through for my hopefully-clear instructions on how to use a loom to make a knitted hat.

I couldn’t believe that our son was finished his first hat in less a day, in which he spent about three hours actually working on it. There are a couple of little holes from missed loops here and there, but he’s immensely proud of himself and wears it constantly.
As for me? I’m totally borrowing his looms and making myself a hat. It’s addictively easy and it will give me an excuse to stock up on pretty yarns!

How to replace a light fixture

For the five years we’ve lived here, several of the light switches haven’t worked. In our daughter’s room, for example, we had to tie a long strip of tulle to the chain on her ceiling fan so she could turn her light on and off. It wasn’t pretty, but it worked.
When we decided to embark on fairly major room makeovers for each of our children — including a loft bed for one and bunks for the other — we knew her ceiling fan had to go. Elevated bed + spinning blades + curious child was just a recipe for decapitation.
Before we sold our condo in Bedford, my husband spruced it up by switching out all of the classic ‘flicky’ light switches with the big, flat, modern ones I call palm-mashers. (I think they might be called decorator switches, but that’s not a very clear description.) That was the extent of his electrical knowledge, so swapping out a light fixture sounded daunting.
We picked out the Canarm Daya flushmount light from Kent Building Supplies because our daughter had her heart set on a sparkly “chanda-wee-ah.” It had a pretty chrome base and LOTS of dangly crystals, so she proudly showed off the box to everyone she could.
When the big installation day arrived, I ducked in and out of the room nervously to make sure my dear husband wasn’t going to electrocute himself while our children watched …
Continue reading in my weekly DIY column, My Handmade Home …
Thanks to Kent Building Supplies for providing us with the Canarm Daya flushmount light so we could tackle this project. As always, all opinions and electrical mishaps are my own.
More (boring) purchases I made online
Remember when I told you about my goal to simplify, and part of that included less annoying errands? (Like running out of liquid hand soap and dishwasher tabs)
I promised to let you know how it went, so here we are — one month into our let’s-have-a-monthly-Walmart-AutoSave-order so I don’t have to go out in public.
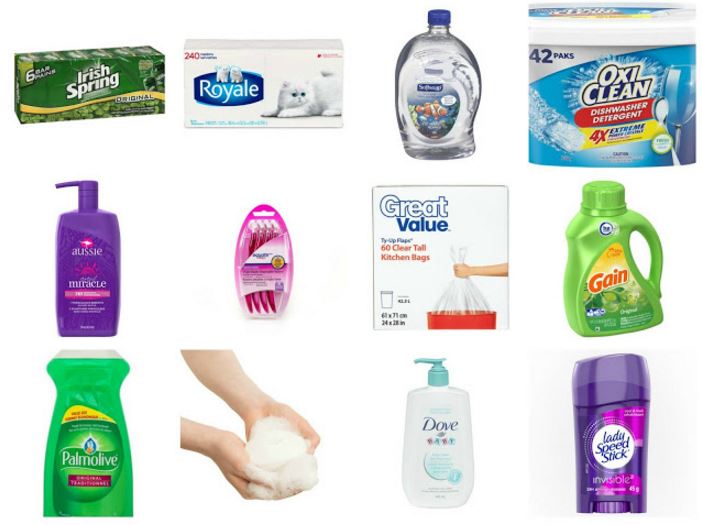
- Irish Spring soap (6-pack)
- Royale napkins (240-pack)
- Softsoap hand soap (1.65L)
- OxiClean dishwasher tabs (42-pack)
- Aussie shampoo in a pump (778ml)
- Razors for me (four-pack)
- Kitchen garbage bags (60-pack)
- Gain laundry detergent (32 loads)
- Palmolive dish soap (1L)
- Dove soap (two-pack)
- Tear-free shampoo/body wash for the kids (440ml)
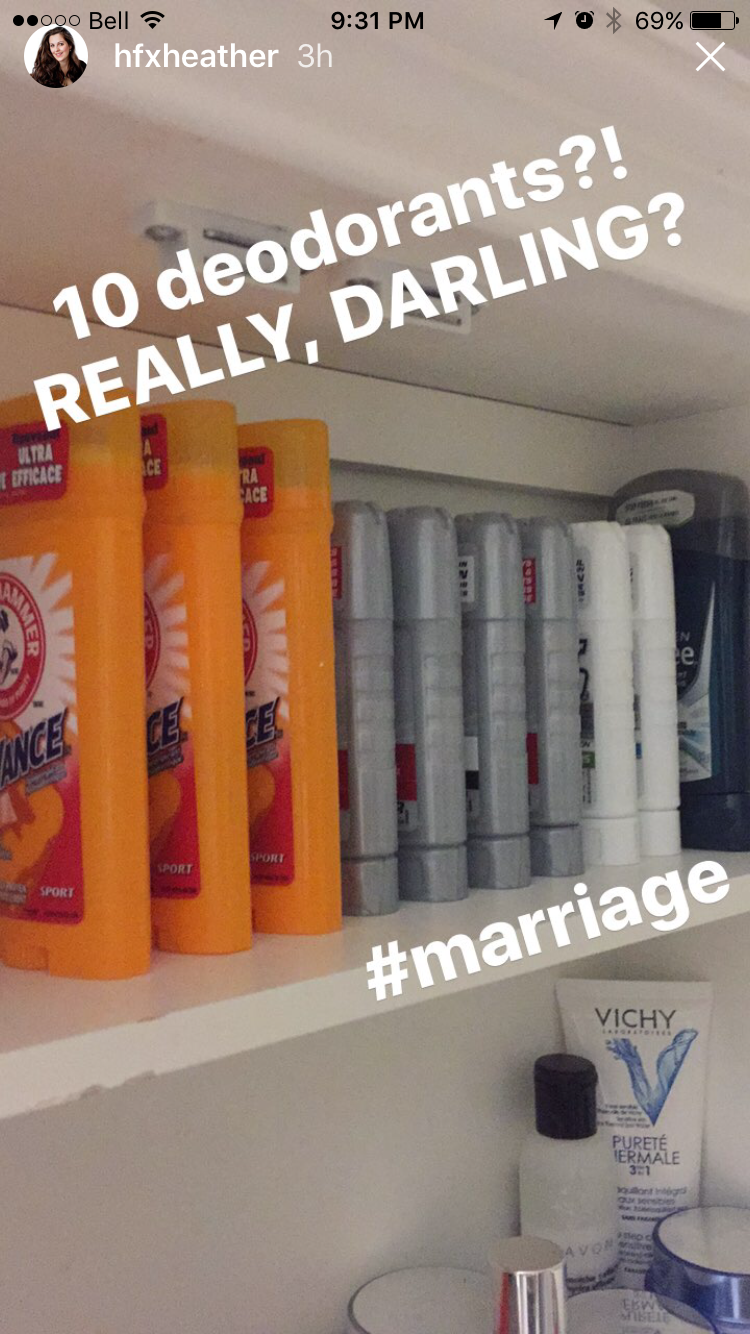
- Deodorant* for me (45g)
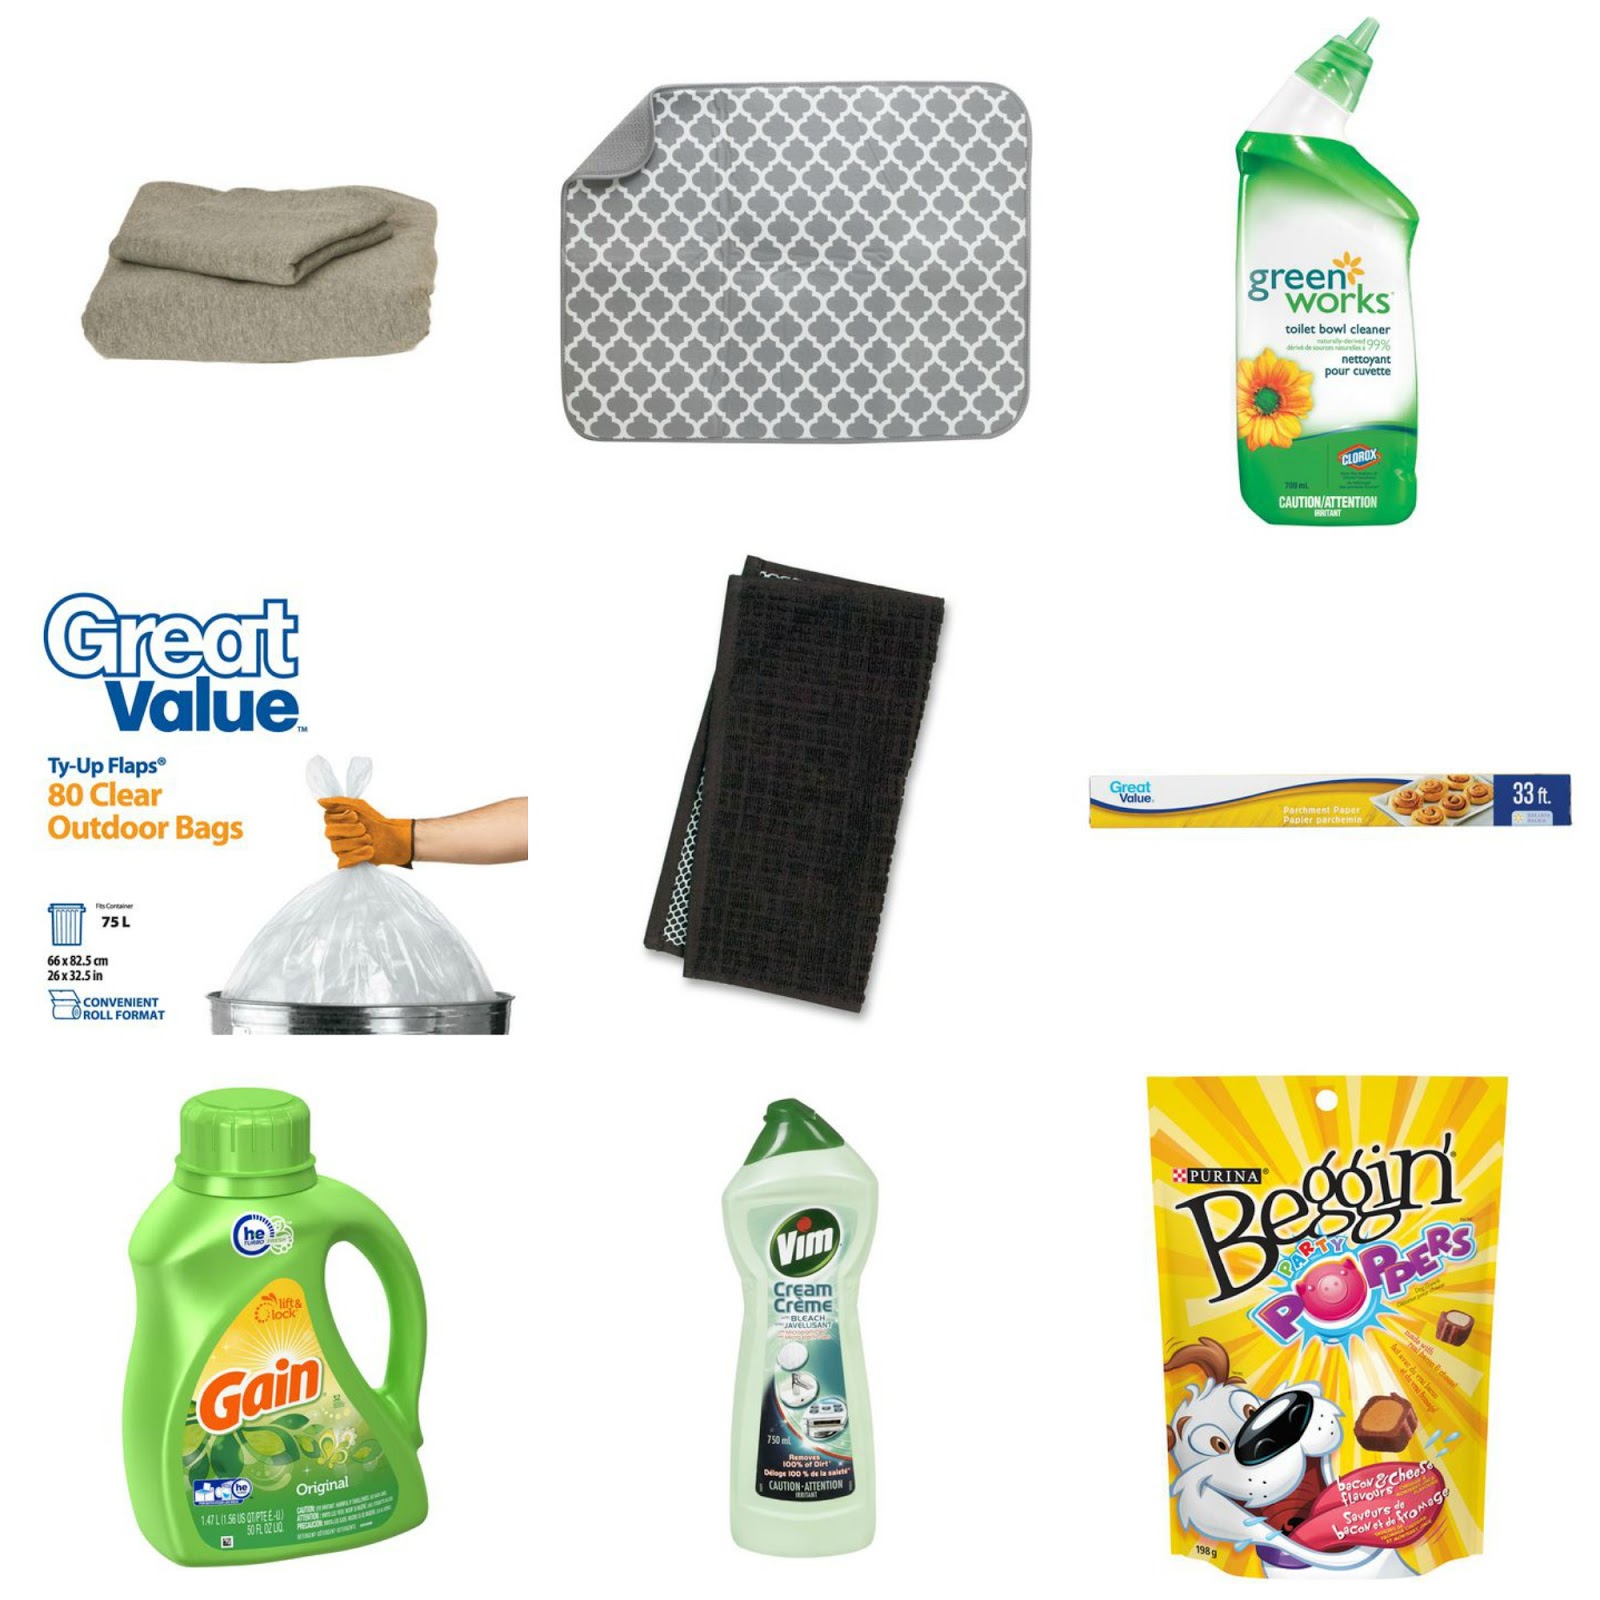
Sheets for C’s new bed, since I wanted to have an extra set. She has white and pale pink chevron cotton sheets on now and that’s all she has. D has two sets of the same soft jersey-knit sheets for his two beds and I’ve always liked how they feel like well-worn T-shirts.
A new drying mat because we use ours constantly with our new sink. I haven’t been washing it very often since it’s always in use, so yayyyy for having two in rotation.
Cleaning supplies (other than products for dishes + laundry) was completely forgotten during the first order. So, yeah, that. and that.
It turned out the garbage bags I’d ordered were too small and annoying for everyday kitchen use. I suppose our kitchen garbage can is larger than, uh, the norm?
So I ordered 80 clear outdoor garbage bags, which I are sturdier and larger and more like what I’d choose to buy if I was out in public. Like, actually picking things out in a store, like the olden days.
Dog treats were something I’d forgotten to put in the first order, and I think that’s a good staple to keep on the AutoSave. It’s not like the dog is going to stop peeing and pooping (and expecting to be rewarded for doing it outside).
The parchment paper is something I don’t use very often but SHOULD, so I guess it’s an aspirational purchase? I picked the smallest roll and it was less than $3, so it will probably last me a lifetime.
Oh, and a scrubby dishcloth for washing dishes. I admit, I was sucked in by the fact it was made by KitchenAid and the fact that it was black and would match our sink.
***
I think ordering these kinds of “boring basics” online is really working for us — so far, at least.
I get flustered in crowded (and uncrowded) stores. I suck at comparing prices (something that’s easy to do online). I forget what we need (well, this happened anyway).
And I’m too tempted by impulse items.
Pop-Tarts!
Cute sweater!
New dishes!
Tights!
New packaging on that cereal! NEED!
Keeping a running automatic order of the basics means our grocery runs are completely food-focused, we’re not stockpiling dozens of bars or soap or disposable razors, and we’re not running out of frigging hand soap (EVER AGAIN).
Plus, I get really excited when there’s a package at the door. Even if it contains garbage bags and toilet cleaner?


As featured on …


