
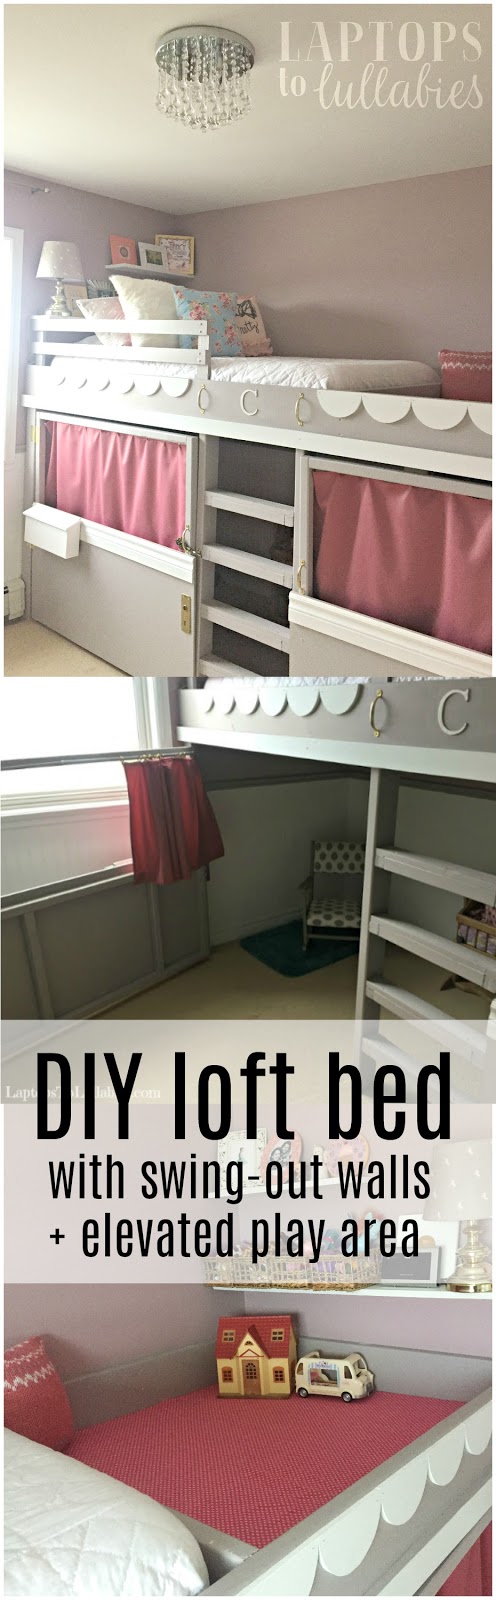
DIY loft bed, playhouse and reading nook


Now, this may seem like a huge project — and it was — but it wasn’t especially complicated. Even though this is a large structure with lots of moving parts, we built the entire thing in less than 24 hours thanks to my mom taking the kids for a sleepover. (I think we went to Kent four times and ate four meals of take-out burgers. It was awesome.)
The first step was finding the studs and securing 2×8 boards to the walls to support the loft bed. We used more than 100 screws for this step alone, just to make sure it wasn’t going anywhere — no matter how many kids piled onto the bed.
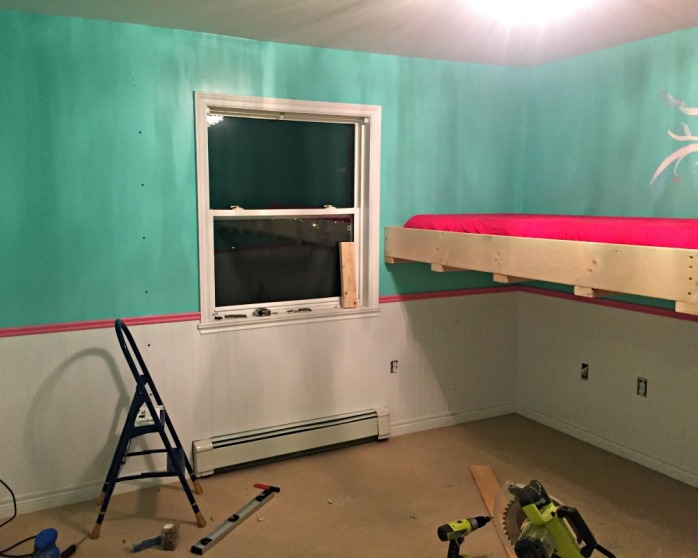
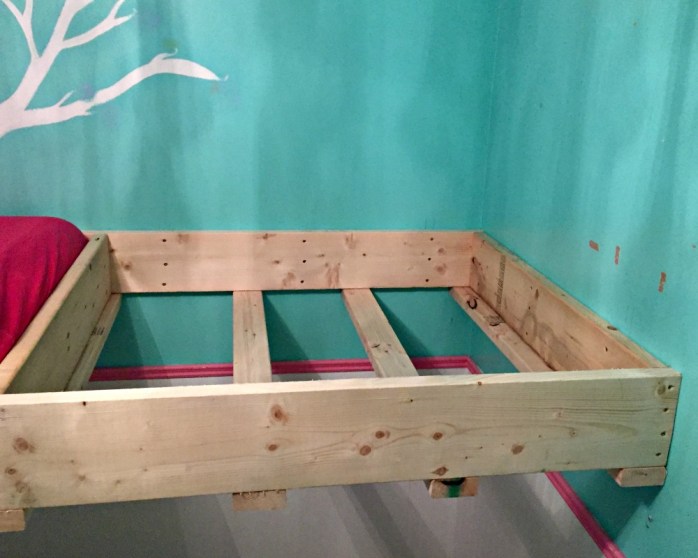
We originally planned to close off the lower play area just with curtains, but then I got the brilliant idea — mid-project, as usually happens — to build huge doors that would swing out into the room.
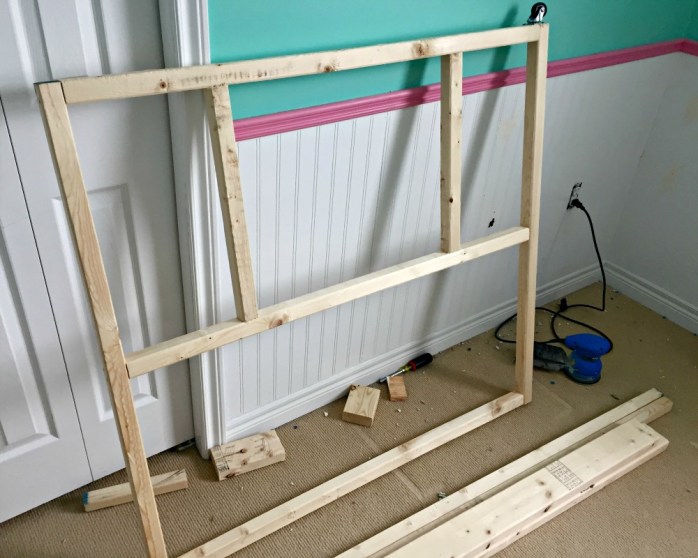
By having doors instead of curtains, I could add all kinds of fun details like house numbers and a mailbox. My ever-patient husband agreed and helped me draw up new plans, and we made an evening run back to Kent.
The plan changed again once we got there.Instead of having the doors be solid plywood and then cutting out windows, it was going to be far cheaper to make half-doors out of half-sheets of plywood and leave the top of the doors open — framed with 2x2s. We put casters on the bottom of the doors so they’d slide more easily and not put too much weight on the hinges.

We designed the swinging doors to be exactly the same size, to make things easier, and left enough room in the centre for the ladder. Typically, a bunk bed ladder leans out into the room so you can climb on a comfortable angle. But our kids have been climbers since they were babies so we knew we wanted to build a somewhat challenging ladder: straight up and down.
(The bonus was that it wouldn’t take up any more floor space, because the bed was looking more and more gargantuan as we worked.)
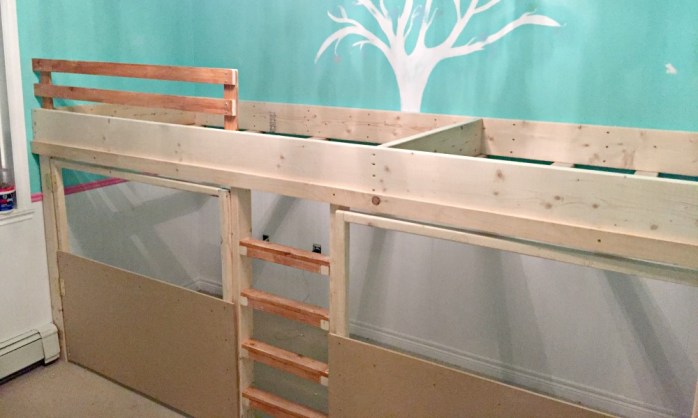
The final step of construction was adding a simple safety rail near the top of the mattress so our daughter wouldn’t tumble out of bed at night — it would be a seriously long, hard fall.
We kept the bottom of the bed open, since that’s where it met with the ladder, and decided not to put a rail around the play area. Since there’s no mattress there, the kids have somewhat of a natural ledge to keep them in.
While the construction was pretty easy, it was priming and painting that monster that took most of the effort. As much as I really, really didn’t want to have to prime it, the associate at Kent gently convinced me that it was the best way to make sure the paint wouldn’t chip or flake. And so I primed . . . and primed . . . and primed.

We chose a soft grey for the bed colour (PPG’s Rice Chips) to go with the new blush-coloured walls (PPG’s Pinot Noir), and we used SICO Furniture & Cabinet paint to ensure we’d get a durable finish.

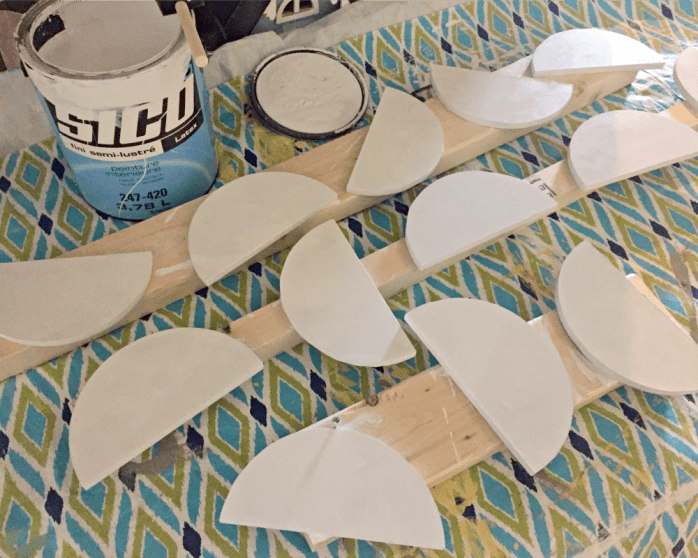
For a finishing touch, I nailed some thick trim on the doors and painted some of the trimwork a glossy un-tinted white. I traced a small dessert plate again and again on a sheet of MDF and my husband cut them out with his scroll saw to create the cutest scallop detail.
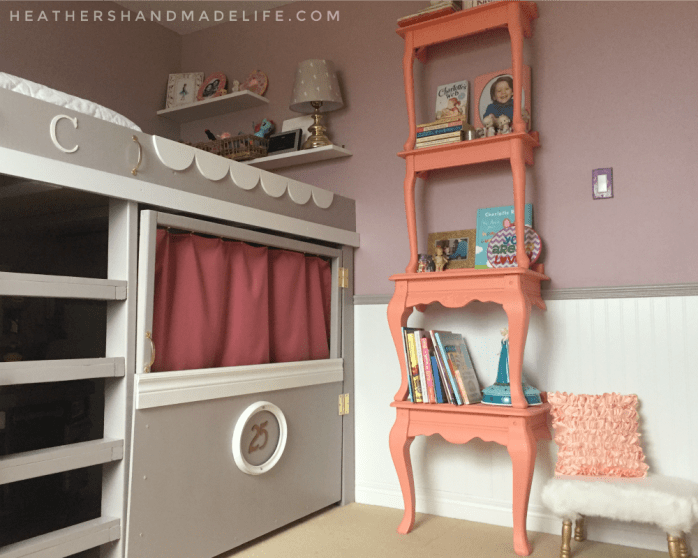
I also added a shiny white metal mailbox, a vintage lock plate from Phillips & Chestnut Victorian Salvage and Decor, and house numbers sprayed gold inside a white oval frame.


I hung cafe curtain rods inside each of the doors and used gold metal clips to hang homemade curtains in a beautiful deep rose. It really looks like a sweet little playhouse under there.
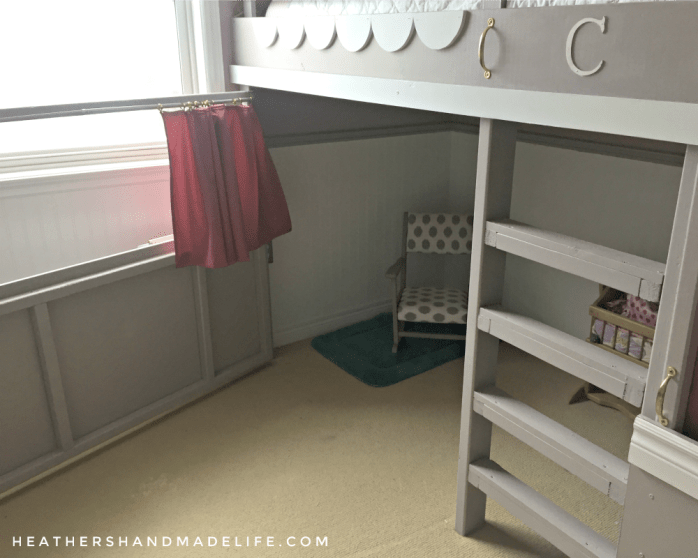

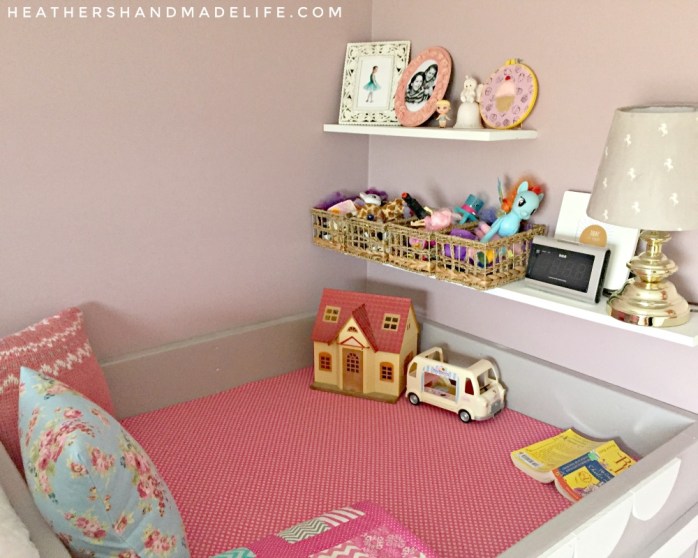
For the elevated play area, I just covered the MDF ‘floor’ with some pink cotton fabric and stapled it tightly underneath — rather than painting the MDF and worrying about it getting scratched up underfoot. With a few throw pillows and rattan storage bins, it’s the perfect spot for our daughter’s Shopkins collection and other small toys. She loves playing up there, and the best part is that I don’t care how messy it gets because you can’t see it!


Even though our daughter’s new loft bed is massive, it doesn’t feel like it takes up the entire room because it’s so multi-functional. The rest of her room is empty — except for the coral bookcase built from end tables that I showed you a few weeks ago — so there’s plenty of breathing room.

And the details! Oh, the little details …


What started off as an idea for a simple loft bed turned into something much more involved, but I’m so happy with how it turned out. By thinking vertically, we were able to double the available play-space while also hiding the toy clutter. I swear, her bedroom has NEVER stayed this clean — or looked this beautiful.
Thank you to Kent for sponsoring this project — providing the paint and a portion of the lumber. All repeat trips (sometimes twice a day) prove how much we really, really love shopping there.
Product sources:
White faux fur pillows: Handmade, fabric from Atlantic Fabrics
Loft bed paint: PPG’s “Rice Chips” from Kent
Wall colour: PPG’s “Pinot Noir” from Kent
Blush-coloured fuzzy throw: HomeSense
White wooden “C”: Michaels
Floral pillow: Handmade, fabric is from the Anne of Green Gables collection at Atlantic Fabrics
Vintage lock plate: Phillips & Chestnut Victorian Salvage and Decor
White powder-coated mailbow: Kent
Chandelier: Canarm Daya flushmount light from Kent
 |
| DIY bookcase from end tables |
 |
| How to replace a light fixture |
Where to splurge (and save) on school essentials

It’s been almost two years since I became an “elementary-school parent,” and this fall I’ll have BOTH kids heading off to school each weekday!

I know, I know — I still have a few months to go. But I’ve already been thinking of what I’ll need to pick up for Miss C so she’s ready for her big year at Primary.
Based on what I’ve learned so far with D, here’s what I would recommend splurging on — and saving on — when it come to school essentials …
SAVE: A single set of lunch containers.
I like the Rubbermaid LunchBlox ones (not sponsored at all) and we’ve been using the same set* for almost two full school years now.
I stuck name labels on every piece (even the lids) and I keep everything in its own little bin of “lunch-making supplies.” These are the ONLY containers I use in D’s lunch, and — as a result — we don’t misplace these and need to buy tons of the cheap throwaway containers or a bunch of baggies.

SPLURGE: A thermos your child can open.
We bought this easy-open Aladdin thermos (again, not sponsored) before D started Primary and we LOVE it. I’ve recommended it to lots of parents who discovered their kids couldn’t open the one they bought originally.
It’s used practically every school day since the kid is obsessed with bringing “dinner food” like pasta with meat sauce. It’s been through the dishwasher a million times and is still going strong.

SPLURGE: Name labels that won’t come off.
We LOVE Mabel’s Labels and have ordered them several times (nope, not sponsored). I like buying a multi-pack that has a combination of sizes, and they really STICK to everything — jackets, shoes, water bottles, etc.

I’m sure that’s why we’ve been able to keep the same lunch containers, thermos, etc. for almost two school years now. Even if D were to have misplaced something, it comes straight back to him (or is easy to pinpoint at the Lost and Found table).
SAVE: A crappy backpack-and-lunch bag set.
Yes, you heard me: a cheap, junky one that will probably cost $10-$15. It will have a huge photo of a cartoon character covering the entire back, and the lunch bag will have little straps so it can hang down from the bottom of the backpack.
 |
| I’m willing to bet C picks this one. |
“But Heather,” you say. “Why buy a piece-of-crap backpack that will surely have holes in it by the end of the school year? Wouldn’t it be better to invest in a quality backpack my child can use year after year?”
No.
Here’s the thing: my kids love character crap and I refuse to buy them character-printed clothes or room decor. They don’t even get a lot of character-y toys. I’m mean that way.
I’m willing to compromise on the hideous character backpacks because (A) it makes them excited for school, and (B) they’re going to want a new one every year, so why would I buy an expensive one and force them to carry it when they’re sick of it?
Backpacks and lunch boxes (or bags) were always something I got to pick out at the end of every summer, so I’m content to buy cheapies that will last just a single school year.
SPLURGE and SAVE: Outdoor shoes that you like more than the indoor shoes.

Your child needs indoor sneakers, obvi. They need to be the non-marking-sole type and they’re only ever going to wear them indoors — at school — so go for something comfy with velcro so they don’t become a pain in their teacher’s butt. They don’t have to be expensive.
But chances are, they will also need a new pair of outdoor shoes. The sneakers they’ve been wearing all summer are likely grubby and very beat-up — possibly outgrown, too — but it’s going to be November before they’re wearing boots on a regular basis.
I bought D a fancier pair of outdoors this past fall (black leather American Eagle high-tops from Payless, almost exactly like these) and, let me tell you, they made me unreasonably happy. He’d be all dressed for school and throw those suckers on, and he looked like the cutest little hipster.
Much cooler than the dork (also him) wearing the grey and orange velcro numbers pictured above (his indoor shoes last year). But I don’t have to look at the indoor shoes, so … *shrugs*
***
What other essentials should I be thinking about for next year? Hit me up in the comments!

Why too many days off school make me crazy
I’m almost positive my son and daughter attend Grade 1 and preschool, respectively. It’s just that for the last three or four weeks, they’ve barely gone.
At least it feels that way, between flu bugs, coughs, snow days, labour action, holidays and more snow days.
//platform.instagram.com/en_US/embeds.js
I actually looked up the definition of “stir-crazy,” expecting it to have a photo of me looking frazzled and cranky. But, no, it means “psychologically disturbed, especially as a result of being confined or imprisoned.”
It pretty much describes my state of mind for the entire month of February.
Don’t get me wrong, I don’t believe in sending kids to school when they’re sick. I don’t think it’s safe for people to be on the road in bad weather, and I have nothing but respect and love for teachers.
It’s just that all of these missed school days are slowly driving me batty …
Continue reading in my weekly parenting column, The Mom Scene …
DIY Lego countertops

We built our son a Lego table a few years back. It was simple enough, with a single shelf to hold a plastic storage bin with all of his pieces. But do you know what happens when a child continues to want nothing but Lego sets for every birthday and Christmas?
A single, modest Lego table no longer cuts it.

We realized on Boxing Day that we needed something bigger — immediately. Our entire dining room table was covered with brand-new creations and the table in his room was already overloaded.
So, a new Lego solution jumped to the top of our project list, and we went upstairs to measure his bedroom.

The ideal wall was 15 feet long, so we decided to frame out the bases for two counters that would be six-and-a-half feet long. My husband put these together with 2x4s with sheets of meranti plywood to hold slim plastic storage drawers.

Our son was using a wheeled contraption with drawers to colour-code his pieces (formerly my scrapbook paper organizer) so we wanted to reuse these drawers instead of buying new ones.
We hefted both (really heavy) frames upstairs to our son’s room and I got to work on sanding them. It was my first time using my mouse sander (a Christmas present) and I loved that it had a pointy tip to get into hard-to-reach areas.
There was no way I wanted to paint these two beasts — especially since I knew, down the road, I’d have to paint custom bunk beds to match — so I decided staining would be much faster. I picked out a new shade — Minwax’s Weathered Oak — that was a natural barnboard-like tone and a single coat was all it took. Gotta love the speed of staining!
Once the stain was dry, the next step was finishing the playing surface. We picked white melamine plywood sheets because that’s what we used to build my custom L-shaped desk and I love how that looks. We used L brackets to keep them from moving around or slipping off the bases, but opted not to screw them in so they’re easy to remove if we move the tables around.

Because these melamine boards have scratchy unfinished edges, you need to get white plastic trim to finish them nicely. I finally have a knack for clicking this stuff into place, but it takes a little practice. You ease the trim around the start of an edge and then press your hand against it as you slowly work your way down — clicking it into place as you go. It seals in the rough edges, protecting it from getting chipped, and gives you a smooth finish.

The magic of these tables — counters, really — is that they’re finished on all sides, so we can move them into different configurations down the road. They can push together to make a huge rectangular play surface, or even make an L-shaped table.

For now, we have them side by side. They take up 13 feet of space — nearly the entire back wall of our son’s bedroom. The plastic storage drawers slide in and out easily and there was even an empty space leftover to store his binders of instruction manuals. He has a couple of chairs that tuck under the counters, but we plan to build long benches so he can have lots of friends over to build.

It didn’t take long for the counters to fill up with finished and in-progress creations, and our son has loved having so much space to work. Let’s just hope he doesn’t outgrow this space, because I don’t think we can dedicate an entire room in our house to Lego — as cool as that would be.


These hands


My fingertips are scarred and calloused from hand-quilting, so most of the time I can’t unlock my iPhone with my fingerprint.
I always have a few cuts here and there because I’m clumsy and in constant motion.
I don’t take very good care of my nails these days, and there is often paint in my cuticles.
But what worries me is my fingers. The way they feel.
***
My thumb, pointer finger, middle finger and ring finger are stiff a lot. (The pinky is fine and dandy, other than being naturally crooked,* and a fine-and-dandy pinky is a pretty sure indication that you’ve got carpal tunnel because it’s connected to a different nerve.)
*The kids both have crooked pinky fingers and it makes me so happy. It’s their little piece of me, in bodies that look so much like their dad.
They’re stiff and sometimes sore. I’ve been waking up in the night to numb fingers for the last few months, which is unnerving. (Bad pun.) My wrist feels FINE — it’s my fingers that are the problem.
These fingers — my right hand — can’t let me down.
I know I’m asking a lot of it/them, though. Typing for hours a day (and mousing). Sewing. Painting. Building. Knitting. Writing. Sketching. All of it — all of it needs my right hand. My mental health needs my right hand, because my mental health needs all of those things.
I regularly panic about the idea that I might fall down the stairs and break my right hand/wrist because I know what it would mean. It would be a disaster.
And so I keep training myself to do more and more things left-handed. I keep running my right hand under freezing cold water and then warm water to refresh it, like my massage therapist suggested. (It really does help.) And I’m going to buy a brace — like, today.
This hand is too important to fall apart on me.









As featured on …