
Five photography tips for amateurs
I take a lot of photos. My iPhone recently hit the 10,000 mark and then decided it was time for me to make some room for more.
But just because I take photos constantly — for the blog, for my parenting column, and especially for my DIY home decor column — doesn’t mean I’m any good at it.
*crickets*
I was lucky enough to attend a photography workshop for bloggers recently, organized by ECM Media, and I learned so many great tips from Matt Corkum of Fade to White Photography.
Ready to slay your photo game, whether it’s for your blog or just for fun? Here are a few of the gems I picked up from him …
1. There’s sometimes a lot of work behind a photo.
Matt told us how it sometimes takes 30 minutes to set up for a shot because he has to do something crazy like move all of the furniture out of a room — just to get a blank backdrop for someone to stand in front of a window or something.
It inspired me to up my photo-game, because there are soooo many times I just kind of ignore the threads on the carpet or the specks of dust on the table. It doesn’t always take a lot of effort to tweak things in “real life” so you get a better photo.
Oh, and he says you’d often be shocked to see what’s JUST outside of the frame.
(Like this shot of my kitchen? See the shadow on the counter on the far right? A yucky compost bin with banana peels heaped on top. Gross — and carefully excluded!)
//platform.instagram.com/en_US/embeds.js
2. Buy cheap-and-easy backgrounds.
Matt suggested buying white foam core for just a few dollars a sheet, and my friend Lori from Farm Fresh Style was a keener and ran right out for some.
It was the perfect background for her post on making marblized Easter eggs. This photo wouldn’t have looked this Pinterest-worthy if the background was a distracting floor tile or a messy kitchen counter.
 |
| Photo credit: Farm Fresh Style |
I often use my kitchen table as a neutral-but-interesting photo background, but it’s not the same as crisp white.
//platform.instagram.com/en_US/embeds.js
We have our awesome white shiplap wall in the basement, which *should* be a good photo background, but it’s in a dark windowless room. Whomp, whomp.
FOAM CORE! I’m comin’ for ya!
3. If necessary, fake a better background.
I loved Matt’s tip that if you put your subject really far away from the background, your camera focuses on the person (or item) and the background gets kind of blurry.
I’ve always wondered how to do that, but I figured it was a fancy camera feature. Nope!
4. Learn how to work with light.
Natural light is obviously the best, but I admit I’m often lazy when it comes to taking pictures and I don’t always seek out natural light even when I can.
For example …
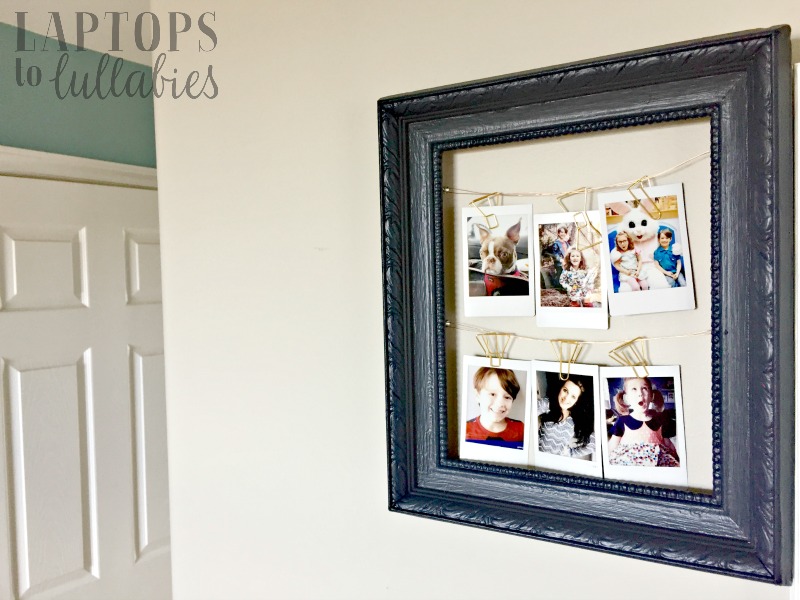
I made a cute frame display for the photos from my new Fujifilm Instax SP-2 smartphone printer, and I wanted to take a picture of it. I just took down something already hanging in my dining room, hung this up, and snapped.


Normally I would have stopped there and called it a day. But when I took the frame into the kitchen and hung it directly across from a window, suddenly the photos were looking much better.
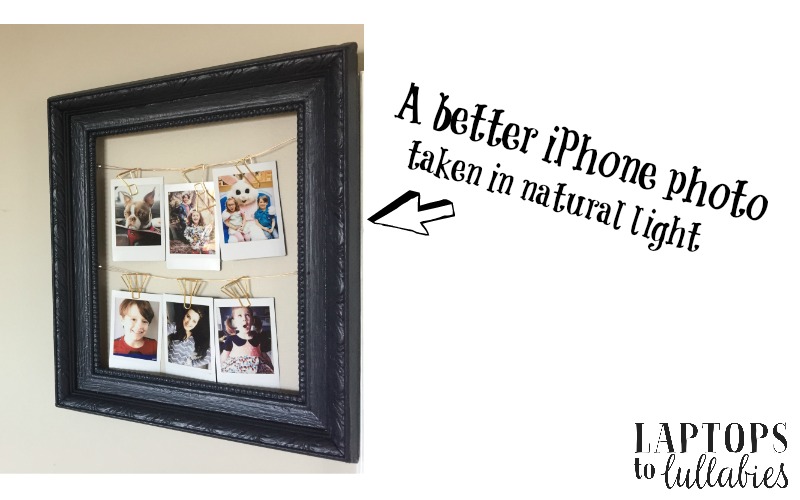
This is a zoomed-in look at the detail I was getting from the naturally-lit shots. You can see the texture of the wire and the shadowing even on that tiny paperclip!

Natural light is also ideal for taking selfies. It’s why you can sometimes find me standing in front of a window mid-day with a selfie stick. 😉

(True story: I stopped taking pictures during this Selfie Session because there was a neighbour outside and I thought he’d think I was grinning/posing out the window for him.)
Natural light can also be faked, and Matt shows us different reflectors that bounce the light around to make a photo better. WANT THEM.
5. Even the best camera in the world doesn’t do the composition.
This was inspiring to hear, as a full-time iPhone photographer. Composition is something ANYBODY can — and should — do, on any device, whether it’s a fancy camera or your father-in-law’s flip phone.
(I had a point-and-shoot and stopped using it a few years ago when my iPhone officially had more megapixels. It seemed pointless.)
I’ve been playing around with the rule of thirds and trying to be more intentional about the pictures I take …
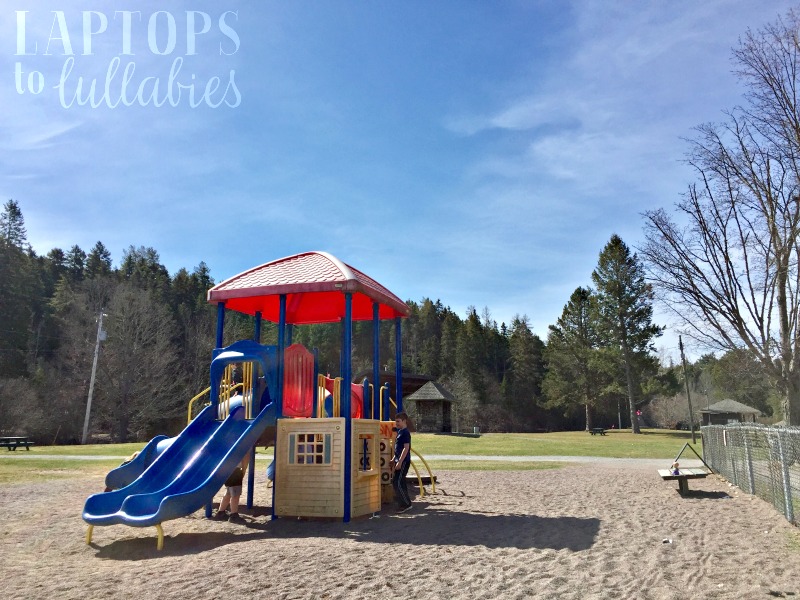 |
| Victoria Park playground in Truro, Nova Scotia |
 |
| Victoria Park stairs in Truro, Nova Scotia |
But still, I think I’m ready to upgrade to a big-girl camera. I have my eye on Matt’s recommendation of the Fujifilm X-A3 because it has WiFi.
 |
| Fujifilm X-A3 Camera |
Yes, WiFi. It will literally zoom your photos from the camera straight to your phone or tablet without messing around with cards.*
*Messing with cards is the No. 1 reason I have not bothered to buy a real camera, so this is huge news.
***
It was a wonderful workshop with my fellow bloggers, AND we all got to take home the flower arrangements we made.
Huge thanks to Dean’s Flowers for hosting our event and teaching us the magic of making a little tape grid on top of a vase so the flowers stay exactly where you want them.
//platform.instagram.com/en_US/embeds.js
What’s your favourite tip for an amateur photographer like me? Hit me up in the comments or over on Facebook!
Don’t forget to pop over and see what my friends had to say about the event …
When little kids ‘date’ little kids
Our son is “in love” with a girl in his class.
They’re getting married, he tells us, and it’s really going to happen because they “hang out almost EVERY day.” He says this part for emphasis because, really, how could that not lead to marriage?
He is six and I’m not sure how I feel about this whole “relationship.” Actually, I do. I think it’s adorable on one hand, but it also kind of weirds me out. I feel both things, equally, which means I’m never quite sure how to handle it.
It started off as a secret. He whispered to me, at night after prayers, that he had a crush on this particular young lady. He blushed when he talked about her and didn’t want anyone to know about his feelings. It was so cute!
Then, somehow, he started talking about her freely. He was in love! He shouted it from the rooftop of the playhouse. He told me she was his girlfriend and I managed to say something about how he was too young for a girlfriend but she sounded like “a very nice friend who is a girl.”
Meanwhile, I was thinking “I never had a ‘boyfriend’ — even a pretend little-kid boyfriend — when I was kid.” I remember being five or six and playing a game called Kissy Girls on the playground, where the girls would chase the boys and threaten to kiss them (but no one ever did because ew).
This was brand new territory for me, but apparently my playboy husband had lots of “girlfriends” in elementary school. He remembers nothing more than notes being passed, boxes being ticked and “breaking up” with somebody on the playground via another friend.
Our son would come home from school and tell me about how they — he and his beloved — spent lunch and recess playing Cops and Robbers with another little girl and her boyfriend. A double date! Awwww. He told me they had “stuff in common” because they both had brown eyes and were six years old. Double awwwww!
Then the drawings started …
Continue reading in my weekly parenting column, The Mom Scene …
 |
| Pin this weirdness for later! |
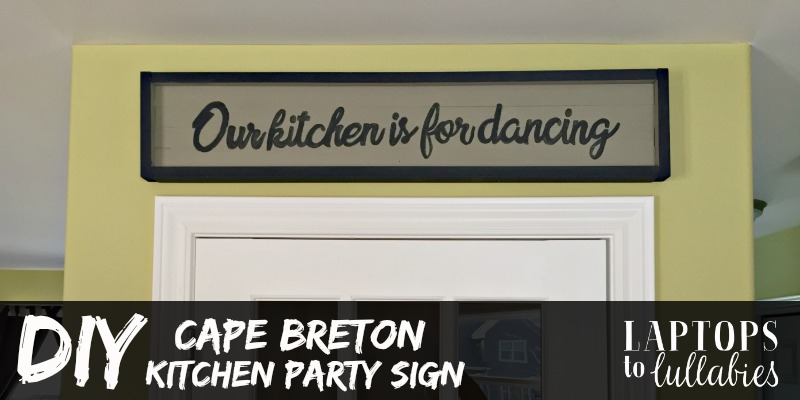
DIY Cape Breton kitchen sign

Everyone’s making pallet signs these days, and you’ve probably seen them all over Pinterest. The idea is to take rustic barnboard-style wood and paint a word or phrase on it, and then hang it on the wall.
A lot of people are selling these — and they’re not cheap — so when a good friend texted to ask what I might charge for one, I told her I’d make one for a birthday gift and share the steps with you guys.
Now, this friend is a proud Cape Bretoner (so is her husband) and they love having dance parties in their kitchen with their two young children — who are almost-five and almost-seven, like my kids. She had her heart set on a sign that said ‘Our kitchen is for dancing’ and wanted it to fit over a doorway, but left the other design details up to me.
I started by figuring out what lettering to use. I headed to DaFont.com and decided I liked the cute curves of the Sweet Sensations font. It’s free to download most of these fonts (for personal use) but I don’t usually bother. I just type my phrase into the preview bar and then take a screenshot of it.

In order for the words to print out large enough for a sign, I have to break the screenshot into separate photos — otherwise the sign could only be as large as a piece of printer paper. I used the Paint program on the computer to divide up the words and print them on three separate sheets so they’d be the right size.
Now I had to build something to put those words on! My friend had given me the length of her doorway, so I cut six 1×2” boards to be slightly shorter than that. Four of them would be the back of the sign, where the words go, and two would be used to frame the top and bottom of the sign. Then I just had to cut two small pieces of 1×2 to frame out either end.


I painted the main part of the sign a nice neutral greige (“Algonquin” by Fusion Mineral Paint) and painted the frame black. And, yes, it would have been much easier to paint everything before I screwed it all together, but I never seem to do things in the “right” order.

Then it was time for the lettering. The hardest part of making a hand-painted sign isn’t the hand-painting — it’s transferring the outline of your letters onto the wood.
One way to do this would be to cut out every single letter, spread them out on the wood, and then trace around them with a pencil. I used to do this and it certainly gives you crisp results, but it takes forever.
So I tried my favourite method of scribbling on the back of the paper with a pencil (to get it nice and smudgy) and then tracing the letters — hard — on the front of the paper to transfer a light outline onto your surface.
Unfortunately, the pencil was too close to the paint colour so I couldn’t see the outline very clearly. I ended up using a tiny screwdriver to essentially “scrape” the outline of the words through the paper and onto the wood — ouch! It’s hard on the hands to grip something so tightly for detailed work.
The only benefit of scraping your letters — rather than tracing them — is that there are little indents in the wood that keep your paint from seeping over your lines. Filling in the letters with black paint went pretty quickly, and then there was nothing more to do than wait for the sign to dry.

My friend was happy with her birthday gift and told me they’ve had many dance parties in her kitchen under their new sign.
Let’s hope its bracket holds it up there securely, because when both of their families comes down from Cape Breton, it can get pretty wild in that kitchen!
Don’t forget to pin this idea to come back to it later!
| Pin this idea for later! |
Build + paint a custom wooden sign
Everyone’s making pallet signs these days, and you’ve probably seen them all over Pinterest. The idea is to take rustic barnboard-style wood and paint a word or phrase on it, and then hang it on the wall.
A lot of people are selling these — and they’re not cheap — so when a good friend texted to ask what I might charge for one, I told her I’d make one for a birthday gift and share the steps with you guys.
Now, this friend is a proud Cape Bretoner (so is her husband) and they love having dance parties in their kitchen with their two young children — who are almost-five and almost-seven, like my kids. She had her heart set on a sign that said ‘Our kitchen is for dancing’ and wanted it to fit over a doorway, but left the other design details up to me.
I started by figuring out what lettering to use. I headed to DaFont.com and decided I liked the cute curves of the Sweet Sensations font. It’s free to download most of these fonts (for personal use) but I don’t usually bother. I just type my phrase into the preview bar and then take a screenshot of it.
In order for the words to print out large enough for a sign, I have to break the screenshot into separate photos — otherwise the sign could only be as large as a piece of printer paper. I used the Paint program on the computer to divide up the words and print them on three separate sheets so they’d be the right size …
Continue reading in my weekly DIY column, My Handmade Home …
Continue reading in my weekly DIY column, My Handmade Home …
Continue reading in my weekly DIY column, My Handmade Home …
| Pin this idea for later! |
Weekly wrap-up: Eggs + hearing loss + cheap tables

SUNDAY
Over on Instagram I shared a shot of some of the drool-worthy fabric I scored during an Atlantic Fabrics sale, as well as some pretty park shots while I took Annabelle for a walk.

MONDAY
I was part of an awesome East Coast Moms blog hop where we all shared Easter egg projects. Mine was a scrappy table runner shaped like an Easter egg, and our hop included everything from home decor to kids’ crafts and yummy recipes.
 |
| Ten egg-cellent Easter crafts |
TUESDAY
I love, love, love our new sofa end tables, and I still can’t believe they’re so cheap to build. I shared the full tutorial and YOU SHOULD MAKE ONE. OR TWO. REALLY.
 |
| DIY sofa tables |
WEDNESDAY
I finished the kids’ baby-clothes quilts and showed you how to make your own. No major sewing skills required, and don’t let the word “quilt” freak you out. It’s really just a blanket with knots in it. Promise.
 |
| DIY baby clothes quilt |
Oh, and over on Instagram I shared how we styled our hair for Crazy Hair Day at D’s school. (It was our morning to volunteer at the breakfast program, so I was pumped C and I got to participate.)
I was pretty proud of my Diet Coke hairstyle, and it took like 30 seconds to execute.
//platform.instagram.com/en_US/embeds.js
THURSDAY
I talked about C’s recent hearing test (she bombed) and what’s next for her to fix her hearing loss (tubes).
 |
| When your child fails their hearing test |
***
Happy Easter weekend, everyone!
I’m not a big chocolate fan, but the Easter Bunny I bought myself a box of Glosette raisins that I plan to devour on Sunday.
xo


As featured on …


