
And so it begins

We’re not even a week into summer vacation, and already school feels like it ended months ago. Was it really LAST FRIDAY — not even one week ago — they got off the bus for the last time? REALLY?
Our weeks of summer camp have yet to begin, so we’re in those early-summer days of getting used to the new normal. Read More
Summer needs some structure

If my kids were left to their own devices this summer, they would not leave those devices — electronic devices, that is. They would alternate between the iPhone, iPad and PS4 until their eyeballs fell out of their heads and rolled across my Wayfair rug.
My kids (most kids, I think) thrive on structure, and sometimes summer can get a little too loosey-goosey. Without the steadiness of that Monday-to-Friday school schedule (I miss it already) kids can get cranky because they (A) don’t know what’s coming up next and (B) get into a rut of doing the same things without any variety.
Yes, they will spend a lot of time playing outside, and we will make many trips to the local park, library, pool, playground, etc. They will draw and make crafts and play with their toys and build blanket forts and invent new games.
Sometimes, I just structure activities that will keep them quietly content while I’m working. So here are some of the ways I’m going to structure our time this summer to keep them from becoming “vidiots.”
1. Tinker time.
I started doing this a few months ago actually. They run up to our son’s room and each build a unique Lego creation, and then I come upstairs and tell them what I like about each one — um, what I like about the Lego creations, not the kids themselves.

2. Wayback playback.
(Yes, everything has some sort of alliteration. It’s the “fluency heuristic,” which means ideas are more valuable if they’re easier to say or think).

This is when I’ll pull out toys they haven’t played with in a long time, and they are legally obligated to play with them for a certain amount of time. I’m looking at you, giant expensive Playmobil collection they never touch anymore.

3. Summer School.
We do this every summer because I’m genuinely afraid they’ll forget everything their teachers have worked so hard to teach them. I bought them each a thick workbook that’s designed to bridge the gap between the grade they just finished and the grade they’ll start in September. I’ll assign them a couple of pages a day and then I get the fun of grading their work (with stickers, naturally).

I will do spelling tests that include the upcoming year’s “No Excuses Words” (words they need to spell by the end of the last term). They’re really into word searches now, too, and I found a site where you can make your own and print them off.
4. Video Village.
I’ll put an iPod or iPhone on a tripod and leave them to shoot videos of their toys (these are weirdly popular on YouTube). If I really want to extend the activity, I’ll have them craft scenery first or draw out storyboards of what they’re going to record.
5. Style Salon.
This is when I send them to the back deck with our nail polish collection and instruct them to paint their fingernails and toenails.

I’ve long since learned not to let them do this in the house unless I like a rainbow of streaks and drips on the kitchen table (or worse). Sometimes the “beauty treatment” will be face-painting each other, and they’ll almost certainly end up with murky brownisn-green faces because they mix the colours together.
Face paint’s another popular option. Skills not required! LOL.

6. Chess Challenge.
They both love chess, and Mommy doesn’t have a frigging clue how to play it with them. When I call out “Chess Challenge!” they will need to drop everything and start setting up those little horsies and castles or whatever the pieces are.
7. Countdown to Clean.
I’ll think of something they want — probably a trip to the frozen yogurt place I don’t like — and tell them it’s a reward for doing a specific cleaning job, like finding all of the Shopkins and organizing them on the shelves by colour.

Whenever they ask if they’re done, I’ll tell them they only get one inspection so they’d better be really sure it’s clean.
8. Reading Rush.
They’re both signed up for the summer reading program at our awesome local library, where you can earn prizes for logging a certain number of reading hours. They read nightly on their own anyway, but I think more midday reading will be in order — after all, guys, PRIZES?!

I also like to get our son read to our daughter (and have him help her read one, too) so I can see myself saying a lot of “Read each other a book and THEN it’s time for a snack.”
***
You might be thinking “Summer is supposed to be about relaxing and doing what you want. Telling your kids how to play is ridiculous!” Fair enough.
But I know my kids. They love school, they love structure, and they miss both of those things during the summer.
While they might grumble initially at one of my “forced play” suggestions, I know they will end up having a great time and appreciate doing something a little different. It’s kind of like school, except without a qualified teacher … and with more nail-painting.
xo
DIY hanging bars

Three summers ago we built a simple wooden teeter-totter for $60 and the kids still love it today. It opened our eyes to the genius of building your own playground equipment from solid wood, rather than spending hundreds or thousands on dinky metal and plastic sets.

Last summer, we built a set of monkey bars for $175 and they’re still the most popular thing in our backyard — well, maybe second to the swings.


This summer, I decided we could expand on the monkey bars and add two hanging bars. The kids love flipping around on the ones in their school playground, and it felt like a natural next step in our backyard.
It started off pretty similar to the monkey bar build — the same pressure-treated 4×4 posts and the same giant ground spikes* to keep them snugly nestled in the yard. Because we were building the bars off the existing monkey bars, we just needed two new posts.

(My handy husband even remembered the trick he “invented” last summer, where he used a small scrap of 4×4 to help him pound the spike into position before adding the real post.)

We’d purchased the monkey bars as a set, but the hanging bars needed to be hunted down since they’re not a standard piece of playground equipment. It involved visits to several different stores as we shopped for something decidedly unusual.
We looked at bars that would be too thick for our kids’ little hands, and bars that would be too skinny for swinging comfortably.
Once we figured out the right thickness (3/4”) we started running into issues on the length. It was seemingly possible to find suitable bars that were 35” long like the ones at the school. We ended up settling on bars that were 24” long, and they worked out fine in the end — narrower for sure, but the kids could still flip on them just fine. They even came with their own flanges for screwing into the posts.
UPDATED TO ADD: Galvanized 24″ 3/4″ metal pipes from Canadian Tire.
I had measured the hanging bars on the school playground so we could copy them as closely as possible. The tall bar was 69” off the ground, and the low bar was 42” off the ground, so we stuck with those measurements.
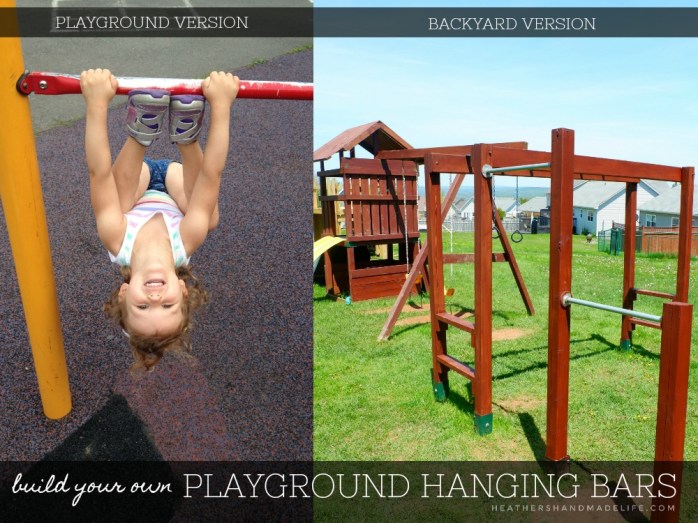
The set of two bars took a single afternoon to build and they were ready for “testing” by the time the school bus returned. it seemed like half the neighbourhood kids flocked to our yard to try them out, so it was another week before we got around to staining them to match our deck (Sico’s “Autumn Brown” in exterior semi-transparent).
Now that our backyard has a playhouse, swings, a teeter-totter, monkey bars and hanging bars, I’m not sure what’s left to add, but I’m sure we’ll come up with something.
We always do! 😉

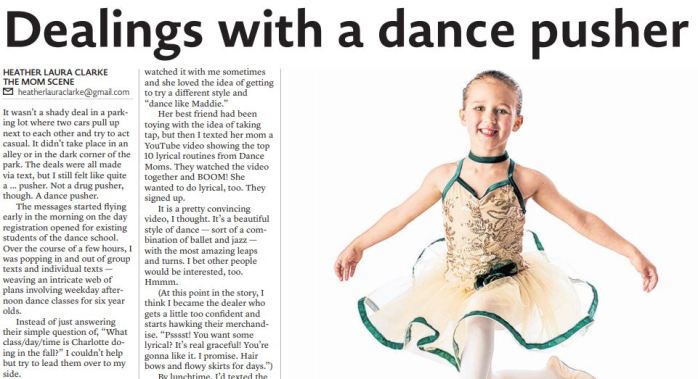
Confessions of a dance pusher

It wasn’t a shady deal in a parking lot where two cars pull up next to each other and try to act casual. It didn’t take place in an alley or in the dark corner of the park. The deals were all made via text, but I still felt like quite a … pusher. Not a drug pusher, though. A dance pusher.
The messages started flying early in the morning on the day registration opened for existing students of the dance school. Over the course of a few hours, I was popping in and out of group texts and individual texts — weaving an intricate web of plans involving weekday afternoon dance classes for six-year-olds.
Instead of just answering their simple question of, “What class/day/time is Charlotte doing in the fall?” I couldn’t help but try to lead them over to my side.
I might as well have been smoking a cigarette and casually leaning against a brick wall. Probably wearing a cool leather jacket and ripped jeans, too.
“You want the good stuff?” I’d say in a gravelly voice. “It’s all about lyrical. Have you heard about lyrical? Oh man, you’ve gotta try lyrical.”
Our daughter’s danced for three full years now, and many of her friends dance with her at the same school in town.
Until now, they’ve always been in ballet classes: Creative Movement when they were three, Pre-Ballet when they were four, and Primary Ballet this past year when they were five.
But now that they’re six, they can stick with ballet or wander down the rabbit hole to try OTHER types of dance. Jazz, tap, lyrical, hip-hop! Choices, choices, choices!
I knew all about lyrical because I had a bit of an obsession with watching Dance Moms — a reality show about the Philadelphia dance school that brought stardom to Maddie Ziegler. Our daughter had also watched it with me sometimes, and she loved the idea of getting to try a different style and “dance like Maddie.”
Her best friend had been toying with the idea of taking tap, but then I texted her mom a YouTube video showing the Top 10 Lyrical routines from Dance Moms. They watched the video together, and BOOM! She wanted to do lyrical, too. They signed up.
It *is* a pretty convincing video, I thought. It’s a beautiful style of dance — sort of a combination of ballet and jazz, with the most amazing leaps and turns. I bet other people would be interested, too. Hmmm.
(At this point in the story, I think I became the dealer who gets a little too confident and starts hawking their merchandise. “Psssst! You want some lyrical? It’s real graceful! You’re gonna like it. I promise. Hair-bows and flowy skirts for days!”)
By lunchtime, I’d texted the same video to five different friends with similarly-aged daughters, and four of them immediately switched from ballet or jazz to lyrical. Our daughter was already psyched to take lyrical, and now she has four of her very best friends in the same class with her so she’s ecstatic.
We’re all pretty excited for the first lyrical class, even though it’s almost three months away. I hope everyone loves it, since I’m the one who “sold” lyrical to half my social circle. If not, the girls can always try something new next year.
“… Hey, have you heard about acro-jazz? It’s really good stuff. Oh man, you’ve gotta try acro-jazz …”
DIY crib bedding

My friend is expecting her third baby, and we’re all so excited for her. She wanted a rustic, woodsy feel for the nursery to go with the rest of her farmhouse, and didn’t want to reuse the old brown and green bedding from her previous two nurseries.
We ended up spending just $75 on everything we needed to recover her old crib bumpers* as well as make a brand-new crib sheet and a four-sided crib skirt.
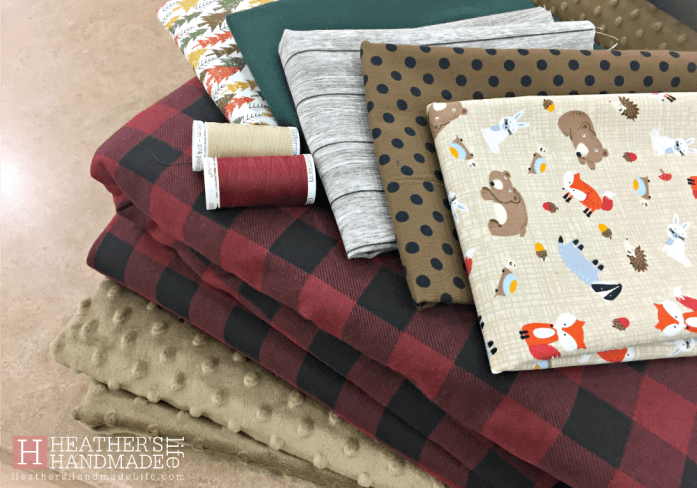
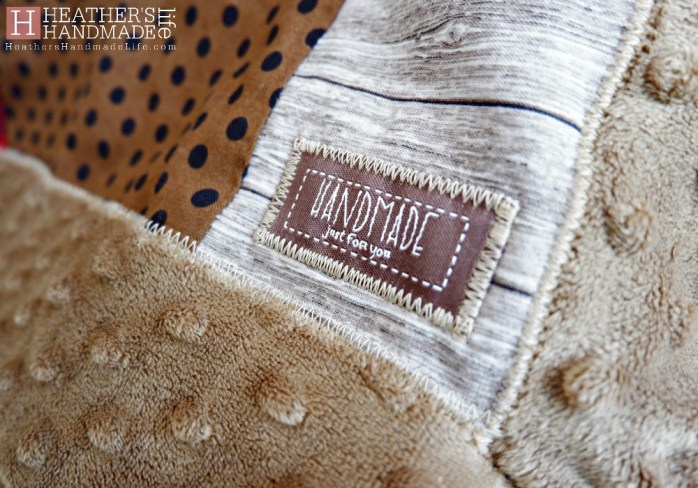
I also made her a sweet, woodland-themed quilt for her baby shower.
If you’re an expectant parent, feel free to hand these tutorials over to a friend/family member who sews and beg them to help you make custom nursery bedding. You’ll be able to get exactly what you want for a fraction of the price of baby bedding sold in stores, and think of the possibilities …

Let’s get started!

How to recover crib bumpers:
If you can’t find bumpers to match your nursery decor, it’s easy to recover old ones with fabric you love.
What you’ll need:
- 4m of prewashed fabric (cotton, flannel, etc.)
Sewing instructions:
-
- Lay each bumper over your fabric, and cut around it leaving a border of about 2” (6cm) excess fabric.
-
- Do this again, because you’ll need two pieces of fabric for every bumper (a front and a back).
-
- Take a piece of fabric and lay it wrong side up. Fold the edges over by 1” (3cm) around all four sides, so you can see the good side of the fabric.

Press or pin to keep it from unfolding. Repeat for all fabric pieces.

- Take a piece of fabric and lay it wrong side up. Fold the edges over by 1” (3cm) around all four sides, so you can see the good side of the fabric.
-
- Make a “bumper sandwich” by stacking a piece of fabric (right side down), the bumper, and another piece of fabric (right side up). Repeat for all bumpers.

- Make a “bumper sandwich” by stacking a piece of fabric (right side down), the bumper, and another piece of fabric (right side up). Repeat for all bumpers.
-
-
- Pin the top piece of fabric to the bottom piece of fabric, sandwiching the bumper inside until you can’t see it. Make sure to pull the bumper’s ties through the sandwich so they’re hanging out, otherwise they’ll be trapped inside for good. Repeat for all bumpers.

- Stitch all the way around each bumper, removing the pins as you go, until the bumper is fully encased in the new fabric with the ties hanging out. You’re done!
- Pin the top piece of fabric to the bottom piece of fabric, sandwiching the bumper inside until you can’t see it. Make sure to pull the bumper’s ties through the sandwich so they’re hanging out, otherwise they’ll be trapped inside for good. Repeat for all bumpers.

-
Now who’s ready to sew a fitted crib sheet to match those bumpers?

How to sew a fitted crib sheet:
This crib sheet should fit all standard crib mattresses, and has French seams to protect it from many trips through the washer and dryer.
What you’ll need:
- 2m of prewashed fabric (cotton, flannel, etc.)
- 62” of 1/4” elastic
Sewing instructions:
-
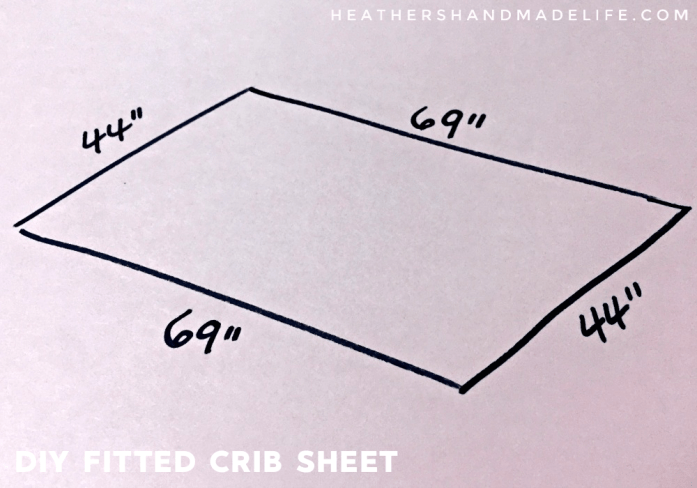
- Trim your fabric down so you have a 69” x 44” rectangle (175 x 111 cm)
- Trim your fabric down so you have a 69” x 44” rectangle (175 x 111 cm)
-
- Cut an 8” square (20cm) out of each corner

- Cut an 8” square (20cm) out of each corner
-
- Fold each cut corner over onto itself (wrong sides together, right sides out, raw edges aligned) and stitch a seam along the cut edge.
-
- Flip the sheet so the right sides are touching and the wrong sides are out — hiding your seam inside. Stitch another seam outside of that first seam. Now your raw edges are encased inside this neat double seam, and your crib sheet won’t fray or fall apart in the wash.
-
- Now that you have a nearly-finished sheet, you need to create a casing for the elastic. Fold the raw edge of the sheet (all the way around the bottom) under by 1/2” (1.5cm) and then again by 1/2” (1.5cm) and press it with a hot iron.
- Stitch as close to the second fold as possible almost all of the way around the crib sheet. Leave a small gap when you’re almost back to where you started.
- Slip a safety pin through one end of your elastic, and pull it through the casing you just made. Securely knot or stitch the ends of the elastic together (overlapping by a few inches) and stitch up the gap in the casing. You’re done!

Ready to finish it off with a DIY crib skirt?

How to sew a crib skirt:
This crib skirt has four pleated sides and is designed for when the crib is at its highest setting (for newborns). As you lower the crib mattress, tuck the excess skirt fabric underneath the crib.
What you’ll need:
- An old sheet or fabric for underneath the mattress (measuring 52 1/2” x 28” or 134cm x 71cm)
- 3m of prewashed fabric for the panels of the crib skirt
- 18-20” high x 72” wide for the long sides of the crib (cut two)
- 18-20” high x 50” wide for the short sides of the crib (cut two)
Sewing instructions:
- You should be starting with five pieces of fabric — the big “mattress piece” rectangle that won’t really be visible, two long skinnier rectangles for the long sides of the crib, and two shorter rectangles for the short sides of the crib. (If part of your crib will be up against a wall, feel free to skip the panel on that side.)


- Fold the edges of ALL FIVE pieces underneath by 1/2” (1.5cm) and then again by 1/2” (1.5cm) and stitch along the second fold to hem them. This is so your crib skirt doesn’t fray and fall apart in the wash someday.
- Spread the biggest rectangle (the mattress piece) out on the floor, right side up.
- Take one of your long panels and lay it over the big mattress piece lengthwise (right sides together) so their ends are matched up. The long panel is TOO long for the mattress piece, so you will need to fold/pleat it a few times — any way you want — until they are the same length.

- Pin the long panel to the mattress piece, right sides together, and stitch them together. Repeat for the other long panel.
- Take one of your short panels and lay it over the big mattress piece along the short end (right sides together) so their ends are matched up. The short panel is also too long for the mattress piece, so you will need to fold/pleat it a few times — any way you want — until they are the same length.

-
- Pin the short panel to the mattress piece, right sides together, and stitch them together. Repeat for the other short panel.
- Flip all four panels down so the right sides are showing, and slip the whole thing onto the flat board below the crib mattress. You’re done!
***
(*RE: BumperGate. I’ve gotten a lot of emails about crib bumpers, since this article ran in the newspaper this past weekend. I don’t “endorse” crib bumpers and didn’t use them with my own babies, BUT my friend has used them with her two previous babies and wants to use them again. That’s her choice, and any parent’s choice. I just made them look pretty for her.)


As featured on …


