
Bench makeover: Giving old furniture new life

Painting a piece of furniture remains one of my all-time favourite DIYs for a few reasons: it doesn’t take too long (unlike walls, ugh), it’s fun to pick a new colour, and it dramatically changes the piece.
It also feels indescribably good to give old furniture a new life. That was the case for my friend, Melissa, who had been handed down a wooden bench from her parents.
For less than the cost of buying a new (cheaply-made) bench at a big-box store, we totally refreshed this sturdy piece of furniture.
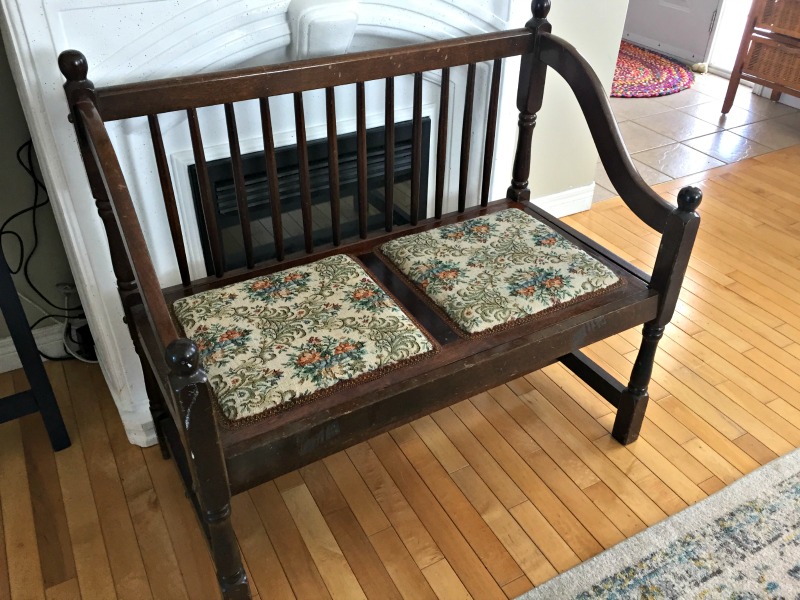
She and her husband just built a stunning farmhouse in Debert and wanted to use the bench in their mudroom, but not in its current condition. The dark wood and needle-pointed cushions must have been stylish 30-odd years ago when it was made, but it wasn’t going to work in their bright new home.
I set the bench up in our basement playroom one night —amidst a giant mess my daughter made that I ‘saved’ for her to tidy the next morning — and started on the first coat of paint.

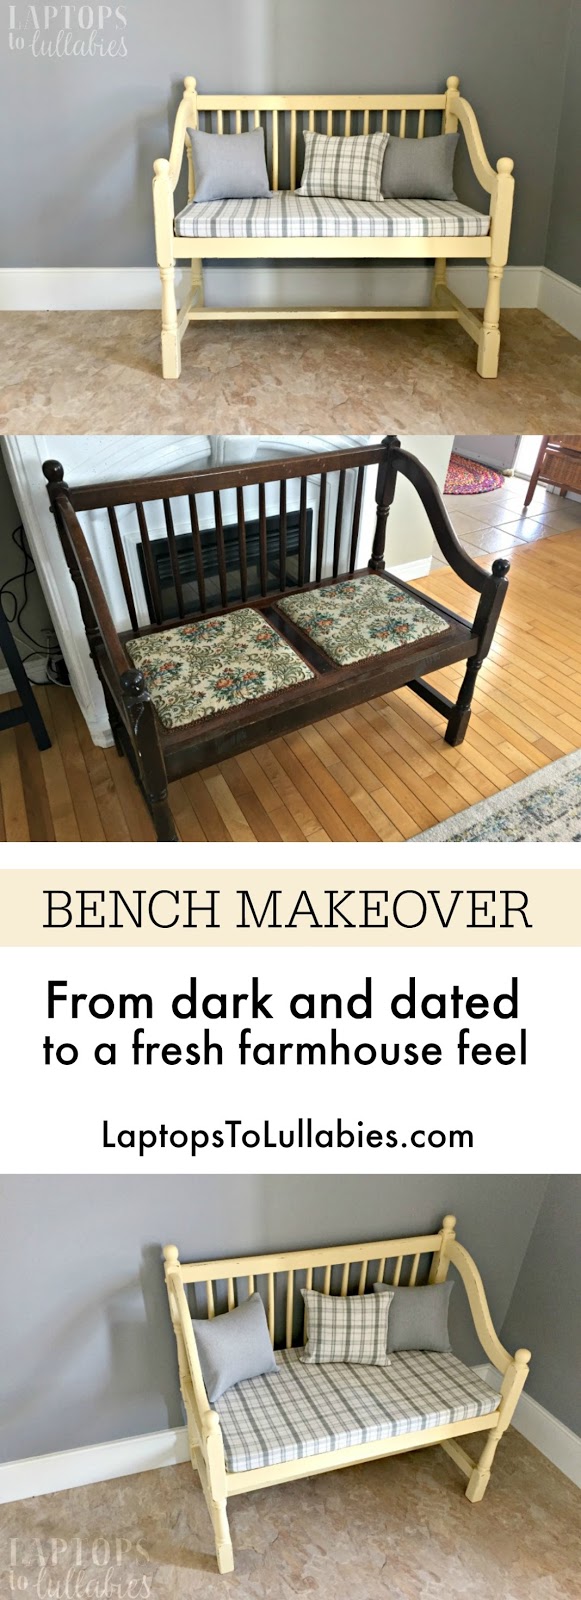
Melissa and I had decided on Fusion Mineral Paint’s Buttermilk Cream, a nice soft yellow, and I think it only took two coats to cover the wood.
There was no question that the needlepoint cushions needed to go.

But I was surprised to see that the bench seat actually popped right out and could be flipped over and fit back inside. This meant I didn’t have to deal with the built-in cushions — they just got hidden on the underside of the seat. Furniture was built properly back then!
After the last coat was dry, I took a bit of low-grit sandpaper — the really scratchy stuff — and roughed up the edges to give it the “farmhouse” look Melissa loves. The distressed areas really highlighted the bench’s curves and pretty details.
To make a new cushion, we bought two 18x18x2 squares of foam, and I only needed to trim a bit in order to make them fit together and cover the length of the bench. Then I made a removable cushion cover by laying them on a piece of right-side-up fabric, sewing a zipper along one side, and pulling the other side overtop to meet the zipper. You sew the cushion with the “good” side of the fabric facing in, and then turn it right-side-out at the end when it’s time to add the cushion.

The trick to making a tidy cushion cover is that you sew a straight line along each short end — closing up the cushion — and then sewing four small vertical lines from the top of the cushion cover to the bottom, right on the corners. This basically nips off the extra fabric at the corners and so the cover fits snugly.

The cushion fit perfectly onto the bench, and then I made a couple of quick envelope-style pillowcases for the little throw pillows we’d picked up. One of the pillows matches the bench seat, and the other two are a solid greeny-grey.

It was so much fun to bring the bench to Melissa’s new house and install it in her beautiful, bright mudroom. The yellow is cheerful against the grey walls, and the cream-and-grey plaid cushion is the perfect farmhouse touch. Plus, she gets to keep a piece that’s been in her family for a long time — and give it a brand-new life.
xo
4 Comments on “Bench makeover: Giving old furniture new life”
So what do you think?


As featured on …


Great makeover! look much more comfortable!
LikeLike
LOVE this makeover! You kill it everytime.
LikeLike
I like it. Saya dari kota jepara indonesia.. juga menjual berbagai macam produk furniture.
LikeLike
Great Job, I love to see people repurpose furniture.
LikeLike