
DIY dog crate cover

Annabelle is friendly, smart and always up for cuddles. She’s fit perfectly into our home and we’re quickly getting used to keeping everything off the floor and away from her teeth — shoes, Legos, Barbies, straight pins, socks, you name it.

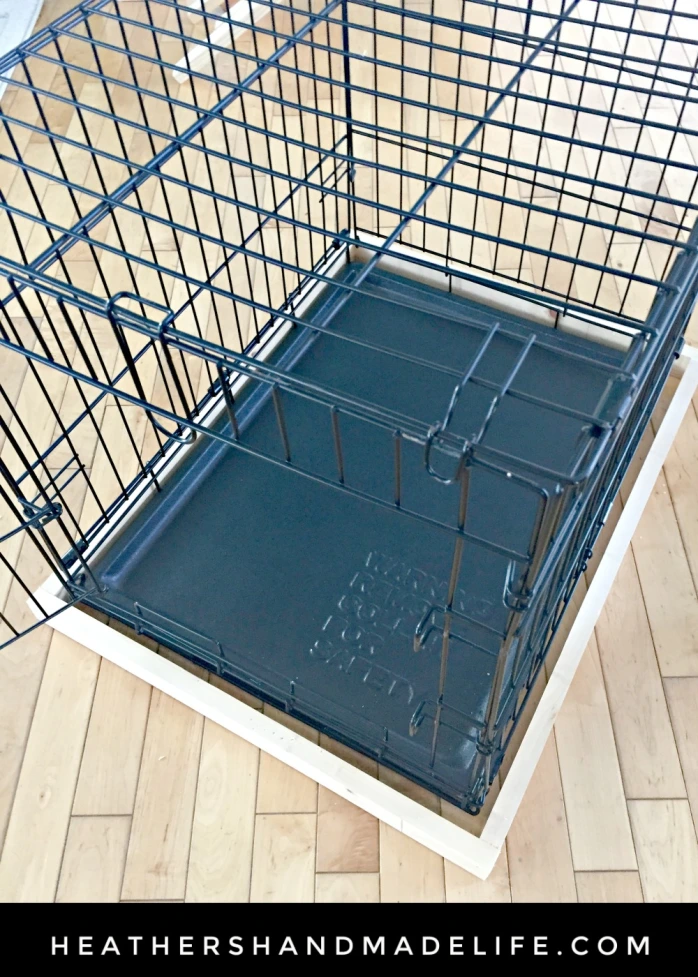
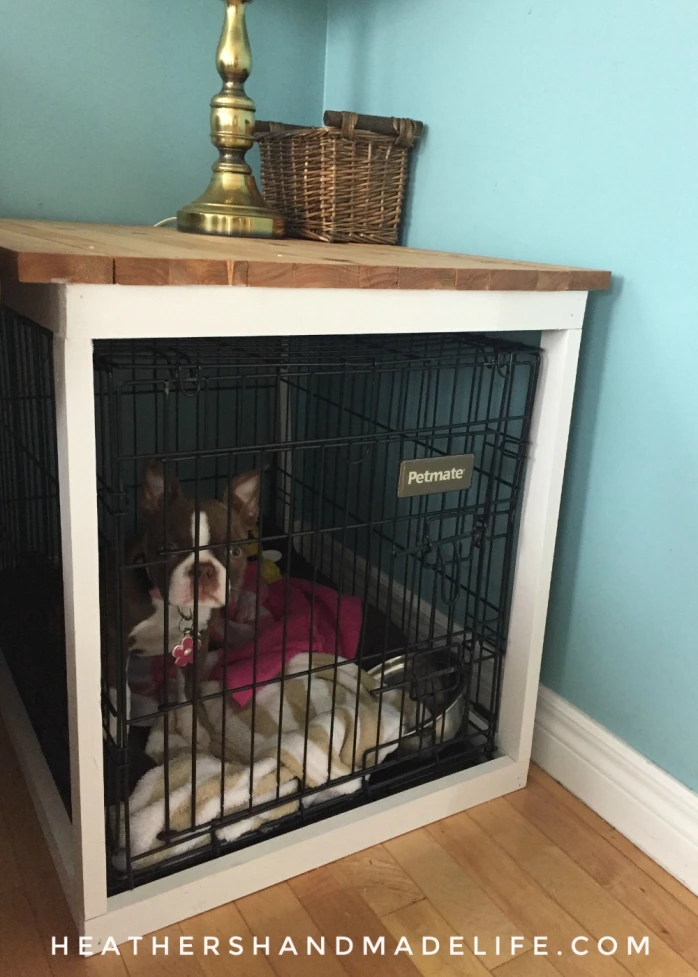
Annabelle is crate-trained, so while she sleeps in our bed at night (like a snuggly little hot water bottle), she goes into her crate whenever we leave the house. We received a great hand-me-down crate from her furry cousin, Tyson, and at first we stuck it in various corners of the living room or the kitchen — covered with a hot pink sheet to make it cozy. Ugly, but cozy.
I toyed with the idea of sewing a nice neutral slipcover for the crate to make it blend in with the main level decor. (Hot pink was not cutting it.) But that wouldn’t do anything about the fact that the crate was also taking up a good chunk of floor space. We had to rearrange the furniture and everything felt crowded.
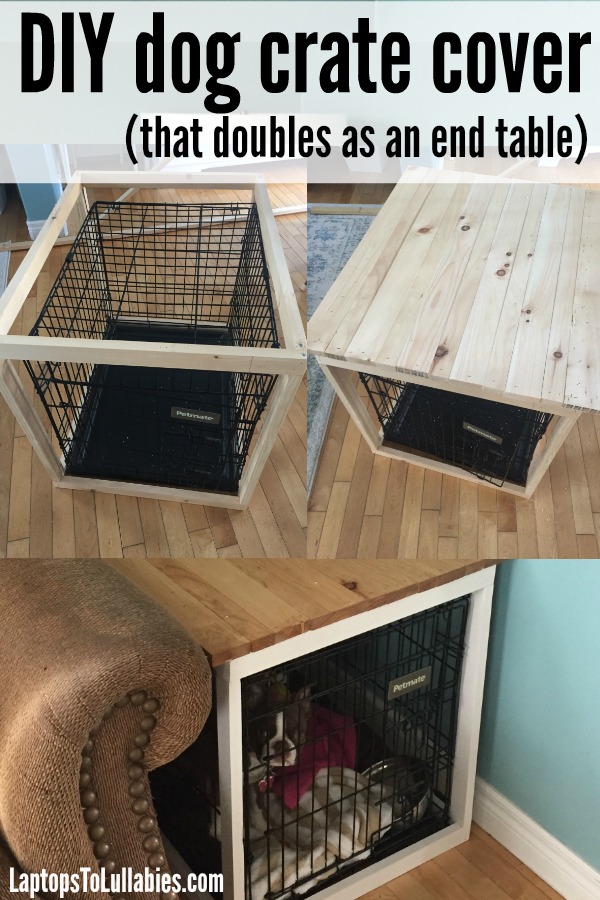
So I decided to DIY two birds with one stone! I would build a removable wooden cover for the crate so it could take the place of an end table.
//pagead2.googlesyndication.com/pagead/js/adsbygoogle.js
(adsbygoogle = window.adsbygoogle || []).push({});
Now, of course, I did this entire project without measuring — that’s just how I roll. It was really easy, though.
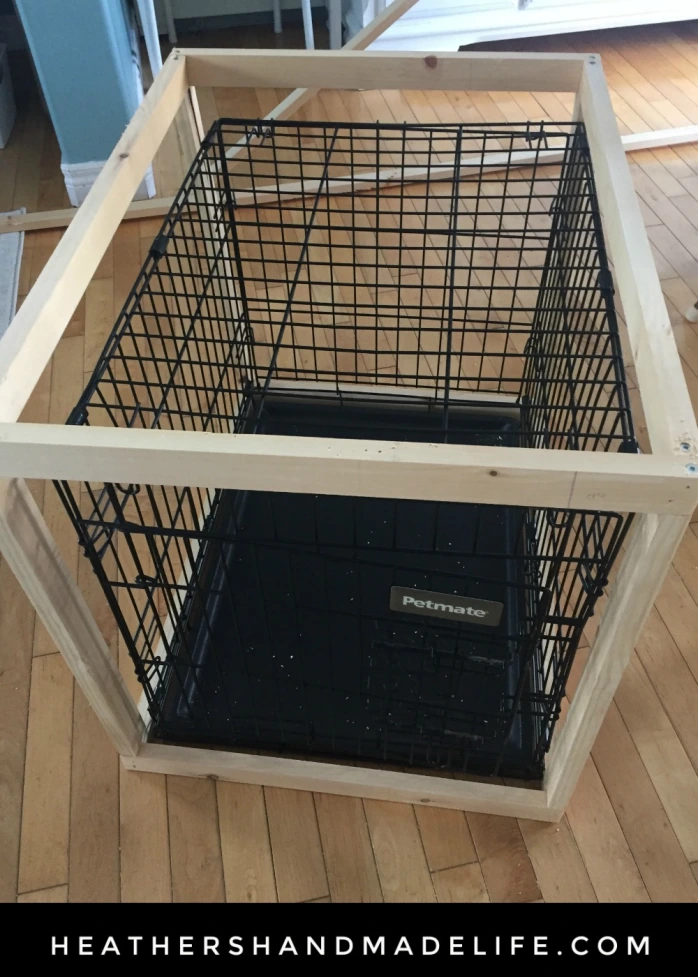
I started with a stack of 1x2s (my go-to boards because they’re light and easy to work with) and cut four pieces to make a little rectangle that fit around the bottom of the crate.
Then, holding more wood up against the rectangle, I cut four more pieces and build a second identical rectangle that would fit around the top of the crate.
Then I held another 1×2 against the crate, vertically, to see how tall the legs needed to be. I marked the height with a pencil and cut four identical pieces to use as legs and secured one in each corner — connecting the two rectangles and making a skinny wooden cube. It had an IKEA feel at this point!
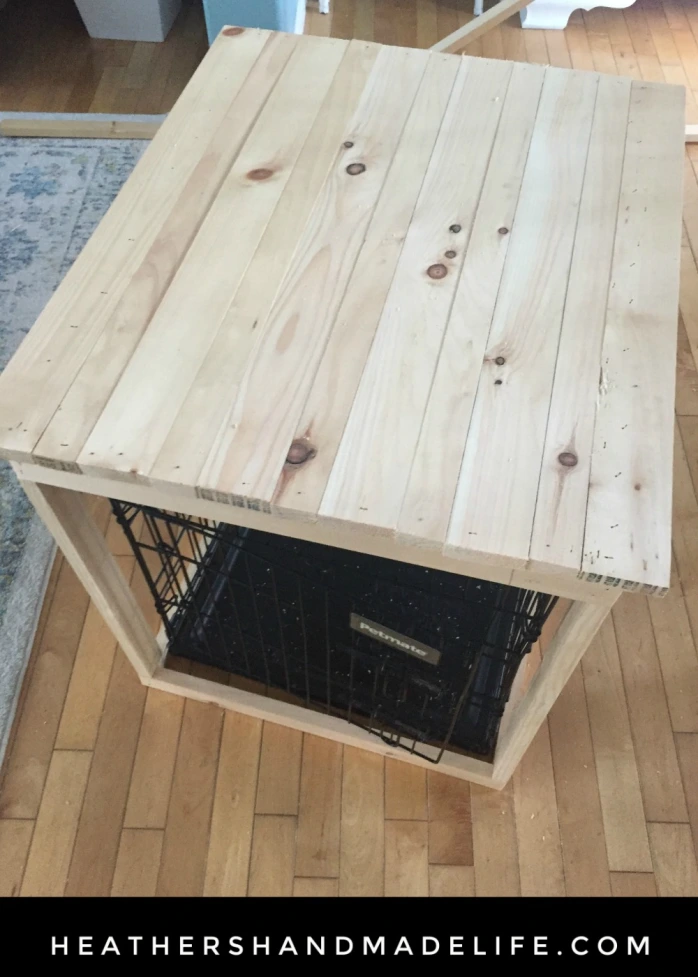
For the top of the table, I wanted to mimic the planked look of the coffee table topper I build a couple of weeks earlier (INSTRUCTIONS HERE).
I laid a 1×2 across the top of the cube and marked off how long each plank should be and kept cutting identical pieces until I ran out of 1x2s. Then I stole a couple of 1x4s from my handy husband’s wood stash and cut more pieces until I had enough to cover the entire top of the crate. Since I was using two different widths of wood, I alternated the boards to make a pattern.
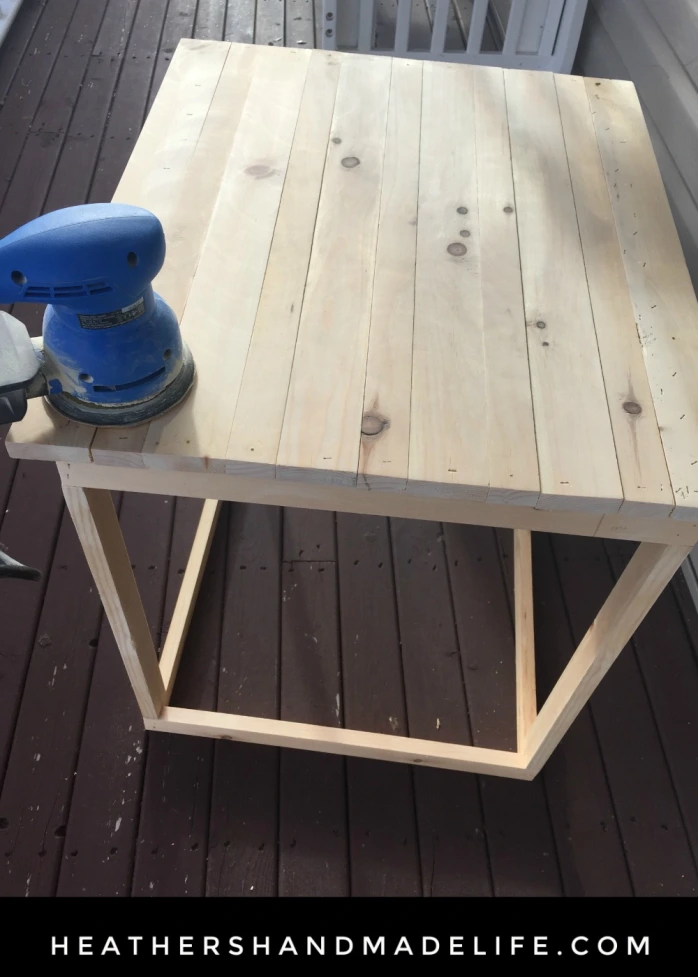
After a quick sand, I did two coats of stain on the top (Minwax’s Golden Oak) and three coats of white on the base (Fusion Mineral Paint’s Casement) while watching Dance Moms reruns. The paint was barely dry when I was excitedly lifting my new end table over the crate — a perfect fit — and sliding in between the couch and the wall.
And yes, this all happened on the same day — the building, the staining, the painting and the installation — because I’m completely impatient.
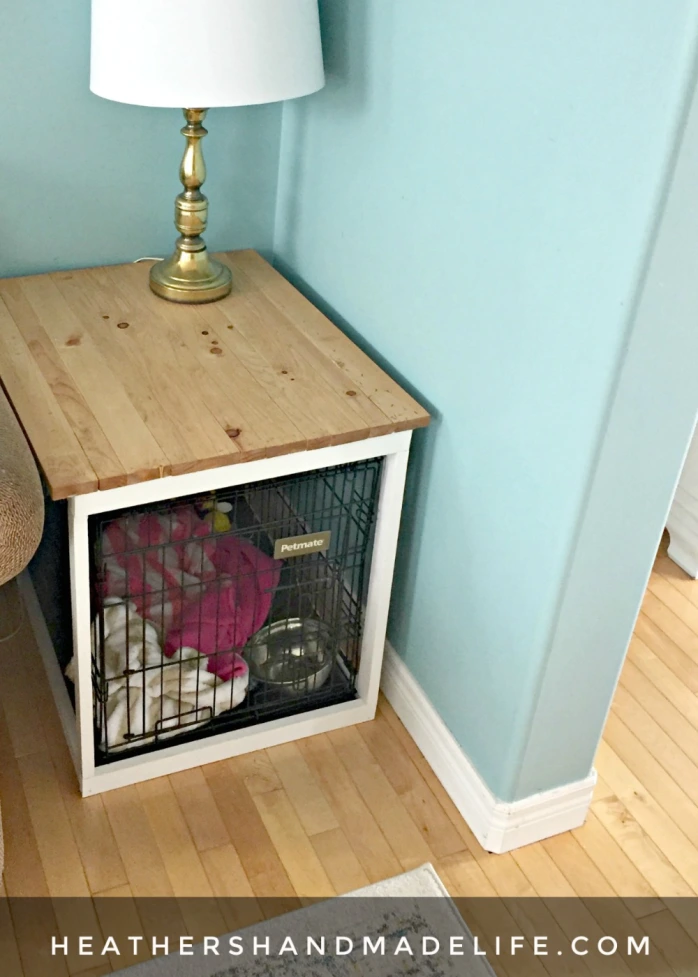
I’m so happy with this two-in-one solution. Annabelle still gets the crate she loves (and needs), but we’re not sacrificing a chunk of our main level to an ugly black metal box that crowds the rest of the furniture. The crate-cover matches our coffee table perfectly and looks so much nicer than a metal cage draped with a sheet.
Who knows? I might end up donating our other end table and building a new one to match this crate-cover. Maybe the kids would like a nice time-out crate? (#kidding).
83 Comments on “DIY dog crate cover”
Leave a reply to Linsey Cancel reply


As featured on …


This is brilliant! I'm looking for ideas to cover up our own ugly dog crate and your tutorial makes it look SO much easier than I was expecting.
LikeLike
Thanks, Diana! I'd love to see a picture if you give it a try.
LikeLike
I am ready to give this a try…silly question…but what tool did this require for drilling it all together ? did you use any wood glue ?
LikeLike
Sylvia, I actually used a brad-nailer! No wood glue for this project.
LikeLike
Why type/size brad nailer did you use?
LikeLike
Hmm, Emily that's a good question! It's my husband's and I think the nails are 1″?
LikeLike
Hi! When you made yours how much room did you leave around the crate? My Aussie pup is getting a pretty decent sized crate so we are losing an end table. I don't know how big I should make mine. He is getting a 42 inch crate!
LikeLike
Congrats on your Aussie pup! I only left about 2″ clearance all the way around the cage. It's easier to build it when you have the cage in front of you, so you don't have to measure — you just hold up the wood and mark off your cut lines.
LikeLike
Hi, this is such a nice way of decorating a crate for your dogs! My crate seems to be double the size of yours (i have 2 dogs) so what size wood would i use for every thing? also how much was this all together for everything? love it and thanks so much for this idea
LikeLike
Thanks Guillermo! It was just $20 CDN for all of the supplies, but our crate is fairly small. You could still use the same type of wood (1×2 boards) for a larger crate — just more of them. I recommend measuring your crate and then heading out for the lumber with those numbers, and an associate can help you choose how many boards you'll need.
LikeLike
Hi Heather Laura Clarke!
This is really worth sharing about your idea.
But for me, I think the space of this crate is so small. Your dog might be he is in imprisonment.
Thanks
LikeLike
A crate trained dog actually likes their crate- it’s a safe space for them like a den.
LikeLike
True E Rice. Crate training is one of the best things we do for our pets. Once they are used to, it makes their lives so much stress-free as they can easily travel, board, and in an emergency a stay at a vet.
LikeLike
Pingback: Build your own slide-out pantry – Heather's Handmade Life
Heather, what woodworking tools do you have? I really want to do this, but don’t have much! I’m willing to buy some basics, but can’t invest in a jigsaw. 🙂
LikeLike
All I used for this one is a mitre saw and a nailgun, but the nailgun isn’t even necessary — a basic drill/driver would have worked, too. I HIGHLY recommend starting with a mitre saw because you can do almost anything with them — other than cut sheets of plywood, etc.
LikeLike
I know you said that you did everything same-day, but how long did this take you from start to finish? Trying to convince my husband to help me but we’re in the process of moving.
LikeLike
Hmm, let me think. It’s been a while but I would guess it took me about 45 minutes to construct the frame? And another 30 to cut/nail the planks for the top? Not long at all.
LikeLike
Do you think l could put sides and a back on this and leave the front open? Would that leave enough ventilation?
LikeLike
I think you could absolutely close up the sides and back, Savannah!
LikeLike
How did you connect the wood for the lid?
LikeLike
Good question, Stacey! The boards across the top are actually not connected to each other — they were pin-nailed into the frame of the table, so you could pull off individual boards if you wanted to.
LikeLike
We have been looking into these to purchase and they are so expensive so we decided to go with a crate and try to figure out how to make a cover. This makes it seem a lot easier than what we expected. I think we can handle this one. Thank you for sharing. We get our puppy in February. So excited.
LikeLike
That’s wonderful, Linda! It really is easy to make, and dresses up a simple crate nicely.
LikeLike
Fantastic job! Looks great, and thank you for making something that seemed so complicated to do, look so much easier! Definitely going to do this. 😀
LikeLike
Thank you, Jacqueline! All the woodworking projects I do are easy, since I’ve only been at it a year and a half. 🙂
LikeLike
Pingback: DIY Dog Crate Cover – iSeeiDoiMake
Thank you so much for this tutorial. I’m feeling ambitious. Will attempt to build this weekend.
Does the 1×2 allow enough room for removal of the pan?
LikeLike
When we need to move the crate and its table/cover, we just lift the table off and set it aside. It fits neatly over top, but isn’t difficult to get off. Hope this helps!
LikeLike
Pingback: These Dog Hacks are Pure Genius! - Princess Pinky Girl
I am SO going to do this! My 5 mo. old Siberian Husky sleeps in her crate at night (still not convinced she’s potty trained to hold it on her own till morning) and the crate is in my bedroom, next to my bed. I have a towel over the crate – and it is pretty tacky looking. I have been trying to ‘put’ things on the top of the crate, but as predicted, the towel just isn’t going to cut it. Also, I have a cat and she has tried to walk on top of the crate with the towel and just sinks into the little holes. So, instead of investing upwards of $200 for a crate cover, or buying a pvc crate that McKinley can chew through, I am going to try this! Looks easy enough! Thanks for the instructions 🙂
LikeLike
So pleased to hear it, Lori! It really is easy to build, since you just customize it to the size of your crate. Good luck!
LikeLike
I want to try this but our crate is huge so thinking about just creating a table and putting a bed under it. What were your dimensions for this table?
LikeLike
Didn’t even measure, Frank — just held the lumber near the crate and marked off lengths with a pencil. I think this could still work with a large crate, though — could even add shelves above the table and make a tall storage unit out of it.
LikeLike
Pingback: DIY Dog Crate Cover - HouseKeeperMag.com
I want to do this for our Golden Retriever, Biscuit! I’ll show this to the two woodworking men in my house, saying that I want to do this and I’ll have lots of unwanted help. Sigh. I love yours.
LikeLike
Haha unwanted help is … sometimes good? (I love the name Biscuit!)
LikeLike
Pingback: 26 Simple DIY Pet Projects Anyone Can Do!
This is wonderful, thank you! Hoping to do this myself. Question, I don’t have a sander…. any recommendations? Would only need something basic for my needs. Thanks!
LikeLike
Good luck, Susan! This is the little sander I have, and I love it — it’s pointed at one end so you can get into tight spaces. (Affiliate link: https://fave.co/2jY1Y4q)
LikeLike
Awesome, thank you!
LikeLike
Hi Heather! Question – Mine is now put together ready to sand/stain, but I find it’s slightly wobbly, just not as stable as I would like…. Do you think cross pieces would help on the sides that don’t have doors? It’s taller than yours as my crate is for an Aussie. I think if I decide to do another one I might use 2×2’s for the frame?
LikeLike
Yes, crosspieces would be a great solution, Susan. Our crate is a very small one, so it didn’t need them, but it would be a good idea on yours if it feels wobbly. It would also be a nice decorative touch, if you did Xs or something cool in the sides?
LikeLike
Thanks, Heather! The cross pieces worked great and I put corner braces on the sides with doors. Love it!
https://scontent.fric1-1.fna.fbcdn.net/v/t1.0-9/35067610_1994450300579850_4519783240235483136_n.jpg?_nc_cat=0&oh=3452c56e1669b116b5235deb53210ba1&oe=5BBE3F0C
LikeLike
Wow! It looks amazing, Susan. Would you mind if I share the photo on my Facebook page?
LikeLike
Hi Heather! Sorry for the delay.. Sure! Feel free to post it. I’m excited as this is my first woodworking project, so thanks so much for getting me hooked, LOL!
LikeLike
Hi Heather I plan to cover my crate this weekend. I also have a larger crate 42 inches for my Siberian Husky. I would like to see how Susan modified hers to make it sturdy. I can’t find the picture on your FB and the link Susan posted no longer works.
LikeLike
Hi Miriam! I believe Susan did additional vertical and horizontal wooden braces across the sides to make it studier for a larger kennel. It looked great — almost decorative — and made it sturdier than mine for sure. Good luck with the build!
LikeLike
Love this idea. Thanks for the post! Question. Is there enough clearance at the bottom to slide the pan out for cleaning. Or, do you just lift the “table” off of the crate?
LikeLike
Excellent question! I just lift the whole table off the crate anytime I need to do something like that with the crate. Though our dog is hardly ever in her crate these days, so I don’t know if I’ve ever cleaned the pan! 😉
LikeLike
We’re getting a puppy, so expect in the beginning that we’ll be cleaning that pan quite a bit (but, hopefully not for long!), so was just curious how I’d access the pan. Thanks so much for the info!
LikeLike
Wow! This is awesome! My little pup will love to be closer to the action of things instead of shoved off to where the crate can be stowed away now and my boyfriend will love the saved space! Such a newbie question, but what kind of wood are you using?
LikeLike
Just cheap-o knotty pine boards — 1x2s — from the home improvement store. Nice and light to work with.
LikeLike
Girl, your instructions made me laugh! You and I are 2 peas in a pod… I, too, never measure anything (which my husband who is a welder fabricator by trade and has to measure within an 1/8 of an inch makes fun of me for constantly), and am completely impatient. I like one day and done jobs also. I am going to try making one of these for our cage… It’s different from the crate because it doesn’t have a top or bottom, and it’s twice the size (we have 2 100lb dogs that share it.) Thank you for your instructions. I am going to do this next week and make it double as a sofa table, or TV console… We’ll see what works best. Thanks!
LikeLike
Haha thank you for the support, Tiffany! 🙂 Would love to see how yours turns out!
LikeLike
Pingback: Hundekiste Cover heathershandmadel ... #dogdiyprojects - Haus Dekoration Ideen
I didn’t even realize how much I hated looking at my dogs crate until I saw this post! I am SO excited to make this!! Thank you so much for doing this tutorial!!
LikeLike
Haha thank YOU, Kara! It’s really easy to make!
LikeLike
We just adopted a Scottie terrier. What size crate do you have?
LikeLike
Do you know how many boards and cuts you made? I know you said 1×4 and 1×2 but how many or each did you cut and the lengths?
LikeLike
We did this project as a family. It turned out great. We used black stain for the top and legs. It’s a winner.
LikeLike
That sounds so nice, Laura! Thank you!
LikeLike
Hi, I would like to do this but in this case it needs to be strong enough to hold 50-75 lbs on the top of the table. Do you think this would be strong enough or should I use slightly bigger wood – maybe 2X2 in stead of 1×1? Thoughts? Thanks so much
LikeLike
Hi Beth! Yes, if you want the table to be strong enough to hold 50-75 lbs., I’d say 2x4s (or even 2x2s) would be a better choice. Thanks!
LikeLike
Pingback: 22 Best Diy Dog Crate Cover - Best DIY Ideas and Craft Collections
Pingback: Top 22 Dog Crate Cover Diy - Best DIY Ideas and Craft Collections
Hi Heather,
I’m making this to go over my large dog crate that houses my indoor bunny when she’s not free roaming ie. at night and if we are out to run an errand.
I’m going to try to configure a door at one end to make shelves where I can store her food pellets, brush, and treats.
I think this will be an ideal solution to integrate her cage into a piece of furniture!
Thanks for your post 🐾🐾🐾🐾🐰
LikeLike
Pingback: Handmade Wooden Dog Furniture
I am excited to try this!! I have a large area between my living room and kitchen that has a large window seat. I want to make this over both dog crates and create a breakfast table at the window seat. I think I may need to make it hang over about 6 inches on all sides for our legs to fit 🙂
LikeLike
Pingback: 16 Cute And Comfy Pet Beds For Your Furry Friends
Pingback: 4 Adorable DIY Dog Crate Plans – PAWSMAFIA
We built a modified version yesterday. Ours is pretty much a combination of your crate cover and your coffee table topper. I haven’t painted and stained it yet. We generally spend a week living with any piece of furniture we build before applying the finish. That way we can made any adjustments/additions/modifications without worrying about damaging the finish.
Thank you for the inspiration and instructions. You can see a picture of ours here. https://www.facebook.com/1322794336/posts/10224553965579613/
LikeLike
Pingback: Our Guide to a Pet Friendly Home - EPM | Equity Prime Mortgage
Pingback: 19 DIY Home Projects For Pet Owners – Mamici Magice
Pingback: 19 DIY Home Projects For Pet Owners - mind-shopping
Pingback: 15 Simple DIY Dog Crate Cover Ideas
I have a much bigger dog and a much bigger crate, so i am going to use 1×4 wood (except where i need clearance for doors) and it will be desk height, lol. This is a great design, i cant wait to get started. It can be my crafting table in my tiny appartment.
LikeLike