
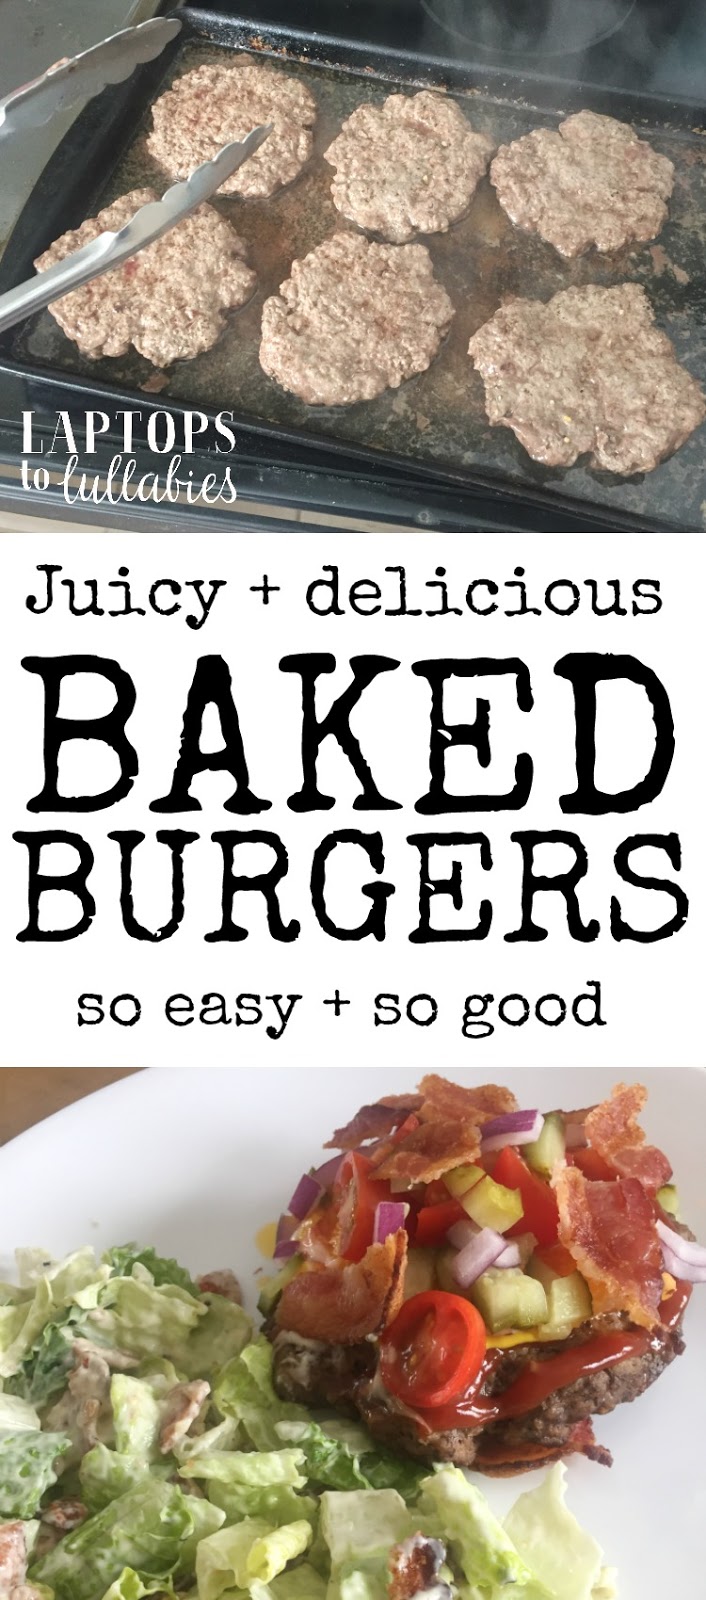
Who knew you could BAKE hamburgers?

You guys know I don’t do a lot of food posts — mainly because I’m a terrible cook but also because food isn’t that interesting to me — but I recently tried something that made me SUPER INTRIGUED and felt I had to share it.
Baked hamburgers! They’re a thing!
I’m a bit of hamburger queen. I don’t love a lot of homemade burgers because they’re never as good as restaurant burgers. Fast-food burgers are my favourite, so maybe that will change your opinion of my opinion. Maybe that’s why I like this method? Hmm.
Anyway, Darling Husband typically BBQs our hamburgers and I have nothing to do with the process, as BBQing and lawn-mowing are really the only two things for which I abandon being a staunch feminist. I don’t care to do either and would flounce my petticoats if you suggested I should.
(I am also not good about taking out the compost, touching the green bin outside, or doing anything to the grass other than sit on it.)
When I have made hamburgers for dinner, I’ve used our George Foreman and they’re fine. It’s annoying to wash that thing, though, and I tend to overcook the burgers because I get all paranoid about serving undercooked meat.
 |
| I made square patties (like Wendy’s!) so they’d fit nicely on the rectangular cookie sheets |
I do, however, bake meatballs in the oven. So last week I decided to Google “baked hamburgers” to see if it was a thing, and it was! Apparently baked hamburgers are actually juicier because the heat is distributed more evenly.

So if you want to bake hamburgers, here’s what to do:
- Preheat the oven to 400F
- Take out two baking sheets (I grabbed two that can fit in the oven at the time, side by side)
- Cover your pans with foil and spritz them with cooking spray (I didn’t use tinfoil this time, but I will next time to make clean-up easier)
- Stick the pans into the oven to heat up! (This helps sear the meat and locks in the juices.)
- Wash your hands and make your burger patties (this tutorial suggests making the patties about 1/2″ thick, and says thin patties are less likely to dry out)
- Carefully take the hot pans out of the oven, spread the burger patties on the pans, and stick the pans back in the oven
- Bake the patties for about 10 minutes, then flip and bake for another 5-10 minutes until their internal temperature is at least 160 degrees
- Add to buns with toppings and enjoy!
 |
| I like mine without the bun but with lots of bacon and cheese, mmmm |
Nothing to wear? Make something.
 |
| Don’t mind the selfie stick. It’s just easier if I take a picture myself rather than whining that my husband is taking shots where I’m all chin. |

xo
 |
| More Laundry Day Tees! |
I hate buying presents for birthday parties

When we got four invitations within two days, I knew it was coming. I could feel its sticky icing-fingered clutches: birthday party season.
Parties are a great way to entertain — and wear out — your kids on the weekend, and sometimes there’s a handful of cheesies in it for the parents. But first there’s the business of buying a present for the birthday boy or girl … and it’s awful.
I used to enjoy shopping for a lot of kids’ birthday parties because we had an awesome, independent toy store just minutes from our house. We knew the owner and his staff, they carried high-quality toys, games and art supplies, and we happily dropped a lot of money there because it was locally owned.
After it closed, gift shopping for birthday parties became a chore. This past weekend, I put on my big-girl panties and admitted defeat: we had to go to the big-box store — and on a busy Saturday, no less.
Two children, two adults and four different birthday parties to shop for. It shouldn’t have taken us close to an hour, but that’s what happens when you have four people looking in four different toy aisles at all times.
It didn’t help that every single gift someone suggested was wrong, in one way or another.
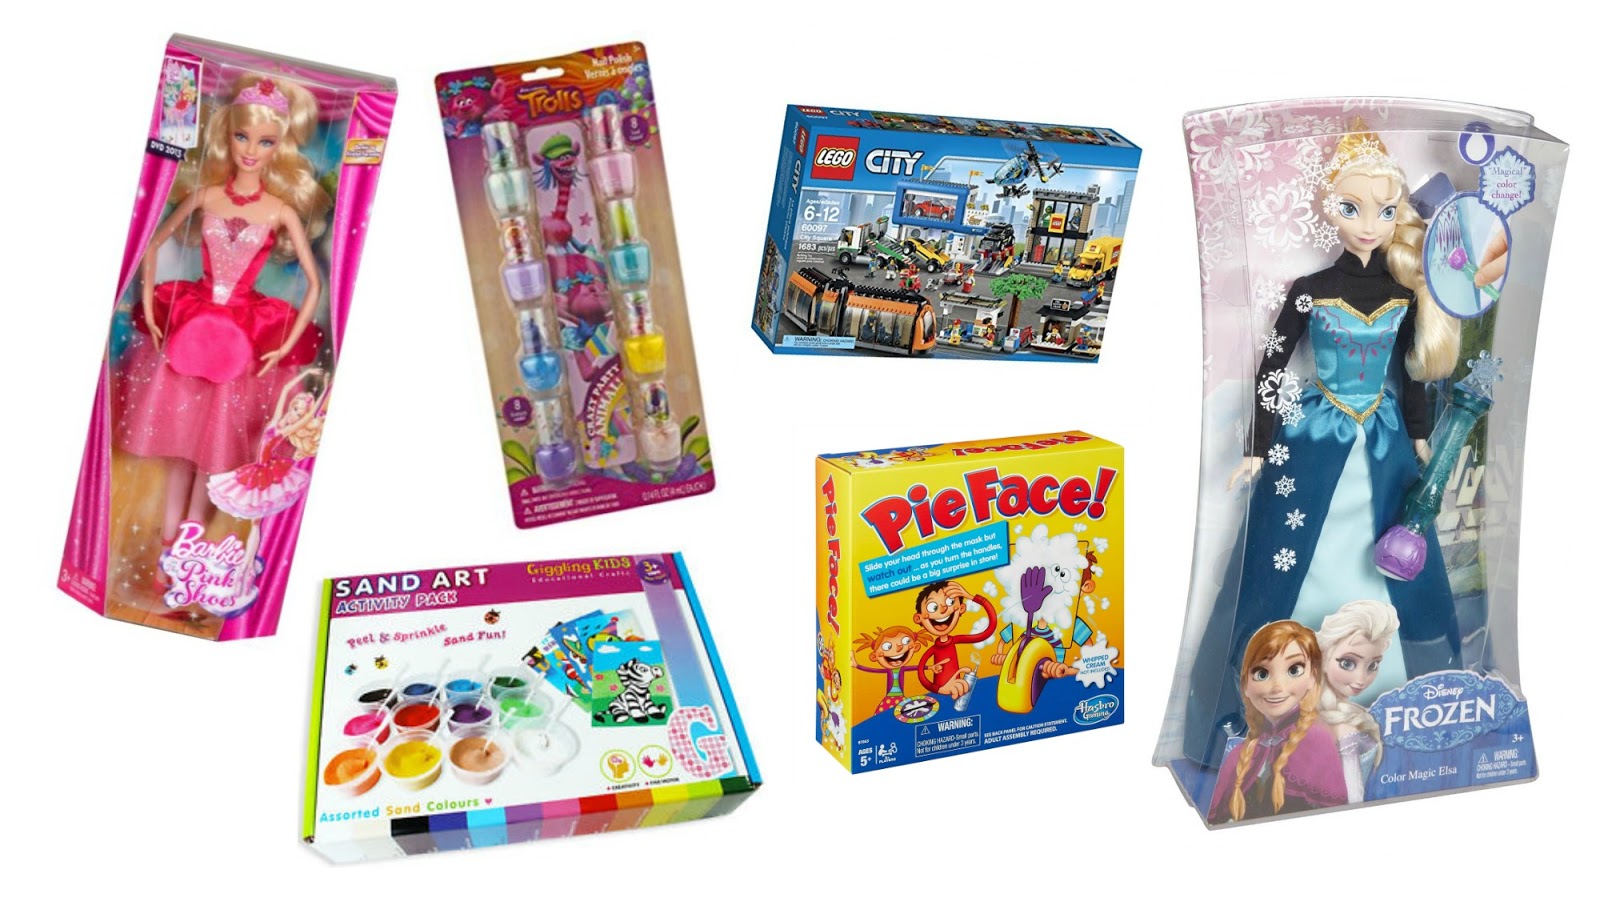
“No way! That Lego set is $60 … Well, then ask for it for your birthday.”
“I can’t believe this costs $30. It looks like it’s from the Dollar Store.”
“How do you know she even likes that show?”
“No, two blind bags are not a present!” (“No, neither are Mash’ems!”)
“That toy is for babies, not big kids … No, they really don’t want a toddler toy. Trust me.”
“I know he likes Pokemon Go! Why can’t we find a #$%& Pokemon Go thing in this #$%& store?!” (That one was me.)
“No, I’m sure he’s far too young to have seen Star Wars, let alone want an action figure of whoever that is.”
“We’re not getting them a zombie toy! What if it scares them?!”
There were three main issues that kept preventing me from pulling the purchasing trigger: if a toy was the right price (not too cheap, not too expensive), if it was something we knew they liked or were interested in, and if it was a present their parents wouldn’t hate (a.k.a. not an annoying/offensive item or another piece of junk taking up space).
I just kept looking at everything and feeling discouraged. I don’t know if it’s the fact that I’ve been shopping for — and attending — kids’ birthday parties for nearly seven years now, but I feel like everyone just has so much stuff. So many toys! So many games! So many books! It’s overwhelming …
It also feels like so many categories are too difficult to even bother with these days. Who knows what movies the kid already has, or even which ones they’re allowed to see? Most kids have stacks of books at home, so what are the odds of picking out a few they don’t have but will actually read and enjoy? If your family owns a Pieface board game, does that mean most families probably have it by now?
(It’s almost enough to make me wish we registered for kids’ birthday gifts. Not because I think they should demand outlandish presents, but because I’d much rather spend $20 on a specific toy they really want, rather than flush $20 on a toy they’re never going to use.)
Sometimes you’ll nail it and find exactly the right gift — something that’s in the perfect price range, exactly what the child really likes, and appreciated by their parents because it keeps them quiet and happy. It’s awesome when that happens and you can usually spot the one or two “nailed-it” gifts at any kid’s birthday party.
But most of the time, it just feels like settling.
Getting the toy that’s $35 marked down to $18 because it feels like you’re giving a more expensive present, even if you’re not sure the kid is going to like it. Guessing at their interests. Digging in your closet’s secret gift stash and then half-heartedly wrapping up something that hopefully looks like it didn’t come out of your closet 30 minutes before the party.
I know it doesn’t have to be that way, but even the gift alternatives aren’t always an easy choice.
I think sometimes about giving movie money or a gift certificate for a store, but my kids would think it’s a “boring” thing to give to their friend. It lacks the excitement of opening a shiny new toy.
Candy and gum are always a big hit with kids, but annoying for the parents because they likely have to take it and be responsible for doling it out.
I’ve only given cash when I knew the birthday boy or girl was specifically saving up for something. It seems tacky, but … everybody likes cash!
I love the idea of having guests donate $5 or $10 to a specific charity instead of bringing a gift, but would my kids be cool with that? Not likely. They are almost-five and almost-seven and they love getting presents. So do their friends.
I haven’t figured out a good alternative yet, and so … I settle.

I buy the “good toys” when they go on sale and stick them in my closet. I buy the cheap-looking-but-still-$20 action figure that my kids insist is a good gift. I buy the two-for-one bracelet-making kits that their parents will curse — I’m sorry! — because it seems better than any of the other stuff I look at.
All the while, I’m counting down to tween-hood when it’s going to be perfectly acceptable to gift a card with some cash . . . and maybe candy, too!
I hate buying birthday presents for my kids to take to parties, and here’s why …
When we got four invitations within two days, I knew it was coming. I could feel its sticky icing-fingered clutches: birthday party season.
Parties are a great way to entertain — and wear out — your kids on the weekend, and sometimes there’s a handful of cheesies in it for the parents. But first there’s the business of buying a present for the birthday boy or girl … and it’s awful.
I used to enjoy shopping for a lot of kids’ birthday parties because we had an awesome, independent toy store just minutes from our house. We knew the owner and his staff, they carried high-quality toys, games and art supplies, and we happily dropped a lot of money there because it was locally owned.
After it closed, gift shopping for birthday parties became a chore. This past weekend, I put on my big-girl panties and admitted defeat: we had to go to the big-box store — and on a busy Saturday, no less.
Two children, two adults and four different birthday parties to shop for. It shouldn’t have taken us close to an hour, but that’s what happens when you have four people looking in four different toy aisles at all times.
It didn’t help that every single gift someone suggested was wrong, in one way or another.
“No way! That Lego set is $60 … Well, then ask for it for your birthday.”
“I can’t believe this costs $30. It looks like it’s from the Dollar Store.”
“How do you know she even likes that show?”
“No, two blind bags are not a present!” (“No, neither are Mash’ems!”)
“That toy is for babies, not big kids … No, they really don’t want a toddler toy. Trust me.”
“I know he likes Pokemon Go! Why can’t we find a #$%& Pokemon Go thing in this #$%& store?!” (That one was me.)
“No, I’m sure he’s far too young to have seen Star Wars, let alone want an action figure of whoever that is.”
“We’re not getting them a zombie toy! What if it scares them?!”
There were three main issues that kept preventing me from pulling the purchasing trigger: if a toy was the right price (not too cheap, not too expensive), if it was something we knew they liked or were interested in, and if it was a present their parents wouldn’t hate (a.k.a. not an annoying/offensive item or another piece of junk taking up space).
I just kept looking at everything and feeling discouraged. I don’t know if it’s the fact that I’ve been shopping for — and attending — kids’ birthday parties for nearly seven years now, but I feel like everyone just has so much stuff. So many toys! So many games! So many books! It’s overwhelming …

You might also like …
 |
| Tips for throwing your child’s first birthday party |
 |
| Loot bags are AWFUL and here’s what I do instead |
 |
| Why we love celebrating half birthdays in our house |
 |
| How to sew reusable fabric snack bags (and use them as party loot bags!) |
 |
| Mickey Mouse birthday party on a tight budget |
 |
| Why I’m done with big birthday parties |
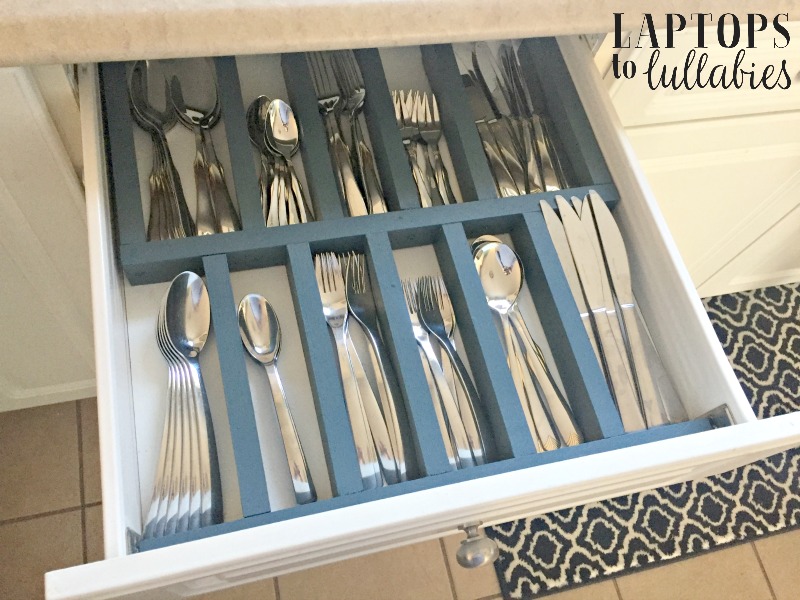
DIY cutlery divider from scrap wood
I’d tried to organize our cutlery drawer with white plastic dividers of different sizes, but it wasn’t anything special. Everything still slid around and it was hard to reach the items at the back.

(Have I lost you yet? Is it just the people who love organizing who are still reading? Hi guys.)
We also kept running out of small spoons and large forks, but the case of “fancy” cutlery was somewhere in the basement — where it made an appearance once or twice a year, on holidays.
After seeing some inspiration on Pinterest, I decided I was going to raid my scrap wood pile and make a simple divider that would fit exactly the items we wanted to keep in that drawer.
I re-homed the can-opener and the scissors elsewhere in the kitchen, and tossed the plastic spoons in the cupboard with the plastic dishes. This drawer was going to be all cutlery, all the time — and it was going to look good, dammit.
I started by taking everything out of the drawer, wiping out (most of) the crumbs, and arranging both sets of cutlery inside. I decided the steak knives weren’t going to fit after all, so they found a new home across the room. But it was going to be a beautiful new living arrangement for everybody else: the everyday stuff and the fancy set with gold detail.
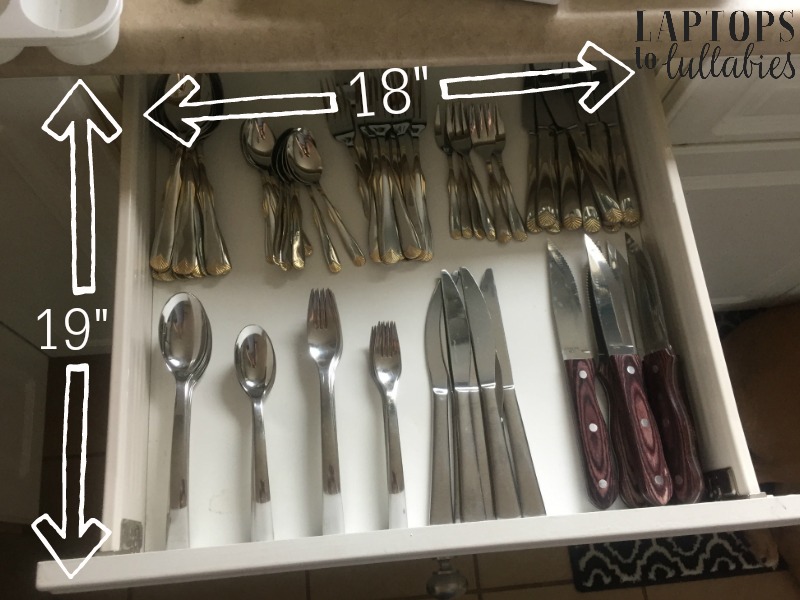
I actually got out my measuring tape and the drawer was 19 inches long and 18 inches wide, so I sketched out that I could make two rows of nine-inch dividers, with an 18-inch bar along the middle. Since the 1x2s were an inch thick — or so I thought — nine plus nine plus one (for the middle bar) would equal the 19-inch depth of the drawer.

I put on a podcast and quickly cut out all of the wood with my trusty RYOBI mitre saw: 10 chunks of 1×2 measuring nine inches, and one long piece measuring 18 inches — and then a second 18-inch piece when I realized I needed the length. You see, 1×2 boards are liars and are not actually a full inch …


Continue reading in my weekly DIY column, My Handmade Home …

Continue reading in my weekly DIY column, My Handmade Home …


As featured on …


