
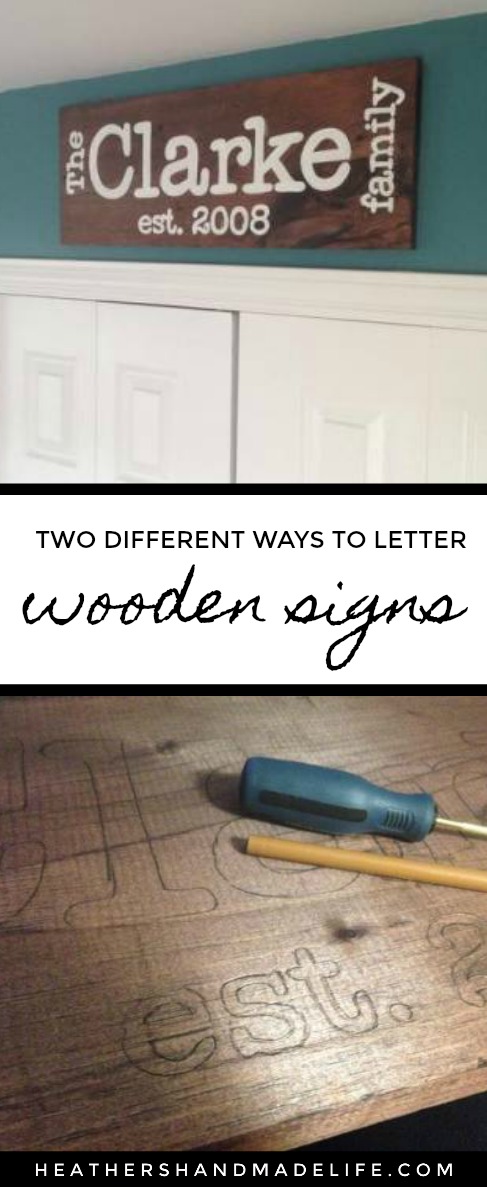
Two ways to letter a wooden sign

Want to hear a secret from a highly-effective crafter? Pursue projects you can make in front of the TV, after you’ve put the kids to bed. I’ve gotten to the point where it actually feels strange to sit on the couch without a pile of supplies spread across the coffee table.
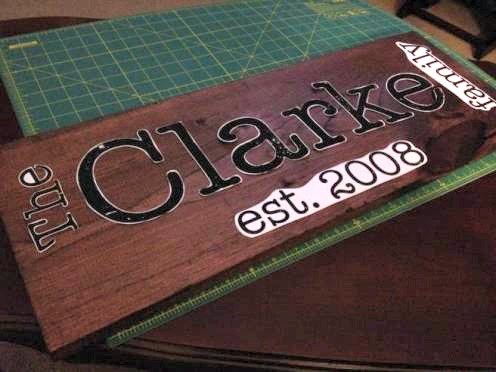
I love the look of the signs on Pinterest that display a family name and the year you were married — the year your family was “established” — so I decided to make one for our front hall.
I usually just hand-letter signs, but they always look … well … hand-lettered. Some turn out better than others. So sometimes I bite the bullet, take the extra time, and print letters to cut out and trace. I knew I wanted this sign to look more polished than thrown-together, so I headed to the computer.
I started by going to my favourite font website (DaFont.com) and found one I liked. Then I wrote out my phrases — “The Clarke family” and “est. 2008.” Is it just me, or does 2008 not feel like very long ago? We have been together since 2000, so I suppose we just should have gotten married earlier, maybe?

The trick to getting things to print at the proper sizes is to use your screen-grab tool (Snipping Tool for Windows users) and digitally snip the words to make them separate image files. For example, I separated the word “Clarke” into “Cla” and “rke,” and printed them each as a full page to make them nice and large.
Once everything was printed out, I started by cutting out “The” and “Clarke.”
Then I decided I was really, really tired of cutting out letters. Who has time for that?
So for the rest of the words, I just cut around the entire word. Then I asked my husband if he had a really pointy screwdriver (that’s a technical term) and he produced a very cool ice-pick type of thing.
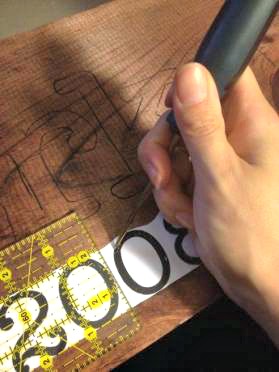
I used the ice-pick screwdriver to trace each letter, right through the paper — scraping the lines directly into the wood.

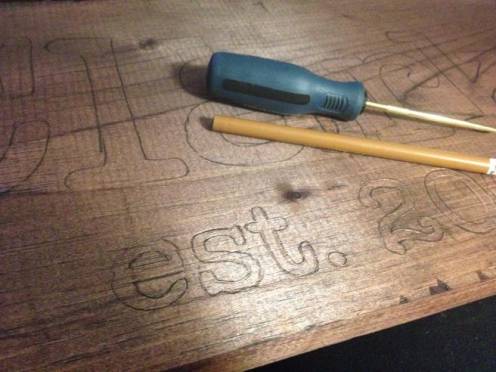
The “scraped” letters left indents in the wood, but they weren’t noticeable once they were painted. Once the shapes of the letters were scraped into the wood, I used a pencil to make the outlines more visible.
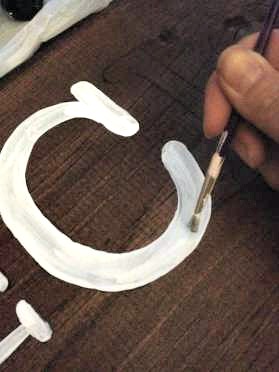
Then it was time for paint! I used leftover white latex paint and a tiny art brush to outline all of the letters and fill them in. It took three coats for good coverage, and a few of the larger letters needed some extra swipes of paint.
The whole project only took about two hours — not including drying time — and I’m happy with how it turned out. I’d actually made one of these signs years ago, but it bothered me that the freehanded letters were crooked and uneven, so it never stuck around. There’s something to be said for spending a bit more time on a project, I suppose!

Happy lettering!
Sew your own mermaid tails
 |
| Aren’t they cute? |
If you, too, refuse to spend money on plexiglass (or those strange monofin flippers that only seem to be available in the U.S.), here’s how to sew a simple mermaid tail in two ways …
*** IMPORTANT NOTE: I don’t recommend swimming in these (or any other) mermaid tails, because, hello, drowning?! Drowning is very possible when you’re squeezing your legs into a tube, and you don’t have the strong abs of a mermaid. These tails are for slithering around on the carpet, on dry land, and pretending to be mermaids. Cool?
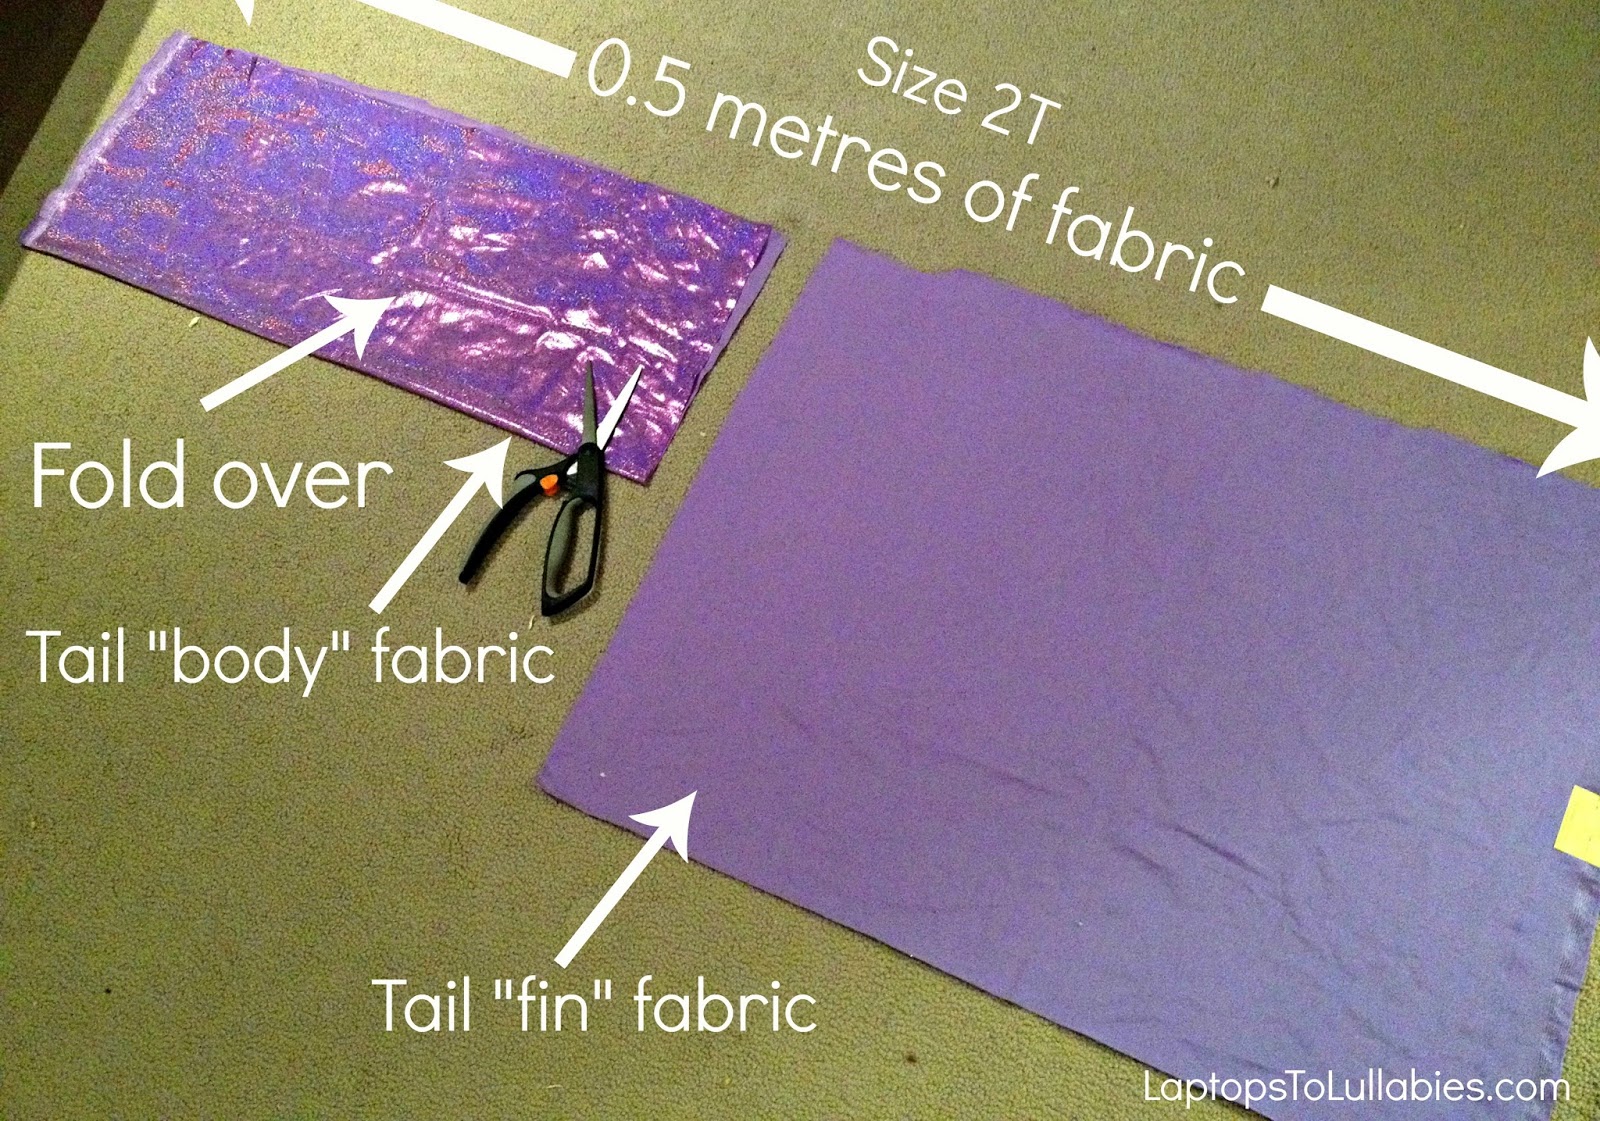 |
| I used 0.5 metres of fabric for our three-year-old (who is the size of a two-year-old) and about 1m for our five-year-old. Cut a piece to be the “body” and fold it over, so it’s about the width of your child. Save the rest for your “fin.” |
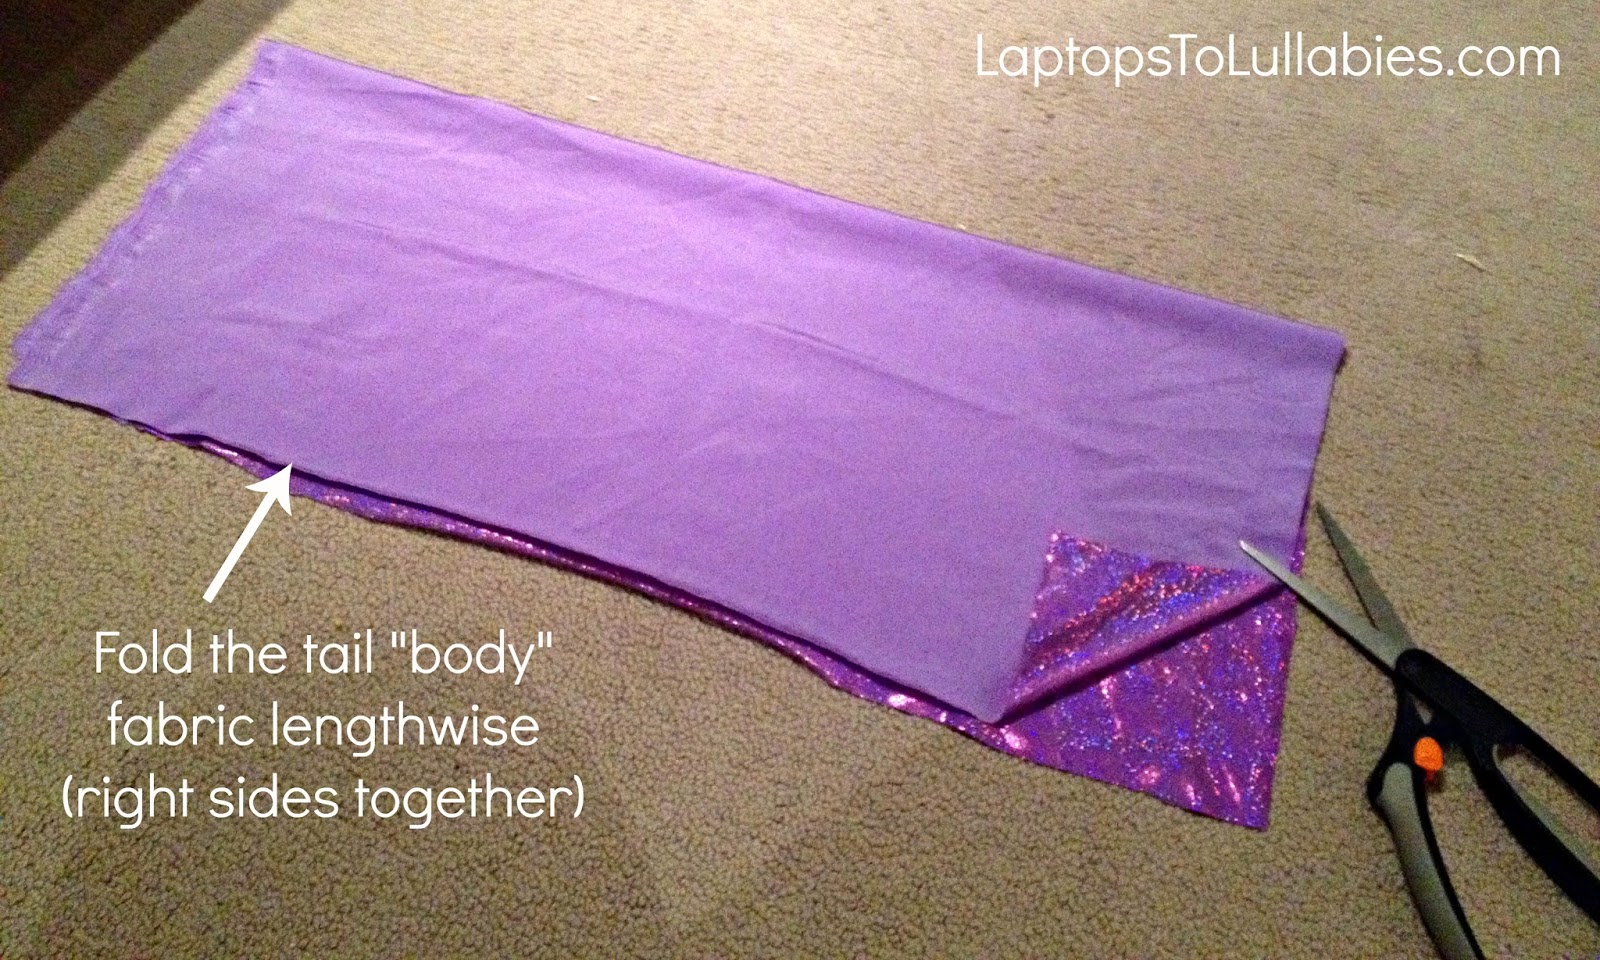 |
| Fold the tail “body” fabric lengthwise (right sides together) |
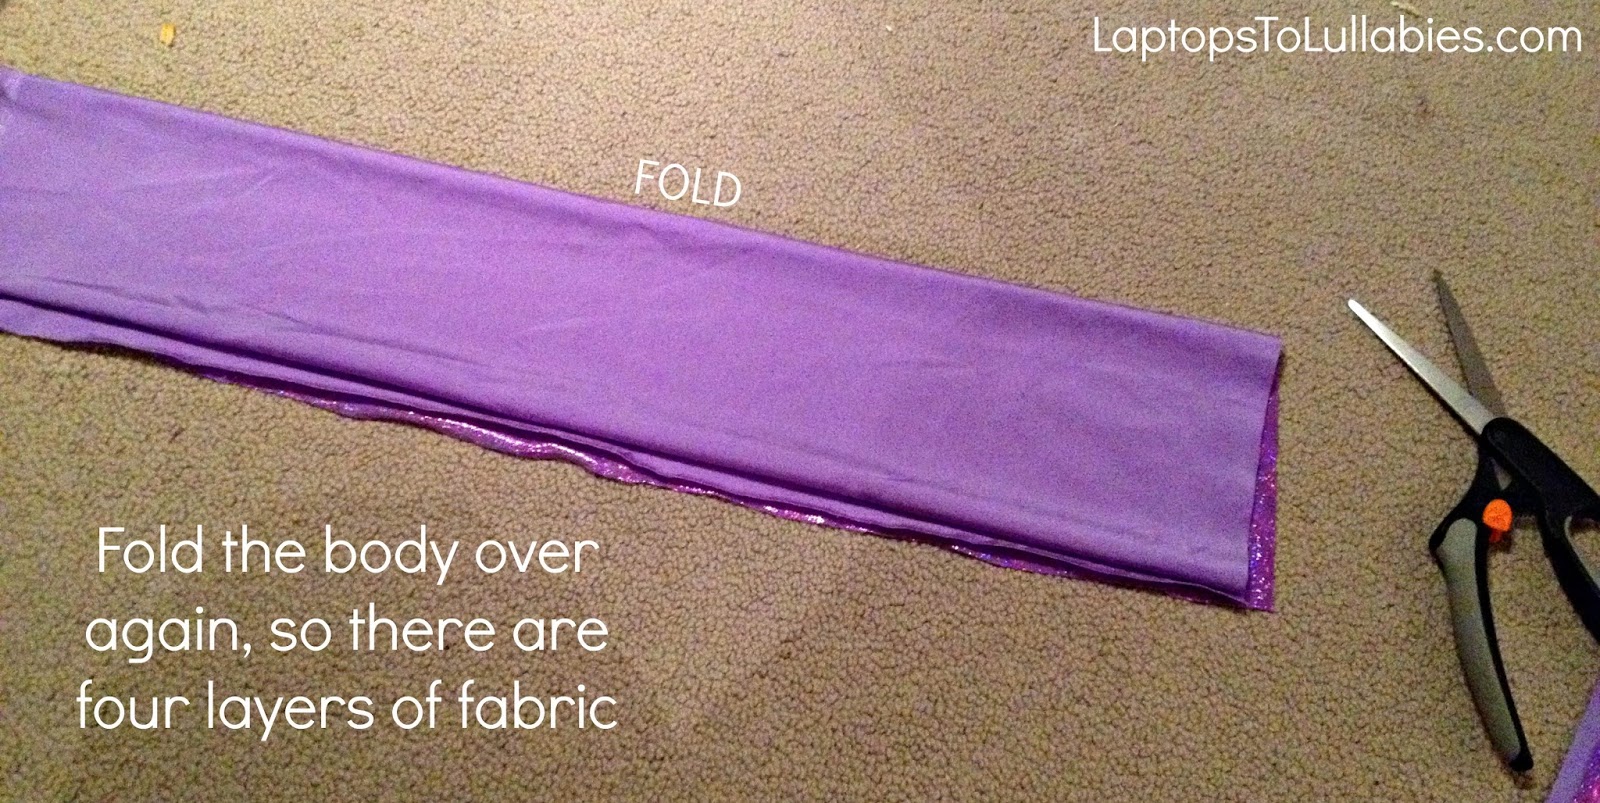 |
| Fold the fabric over again, so there are four layers (this is so you can make the body nice and curvy on both sides at once) |
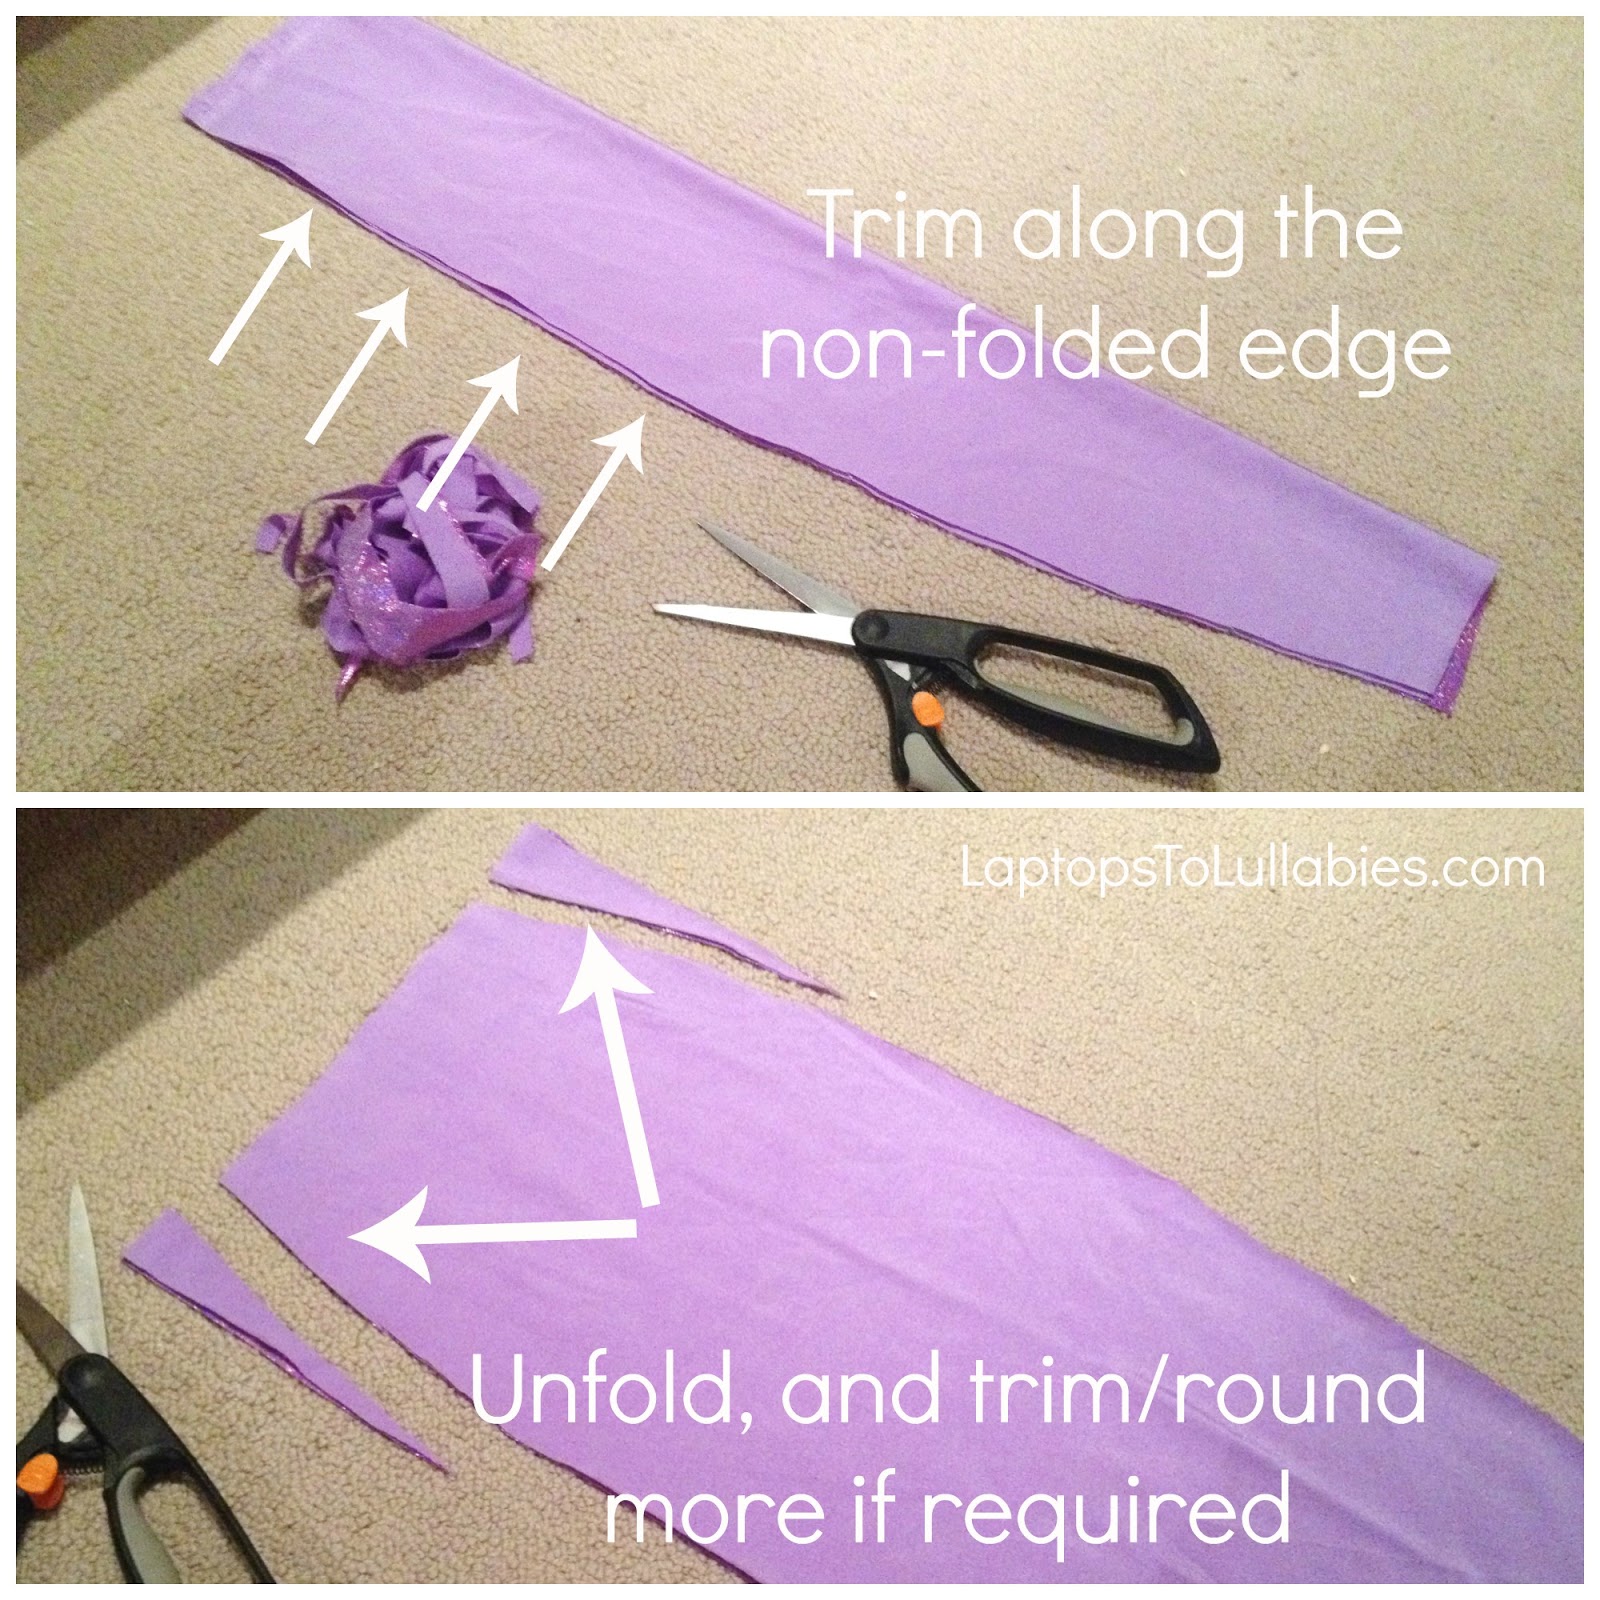 |
| Trim along the non-folded edge, tapering in as you get closer to the bottom. Then unfold it, and do any more trimming. On C’s, I decided to make the waist even smaller at this point.
Make sure the waist looks similar to the waistband of your child’s leggings/pants. You want the tail to be snug, since the fabric is stretchy. |
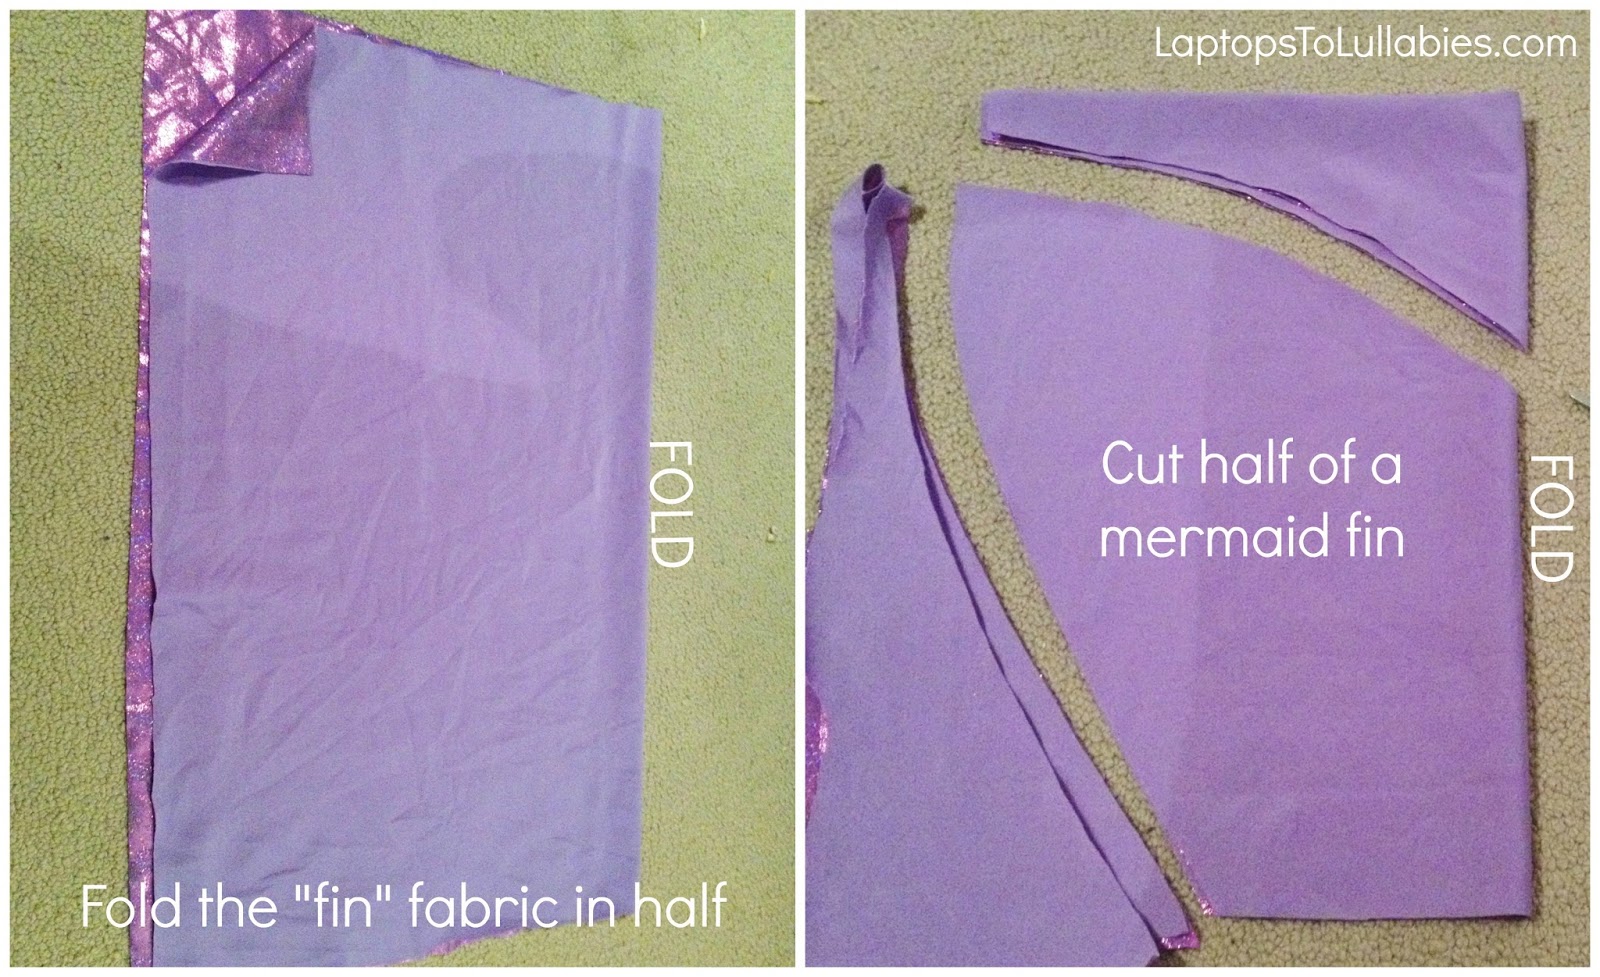 |
| Now put the body aside. Fold the “fin” fabric in half, and cut half of a mermaid fin. You know, it sort of swooshes down to a point, and then comes up in the middle? You’ve seen The Little Mermaid. You get it. |
 |
| Now you’ve got your fin and your body ready to sew. Pin and sew around the edges of the fin (leaving the top open). Pin and sew around the edges of the body (leaving the top and bottom open). |
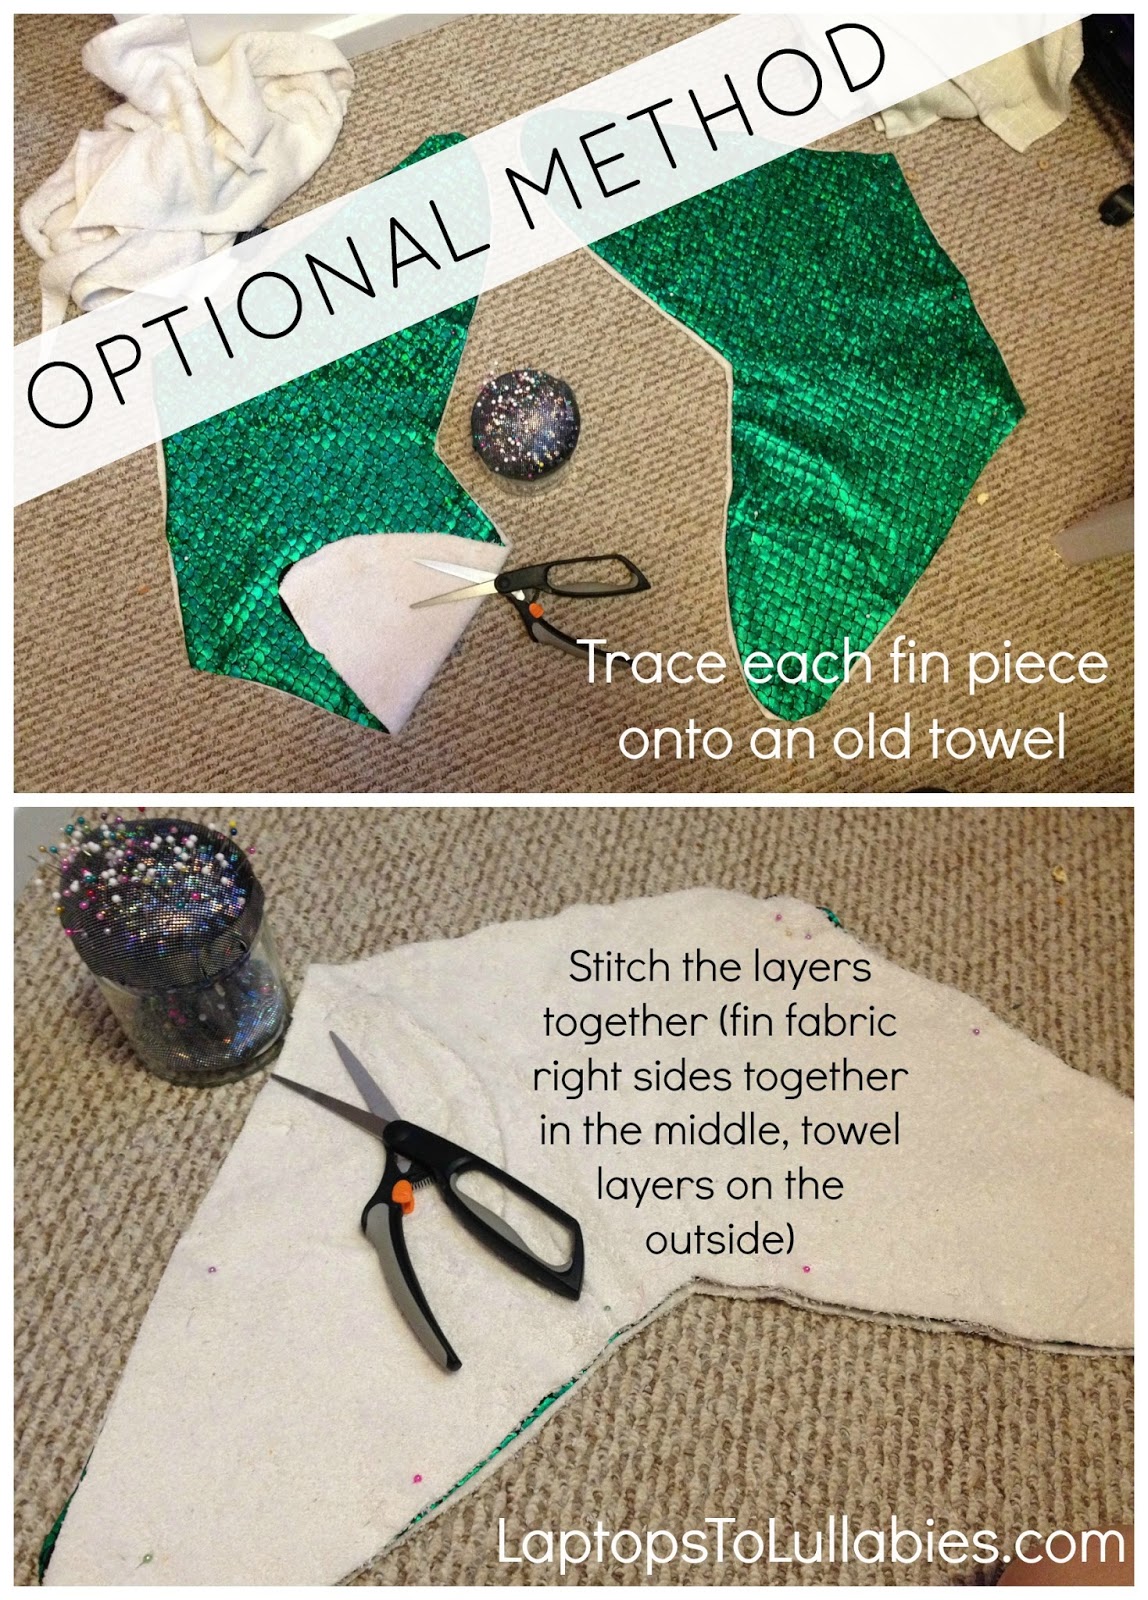 |
| If you want your fin to be sturdy (not floppy), you can line it with an old towel or some other kind of stiff, thick fabric. Trace each of your fin pieces onto the thick fabric, and sew the layers together.
(Full disclosure: the terry-cloth jammed my serger and broke a needle. And I cried in frustration trying to replace the needle and rethread the thing.) |
 |
| Turn the fin right side out, and stuff it inside the body of the tail. Pin and sew the layers together.
This part looks tricky, if you’re not used to sewing, but it’s not. I promise. You’re just sewing the fin to the body, but you’re doing it all on the “inside” so you don’t see your stitches. |
 |
| C’s fin is floppier than D’s, but it was *much* faster to sew. |
 |
| The kids LOVED their new mermaid fins so much, they wanted ones for their dolls, too. |
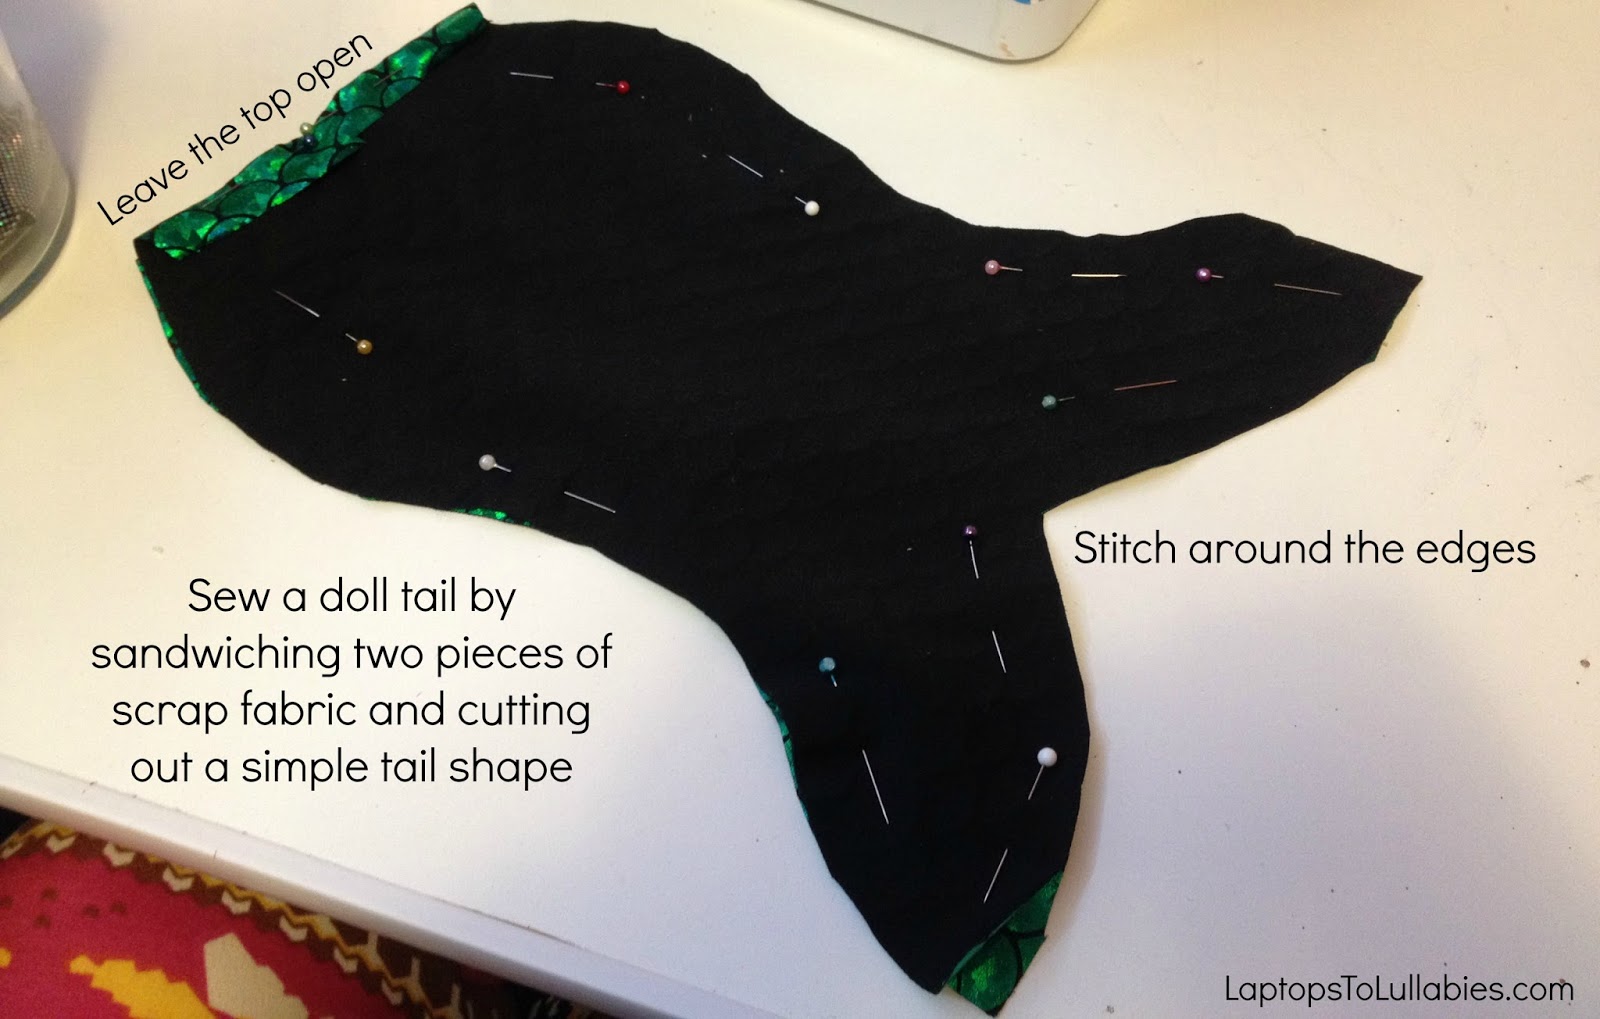 |
| I took the lazy way out for the dolls (they’re just dolls — they don’t care). I sandwiched two scrap pieces together, threw in a few pins, and cut out a rough mermaid tail shape. |
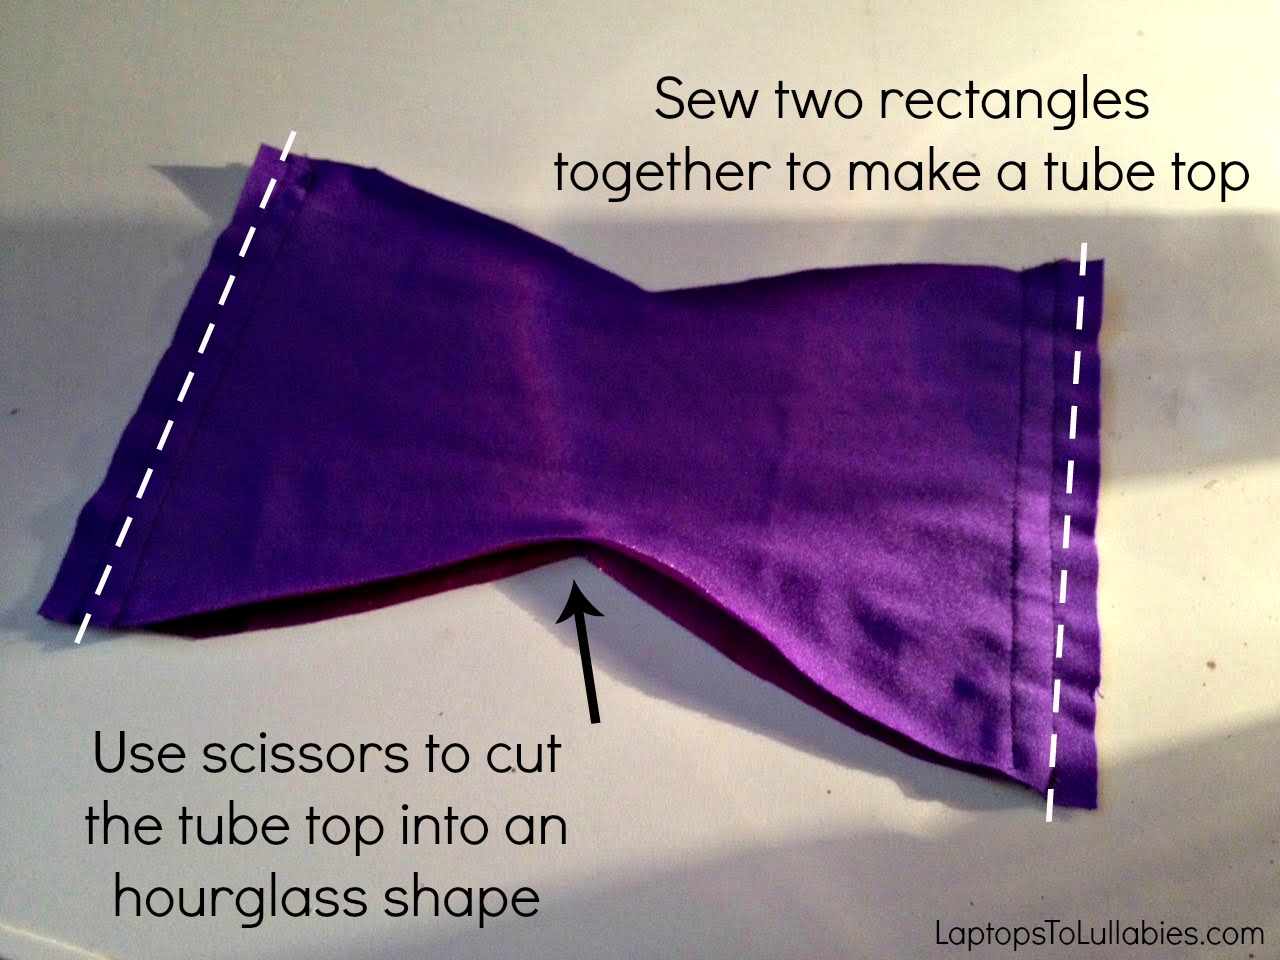 |
| C wanted a bandeau top like Ariel, so I sewed a simple tube top, and then used my scissors to cut it into an hourglass shape. No need to hem, because it’s not going to fray. (Also: hemming sucks.) |
 |
Thanks for checking out my mermaid tail tutorial! I hope it inspired you to make one, and not just, like, eat some fish or something. Although the scales on D’s tale really make it look like something in a seafood restaurant, don’t they?
Happy mermaid-ing!
xo
Build your own seesaw

Our backyard already has a playhouse, a sandbox and a slide, but I wanted to see if we could build something new for the kids to play on. Because, you know, clearly they don’t have enough stuff back there.
I quickly found a great set of seesaw plans from Ana White, author of The Handbuilt Home: 34 Simple Stylish and Budget-Friendly Woodworking Projects For Every Room. She has hundreds of sets of (free!) project plans on her website (ana-white.com) so it’s been a favourite of ours.
Normally, Michael and I are very much “creative” when it comes to plans — possibly because we aren’t good about following directions — but we stuck exactly to Ana’s instructions for this project. We didn’t want our kids catapulting through the air just because we’d “estimated” what we’d need for supplies, or guessed on the measurements.
Want to make your own backyard seesaw? Pop over to Ana’s tutorial for the list of materials.
The first step is to make your cuts …
- You don’t need to cut your two 2x4s at all — they’ll form the length of the seesaw.
- Take your two 2×6 boards, and cut each board into a 24” section, another 24” section and a 36” section — which will leave each board with a remaining piece that’s a little shorter than the recommended 12 inches (no worries about the exact length, because it’s just part of the handle).
- Take two of those 24” pieces, and cut the ends on a slant, not parallel to each other (the plan suggests 30 degrees).
- Cut two seats from your 1×8 board (we made our seats longer than the recommend 1 1/2 feet, so we could fit two kids per side).
- Cut your wooden dowel in half, so you have two handles measuring about 12” long (doesn’t have to be exact).
Now you can put away the saw and take off that protective eye-gear I know you were wearing. Lay out all of your cut pieces, and mark on them with a pencil so you know where each piece is going …
- Two 24” pieces with flat ends: uprights.
- Two 24” pieces with 30-degree slanted ends: short base supports.
- Two 36” pieces: long base supports.
- Two uncut 2×4 boards: seesaw length (the part that teeters).
- Two leftover chunks of the 2x6s: handle bases.
- Two dowel pieces: handles.
Now take out your drill, put that eye-wear back on and prepare to make a few holes …
Take your two 24” pieces with flat ends (uprights) and drill a hole near the top of each, about five inches down. The hole should be large enough to fit your 5/8” bolt. (If you’re making the seesaw for younger children, making a lower hole will keep them closer to the ground.)
Take your two 2x4s (the length of the seesaw) and drill a hole in the centre of each (again, large enough for your 5/8” bolt).
Take your two handle bases and screw a hole through each that’s large enough to fit your dowel handles.
It’s time to start assembling! Ana White’s website has really clear diagrams that will help you assemble your seesaw, so I highly recommend popping over there, but I’ll try to help you along with clunky instructions …
Build your base

- Take your two long base supports and measure 14 1/8” inch from either end, marking those spots with a pencil.
- Use wood glue and screws to secure your two uprights in between the base supports so that their outer edge is touching the pencil mark (the boards should be 4 3/4” apart).
- Glue and screw the two short base supports to the sides of the long base supports, so your seesaw will be steady on the ground.
Attach the handles
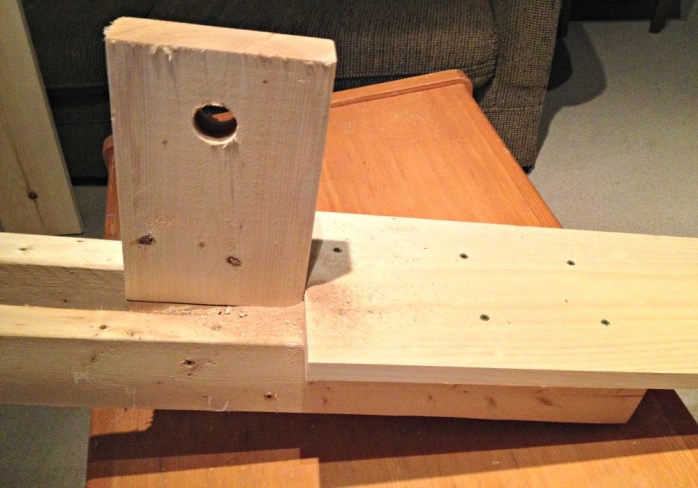
Take your handle bases (the short chunks of leftover wood), sandwich them between your 2x4s, about 12 inches from the ends and screw them in place. Slide your dowel handles through the drilled holes and secure them with glue and more screws. Now your seesaw has handles!
Sand, then stain or paint
At this point, the seesaw is completely built but not yet assembled. I spread a dropcloth over the floor and applied one coat of stain (Minwax’s “Provincial”) to the whole thing. You could also upholster the seat with foam and outdoor fabric, if you felt really ambitious.
Put it all together
Take the seesaw outside and use your long bolt to secure the “length” of the seesaw to the base — using a washer on each side of the uprights, so it has a smoother glide. If you have trouble getting the bolt in place, you can make the holes a little larger and it won’t affect the “ride.”
We were setting up our finished seesaw the same day we bought the project supplies, so this is a fun project without a lot of waiting around. It’s been a huge hit in the backyard and the extra-long seats allow a couple of kids to pile on each end.
Of course, I made the mistake of telling the kids how we used to call “Charlie Brown, let me down!” when we were stuck at the high point on the school playground. Now they think they have to yell “Charwee down! Lemme down!” every two seconds, whether they’re up or down.
And, of course, they’re asking when we plan to build them a swing set. Hmmm …
Build your own wooden seesaw with Ana White’s plans
 |
| DIY wooden seesaw (full tutorial) |
The fears behind free-range parenting
Nothing gets your heart pounding after dinner like racing for the back door, dripping sudsy dishwater all over the floor as you worry that your child might have been kidnapped.

Let me back up. For the past couple of summers, I was able to keep the kids contained on the back deck while I was bustling around the main level, washing the dinner dishes. We had wooden baby-gates across the stairs and slide, so they were essentially penned in — free to play with the sand table or blow bubbles while they waited for me.
Once I had finished clearing the counters and stuffing the leftovers into the fridge, I’d join them on the deck and open the gates. They’d be down the slide and into the grass as quickly as they could, and I’d be right there to watch them and play with them. It was a good solution that allowed them play outside for as long as possible each evening, while always being supervised in the (unfenced) backyard.
But this summer, at age three and five, they were clawing at the gates and begging to be free …
Continue reading in my weekly parenting column, The Mom Scene


As featured on …


