
Build your own seesaw

Our backyard already has a playhouse, a sandbox and a slide, but I wanted to see if we could build something new for the kids to play on. Because, you know, clearly they don’t have enough stuff back there.
I quickly found a great set of seesaw plans from Ana White, author of The Handbuilt Home: 34 Simple Stylish and Budget-Friendly Woodworking Projects For Every Room. She has hundreds of sets of (free!) project plans on her website (ana-white.com) so it’s been a favourite of ours.
Normally, Michael and I are very much “creative” when it comes to plans — possibly because we aren’t good about following directions — but we stuck exactly to Ana’s instructions for this project. We didn’t want our kids catapulting through the air just because we’d “estimated” what we’d need for supplies, or guessed on the measurements.
Want to make your own backyard seesaw? Pop over to Ana’s tutorial for the list of materials.
The first step is to make your cuts …
- You don’t need to cut your two 2x4s at all — they’ll form the length of the seesaw.
- Take your two 2×6 boards, and cut each board into a 24” section, another 24” section and a 36” section — which will leave each board with a remaining piece that’s a little shorter than the recommended 12 inches (no worries about the exact length, because it’s just part of the handle).
- Take two of those 24” pieces, and cut the ends on a slant, not parallel to each other (the plan suggests 30 degrees).
- Cut two seats from your 1×8 board (we made our seats longer than the recommend 1 1/2 feet, so we could fit two kids per side).
- Cut your wooden dowel in half, so you have two handles measuring about 12” long (doesn’t have to be exact).
Now you can put away the saw and take off that protective eye-gear I know you were wearing. Lay out all of your cut pieces, and mark on them with a pencil so you know where each piece is going …
- Two 24” pieces with flat ends: uprights.
- Two 24” pieces with 30-degree slanted ends: short base supports.
- Two 36” pieces: long base supports.
- Two uncut 2×4 boards: seesaw length (the part that teeters).
- Two leftover chunks of the 2x6s: handle bases.
- Two dowel pieces: handles.
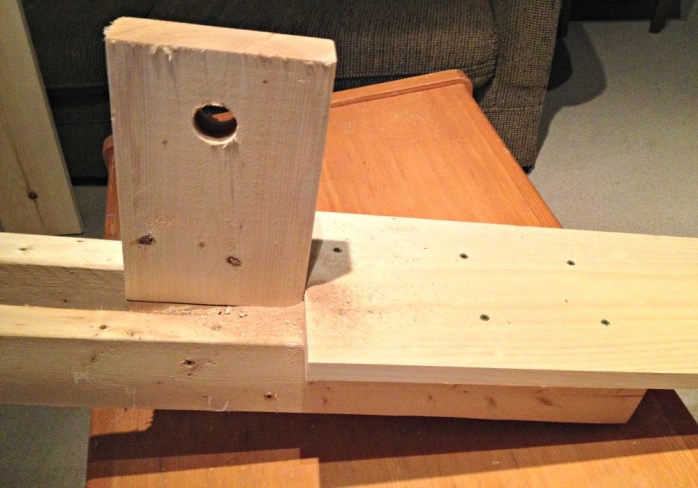
Now take out your drill, put that eye-wear back on and prepare to make a few holes …
Take your two 24” pieces with flat ends (uprights) and drill a hole near the top of each, about five inches down. The hole should be large enough to fit your 5/8” bolt. (If you’re making the seesaw for younger children, making a lower hole will keep them closer to the ground.)
Take your two 2x4s (the length of the seesaw) and drill a hole in the centre of each (again, large enough for your 5/8” bolt).
Take your two handle bases and screw a hole through each that’s large enough to fit your dowel handles.
It’s time to start assembling! Ana White’s website has really clear diagrams that will help you assemble your seesaw, so I highly recommend popping over there, but I’ll try to help you along with clunky instructions …
Build your base

- Take your two long base supports and measure 14 1/8” inch from either end, marking those spots with a pencil.
- Use wood glue and screws to secure your two uprights in between the base supports so that their outer edge is touching the pencil mark (the boards should be 4 3/4” apart).
- Glue and screw the two short base supports to the sides of the long base supports, so your seesaw will be steady on the ground.
Attach the handles
Take your handle bases (the short chunks of leftover wood), sandwich them between your 2x4s, about 12 inches from the ends and screw them in place. Slide your dowel handles through the drilled holes and secure them with glue and more screws. Now your seesaw has handles!
Sand, then stain or paint
At this point, the seesaw is completely built but not yet assembled. I spread a dropcloth over the floor and applied one coat of stain (Minwax’s “Provincial”) to the whole thing. You could also upholster the seat with foam and outdoor fabric, if you felt really ambitious.
Put it all together
Take the seesaw outside and use your long bolt to secure the “length” of the seesaw to the base — using a washer on each side of the uprights, so it has a smoother glide. If you have trouble getting the bolt in place, you can make the holes a little larger and it won’t affect the “ride.”
We were setting up our finished seesaw the same day we bought the project supplies, so this is a fun project without a lot of waiting around. It’s been a huge hit in the backyard and the extra-long seats allow a couple of kids to pile on each end.
Of course, I made the mistake of telling the kids how we used to call “Charlie Brown, let me down!” when we were stuck at the high point on the school playground. Now they think they have to yell “Charwee down! Lemme down!” every two seconds, whether they’re up or down.
And, of course, they’re asking when we plan to build them a swing set. Hmmm …
One Comment on “Build your own seesaw”
So what do you think?


As featured on …


Pingback: DIY monkey bars