
The end of naptime
We’ve had some major schedule shake-ups in our house over the past couple of weeks.
The kids spent a week at (morning-only) day camp, which was awesome because I could work uninterrupted for three full hours. But it also caused problems because Darling Husband was only off in the mornings, and it was like … why are we paying for camp if you’re here to be with the kids, and why are we putting them down for “naps” during the 1-2 hours a day they would actually see you? *crickets*
So we decided that as long as he’s on this schedule (working from mid-afternoon until about midnight or 1 a.m.) it made sense to have me work a couple of days a week from 9 a.m. until he had to leave for work, and then I’d stop working mid-afternoon to be with the kids. It would also free me up to have a day or two mostly “off” each week during the summer.
This mean scrapping “naptime” (ha — yeah, like they were REALLY napping every day), and it’s actually worked out pretty well, as I explain in my parenting column this week …
 |
| Read the full column |
DIY dollhouse from old shelves

Good news, DIYers! I’ve found a way to combine the most joyful elements of crafting — brightly-coloured paints, polkadots, pretty scrapbook paper, chevron, gold leaf, stripes and glitter — all into a single project that’s easy to create while watching your favourite TV show.
We’ve been doing a lot of major projects around our Handmade Home over the past couple of months — from making over our master bedroom/bathroom and redoing our kitchen cabinets to turning our entry closet into a mudroom — so this week’s project was a nice break from power tools and hours of manual labour.
As much as I love tackling the big projects on my ever-growing list, it’s also satisfying (and less expensive!) to work on a smaller piece using materials we already have.
Our kids are not lacking for dolls, or dollhouses. We have a secondhand plastic dollhouse in our daughter’s bedroom, and my old Barbie house (built by my husband when we were in high school — awww) in the playroom.
But we were collecting a lot of random little figurines and dolls that didn’t have a home to call their own. Our three-year-old daughter loves playing with tiny figures, and she was always losing them because they didn’t have a designated spot.
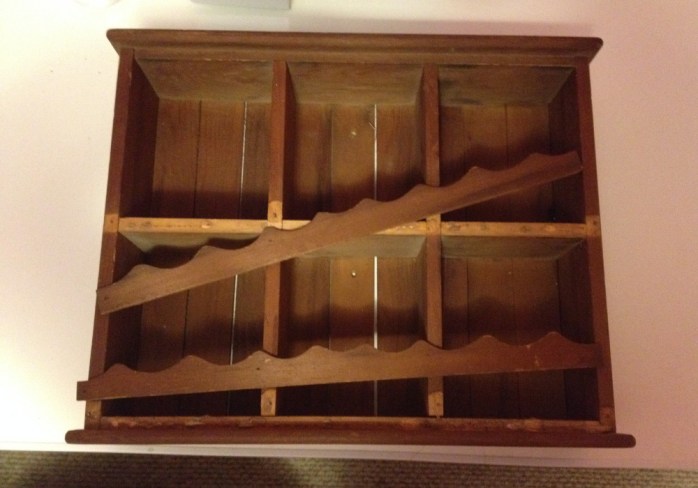
So I decided to turn a beat-up set of shelves (pilfered from my mom’s house) into a cubby-style organizer slash dollhouse for her little treasures.
I started by giving the shelves a quick coat of white primer …

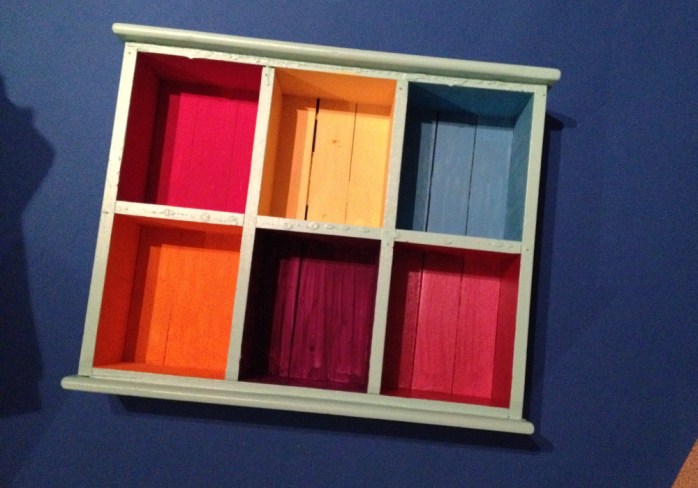
… and then painting the outside using some leftover aqua paint from our daughter’s bedroom (CIL’s “Bali Hai”).
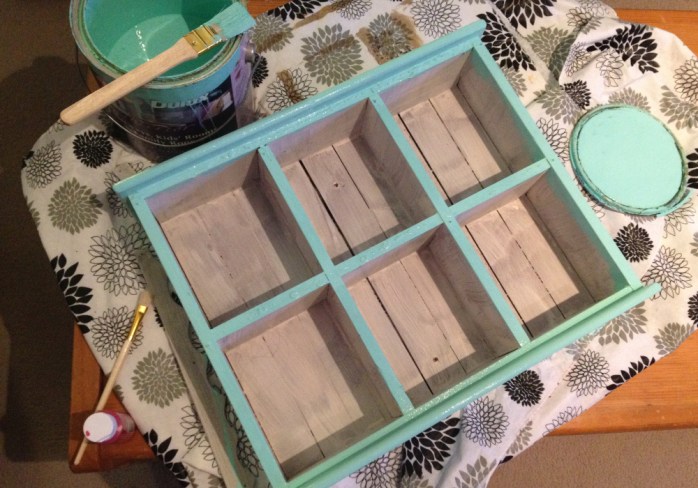
Then I painted the inside of each cubby a different colour, just using random acrylic paints I found deep in my Craft Closet of Mystery.
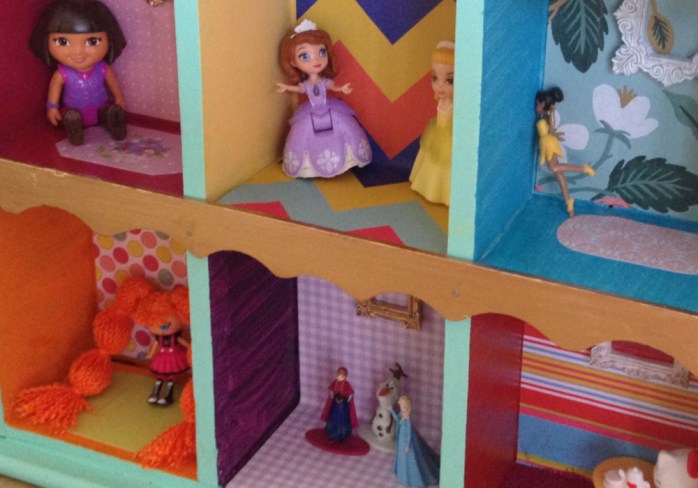
The fun part was choosing pretty scrapbook papers and wrapping papers to decorate each “room.” Each cube measured five inches wide and six inches tall, so I cut pieces of paper to fit — cutting some papers long enough to cover the back wall and the floor, just to mix things up.

Once all of the papers were cut, I brushed some matte Mod Podge onto the back of each cubby and pressed the paper in place. I could have brushed another coat on top, but it didn’t seem to need it, so I left it alone to dry.
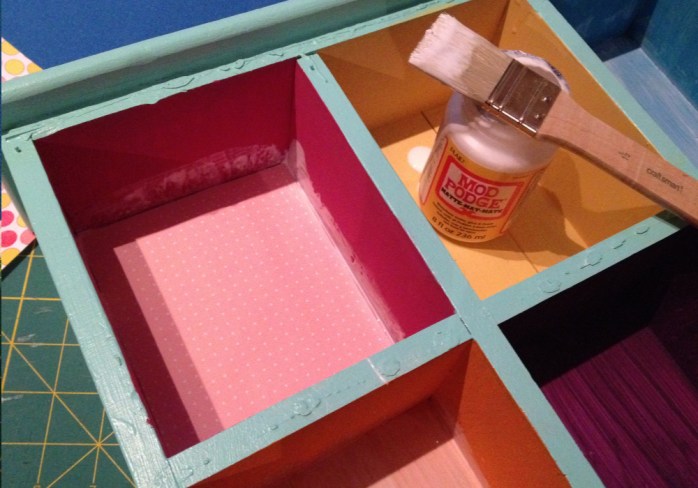
That took no time at all, so I cut out a few oval-shaped “rugs” and pasted those on the floor in a few of the cubbies. I also brushed Mod Podge onto one of the “floor” sections, and shook on some hot pink glitter (Recollections’ “Janelle”) just because sparkles make everything more fun.
The finishing touch was digging out my gold leaf paint (LiquidLeaf’s “Classic Gold”) and glitzing up the wooden trim pieces for the shelves. I also painted a couple of miniature frames (50 cents each at the craft store) and hot-glued those to the walls. Once the trim pieces were dry, I used a few tiny finishing nails to tap them back onto the shelves, and I was done.
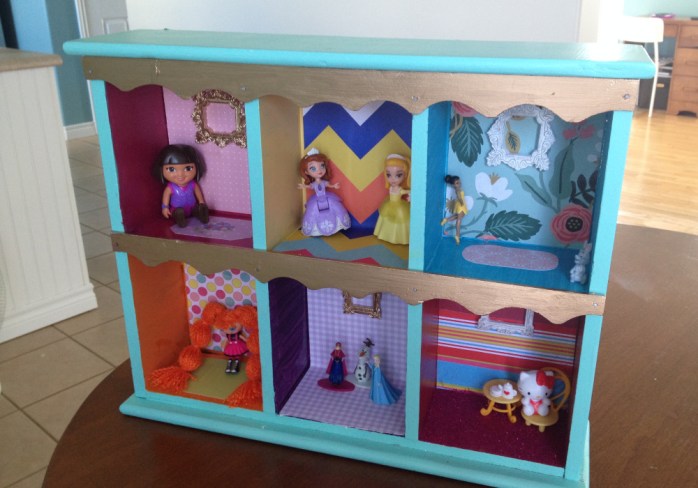
The kids were so excited to see their new play shelves, and they’ve been having fun arranging everybody from Happy Meal toys and Kinder Surprise prizes to board game figurines.

The shelves take up very little space, and they’re light enough to move around from room to room. Because our daughter loves putting her figures “in their rooms” when she’s done playing with them, there aren’t any more tears because she can’t find a one-inch tall Elsa, Dora or Hello Kitty.
I’m happy with it, too, because any day that I don’t accidentally step on that pointy little Sofia the First figurine is a pretty good day.
Don’t forget to pin this idea for later!

How to make a backyard water blob

I never thought we’d be ironing in the backyard or that we’d be wading through a mini-flood a couple of hours later. But when Pinterest tells you something is a good idea, you really just have to go with it.
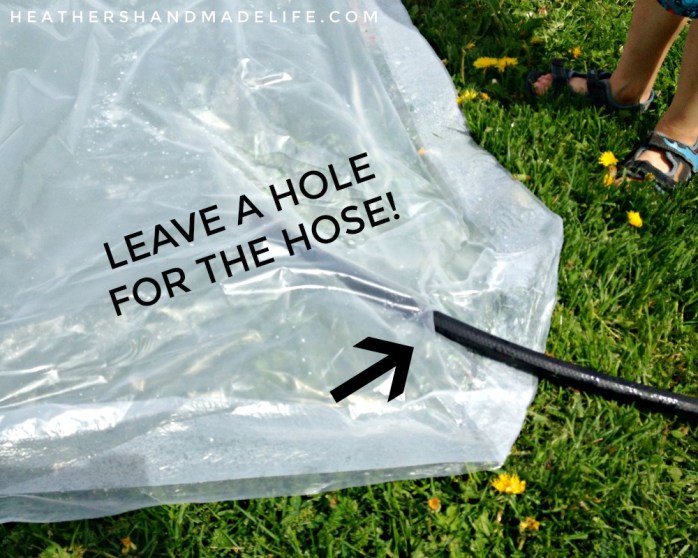
Water blobs are a fun way for kids to keep cool in the summer and they’re easy to make. All you’ll need is a roll of heavy plastic sheeting, parchment paper, scissors, an iron, an ironing board and a roll of sturdy tape (we used Gorilla tape).

Here’s how to make your own backyard water blob:
1. Spread out the plastic sheeting. We unrolled a long section of sheeting, spread it flat and then folded it over once to create a huge rectangle. Use rocks or bricks to keep it flat against the grass.

2. Prep your parchment paper. Cut a piece that’s about 60cm long and fold it over lengthwise twice. The paper will protect your iron from melting the plastic sheeting.
3. Get your iron nice and hot. Lay your ironing board on the grass, and wrap the folded parchment paper around where the two layers of plastic come together (if it was a sandwich, the paper is the bread and the plastic is the filling).

Run the iron over the paper for a few seconds. Carefully remove the hot parchment paper and you’ll see the two layers of plastic have melted together to create a seam.

Continue around the entire perimeter, leaving a small gap for the hose.
4. Fill ’er up. We used our hose and the neighbour’s hose to speed up the filling process, and it still took almost an hour. Add blue food colouring and glitter for an “ocean” look the kids will love, but be prepared to use a full bottle or two!
5. Seal the gap. Once the blob is filled, shut off the water, remove the hose and seal the hole with a bit of tape. Squirt some dish soap over the surface to make it slippery, turn on the sprinkler and you’re ready to play!

Our water blob lasted about an hour and then it sprung some pretty serious leaks that tape couldn’t fix.

The ironed seams held up really well, with just a few pinhole leaks, but it was the kids’ feet and knees that popped holes into the surface of the blob.

We plan on making more blobs for sure, but we’re going to be less ambitious about the size. Ours was way too large, and the plastic was stretched too thin, so we’ll double up the plastic layers next time.
This would be a great project to attempt during a drought, because you should have seen the torrential soaking the blob gave our lawn when it sprung all of those leaks — and then was enthusiastically ripped open by the kids.
We won’t need to turn on the sprinkler anytime soon, that’s for sure.
When your child hurts your feelings
“I want to leave the family,” he mumbled without meeting my eyes. Six little words felt like six sharp punches to my stomach.
He was lying on his bed, staring off into the distance while I sat on the edge and tried to process what he just said.
Our five-year-old had been angry when I’d put him to bed, complaining he wasn’t tired and he didn’t want to sleep. I’d told him to read a book (well, you know, look at the pictures) or play quietly with his toys until he felt sleepy, but he needed to stay in his bedroom.
 |
| Unrelated photo of another feeling-hurter |
His fury would not be shushed, though, and he continued to rage against the man (evil overlord mom-type) for the next 20 minutes. As I worked in my office downstairs, I heard whining and muttering over the baby monitor. He was grumbling about how it wasn’t fair that he had to go to bed, and he didn’t want to stay in his room and he wasn’t tired, so there.
I heard our three-year-old slip into his room and try to talk to him, and he continued his complaints about me and my tyrannical ways. I figured he would simmer down soon, and continued working. But a couple of minutes later, I heard our daughter’s voice tattling through the baby monitor.
“Mamaaaa! Dess-er say he want to weave da fam-a-wee!”
The best apps for kids and parents (at least, in my opinion)
 |
| Read the full story on the Family Matters website |
Really, any day that I can publicly rave about my undying love for Rachel Coleman and her signing skillz is a good day.
xo


As featured on …


