
Make-ahead Chicken Broccoli Divan
I don’t post a lot of recipes on here because I don’t cook very adventurous meals. In fact, it seems most of my recipes are desserts or bread-related items (that’s where I tend to shine).
But I’ve been meaning to share this one because it’s one of my favourites. My mother-in-law made this many times and I loved, loved, loved it but never thought I’d be able to make it myself — despite her insistence that it was easy. When I finally tried it, I realized she was right. IT IS EASY. Easy enough that I can make it, and that says a lot.
What I really love about it is that you can make the whole thing in advance and stick it in the fridge until you’re ready to cook it. I am ALL ABOUT making dinner early and then not having to do much at 4 p.m. when I’m still drowning in work and everyone is cranky (mainly me).
So here we go …
Make-ahead Chicken Broccoli Divan

Start by dumping a bunch of steamed broccoli (and cauliflower, if you’d like) into a casserole dish sprayed with oil. (All classy recipes include the word “dumping,” right?)

Add a bunch of cooked boneless chicken chunks. (The recipe calls for three breasts, but I have used more and I have used less. I’m not so good with the recipe-following.)

Pour “the sauce” over the top, which is the following all mixed together …
- 1 can Cream of Chicken soup
- 1/2 cup mayonnaise
- 1/2 cup of chicken broth (this is roughly half the can, so I’ll freeze the remaining half in a baggie to use the next time I make this)
- 1 tsp. curry powder (this recipe = the only reason I own curry because I’m lame)
- 1 tsp. lemon juice

Cover the top with 1 cup grated cheddar cheese

Cover the whole shebang in plastic wrap and stick it in the fridge until you’re ready to cook it, or …

Bake it uncovered at 350 degrees for 35-40 minutes until the cheese is golden and bubbly. (Really, you’re just warming it up and melting the cheese because the chicken and the veggies are already cooked.)

It’s super delicious served over rice, and then you’ve got a complete meal — meat, veggies, carbs — in no time at all. Plus CHEESE, which makes everything better.
Let me know if you try it!
xo
Non-dinner, carb-heavy recipes you might like …
 |
| Best-ever banana chocolate-chip muffins |
 |
| No-knead, four-ingredient bread |
 |
| Chocolate brownies + frosting |
 |
| Insanely good vanilla buttercream frosting |
 |
| Our go-to pancake recipe |
 |
| Homemade chocolate crack candy |
The day we had a tea party
The following is sponsored conversation with Put Me In The Story. All opinions and dusty dishware, as always, are my own.
***
Bonjour, my lovely readers! You are cordially invited to my very fancy tea party today on zee blog …

Yes, this is the cutest book ever. I know, I say that every time. But really — this one might just be the cutest.
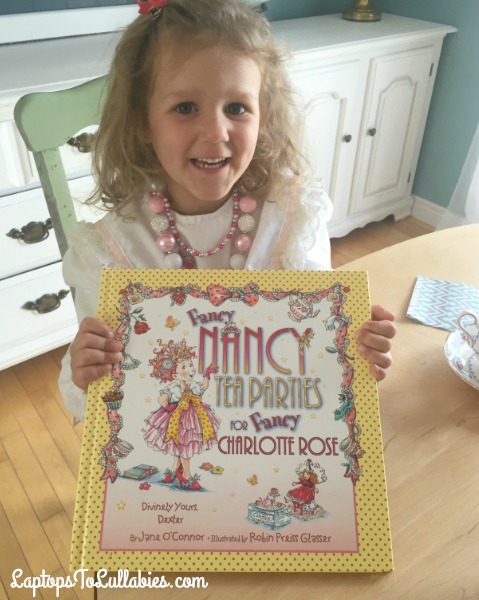
To celebrate our newest Put Me In The Story book, Fancy Nancy Tea Parties (for Fancy Charlotte Rose), my little lady dressed up in my old First Communion dress (!!!) and two necklaces and we threw ourselves a très elegant tea party.

I’ve never used my fancy teacups with the kids, but you know what? Nothing broke and we all really enjoyed ourselves. Gosh darnit, we’re going to do this more often!
(Also, everything tastes better off a fancy toothpick. Nancy taught me that.)

Let’s get down to business: the book, and how it’s going to make your tea parties 4000% better than before …

There are fun recipes that kids can follow, like Delectable Fruit Kebabs and a yummy-sounding drink called an Orange Fizzeroo.

There are decoration ideas, little craft projects, and keep-’em-busy suggestions EVERYWHERE.
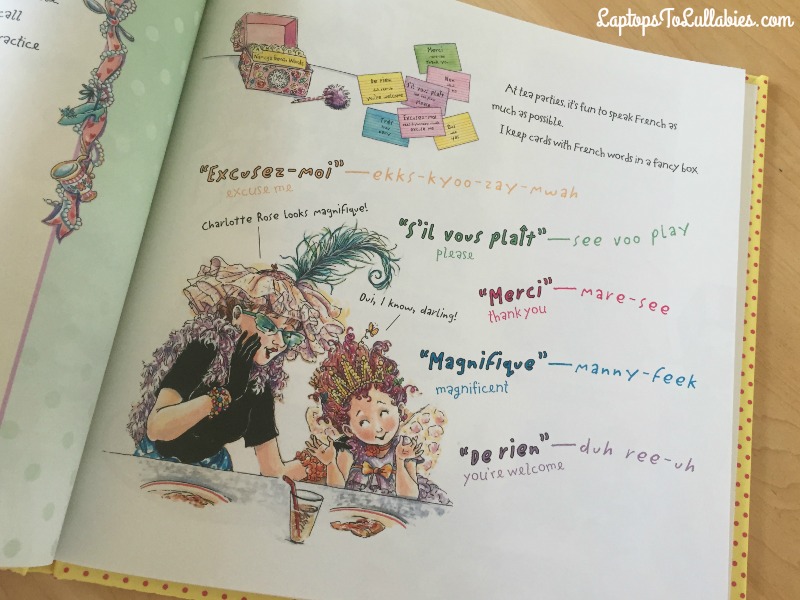
There’s also a ton of French instruction, and the former French Immersion student in me really got a kick out of that. The kids have been fascinated lately by asking me to say things in French, so they loved this.

I burst out laughing at D’s expression when he sipped his “tea” (pink lemonade). He was hella suspicious of this tea party, but had a fine time in the end.

Nothing like curls, pearls and sepia tone to make a little girl + a tea set look EVEN MORE ADORABLE.

Now who’s ready for a personalized ultra-glamorous copy of Fancny Nancy Tea Parties? I thought so!
Enter below to win a Fancy Nancy Tea Party Kit that includes …
- A personalized copy of Fancy Nancy Tea Parties
- A personalized tutu basket
- A way-cool feather boa
- A really cute children’s tea set
a Rafflecopter giveaway https://widget-prime.rafflecopter.com/launch.js
I hate camping … but here’s why I go

My husband, son and daughter all love camping, but I’m a cranky camper — I fully admit it.
Camping just sets me on edge. I dislike feeling grubby and sweaty and itchy from all of my swollen bug bites. I dislike waking up in a humid sweatbox of a tent trailer that smells like pee. I dislike spending day after day outdoors, with little reprieve from the elements. I dislike trying to cook on a camp stove and wash dishes under a rusty spigot.
We just returned from an annual camping trip with good friends to Yogi Bear’s Jellystone Park. Our friends have a spectacular nearly-new camper with air-conditioning, a huge fridge and freezer, a stove, a microwave and — most importantly — a bathroom with a toilet, sink and tub/shower.
Us? We’re the ones rocking the tan and brown Jayco tent trailer circa 1990 — the exact one I camped in as a child, since my dad handed it down to me four years ago. It’s certainly better than sleeping on an air mattress on the ground, and … well, there’s power so I can charge my phone. That’s about it.
All weekend long, my dear husband pestered me about upgrading to a luxurious camper like the one our friends have …
Continue reading in my weekly parenting column, The Mom Scene …
//platform.instagram.com/en_US/embeds.js
//platform.instagram.com/en_US/embeds.js
//platform.instagram.com/en_US/embeds.js
This is how it feels

He noticed the tears and I told him it was just allergies. He’s carefully printing me a Get Well Mommy card right now with his Crayola markers.
It was, partially. Stupid sinuses.
The sun is shining and it’s a beautiful August day, but I can’t see it. Not really, anyway. Other families are probably packing lunches for the beach or rounding up towels for the pool. Maybe going to the park or just playing in the backyard.
Our windows are still closed and the kids are watching too much TV while I cradle a huge mug of tea and try to shake my trance. They are happy and they have no idea I’m being a crap mother today.
I’m angry. I’m frustrated. I’m overwhelmed. I’m sad. I’m anxious. I’m irritated. I don’t know if I want to run out the door and never come back, or find the nearest closet and barricade myself inside.
I fight with my husband before he leaves. It’s the continuation of yesterday’s squabbles, mostly, with some new stuff thrown in for kicks. The gross leftovers he never took out of the fridge. The heap of cardboard he’s been building next to the recycling bins. The fact that he’s skipping breakfast. He can do nothing right and I hate myself but it’s just what my brain is telling me.
I may have missed a Zoloft or two in the camping chaos, but even if I did, I don’t know if that makes a difference. Was it enough to shift something in my brain? Sometimes these days hit, whether I take my meds or not. They’re not the worst days — no, far from it. They’re the annoying in-between days when I remember how bad it can get without actually getting there.
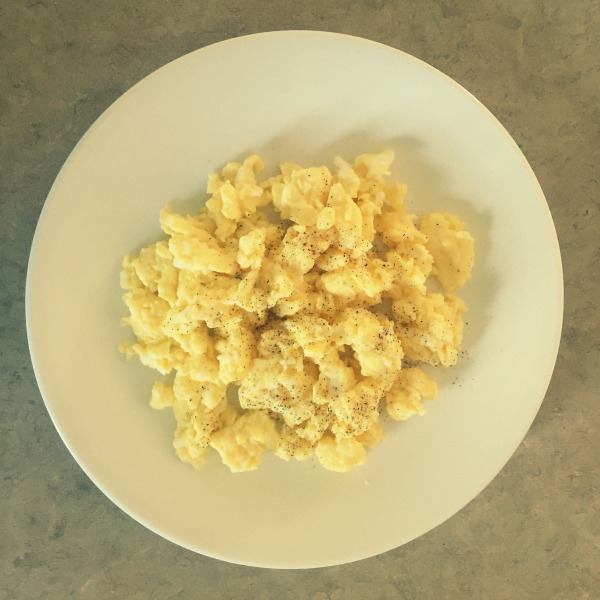
I force myself to make scrambled eggs because I know they are good for me, when really I want a huge bowl of the Froot Loops we have leftover from camping. Starting the day with that much sugar would be a terrible idea. It would send me racing for the kids’ Halloween candy from Fake Campground Halloween. It would leave me crankier.
I force myself to get dressed in my Zumba clothes so I get to the 5:30 class tonight. It feels like an eternity away, but when I catch a glimpse of the bright colours in the mirror I feel a tiny boost. I know it will be good for me to go.
I force myself to sit down at the desk and work. The panic of putting off work is much worse than sitting down and just doing it, with every ping of a new email feeling like an ice-cold water balloon between my shoulder blades. I know checking off tasks and sending in assignments will help to calm me down.
I force myself not to care that the kids will be watching TV or playing computer games while I work, because I couldn’t bring myself to get them to morning day camp. I used to spend my summers watching Days of Our Lives and the OJ trial. Surely a bit of Super Why is better than that.
In a few hours, it might be a lot better. Or maybe not — today could be a write-off. Tomorrow, though, I might wake up feeling a million times better. I know that and it’s what keeps me going. I know this is a blip and that all I can do it fight my way through it.
And so I do.
Why you should paint your hutch

The only thing that makes a big painting project even more painful is when you drop a jar of paint and it splatters onto your hardwood floors . . . twice.
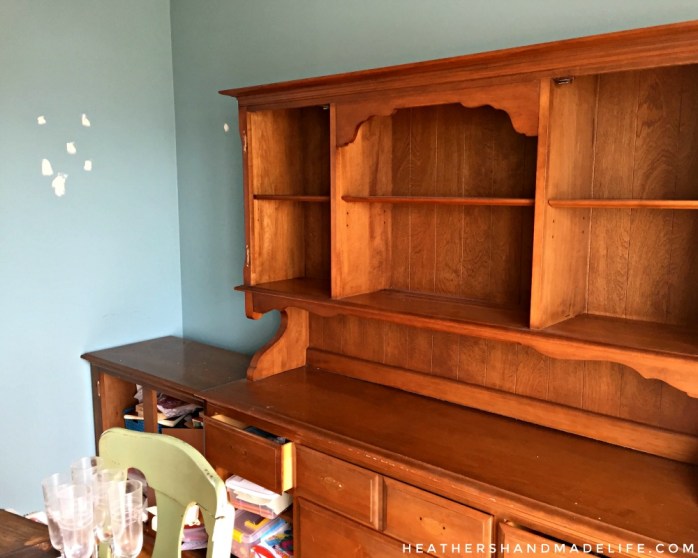
But let me back up. After deciding I was brave enough to redo our hand-me-down hutches, there wasn’t any question that I was going to paint them a chalky white. I wanted them to brighten up our dining area and go with our white kitchen cabinets and white beadboard peninsula. Plus, I just like painting things white, I think?

I went with Fusion Mineral Paint* since I wanted a matte finish without sanding or priming, and picked Casement* since it’s a neutral, warm white. I didn’t want the hutches to be entirely white, though, so I also picked up a jar of Homestead Blue* for the back paneling.
(Quick backstory: I was really tempted to pick a grey — like Ash* or Pebble* — since the walls are a grey-blue, but in the end I couldn’t resist the contrast of the deep, historical blue against the white.)
I unloaded the hutches onto the kitchen table and onto the floors — hola, giant mess! — and took off every door, knob and hinge. The entire main level became a maze of propped-up doors, errant drawers and wine glasses filled with tiny screws. It was at this point that I realized I’d gotten myself into a really, really big project.
I’m not going to sugar-coat it — the first coat was bad. But I kept reminding myself that I’d been spared the agony of a ton of sanding, not to mention priming (the worst task in the history of DIY). I went back over both hutches a second time and they started to look a lot better.

And then, just as I was about to stop for the night, I fumbled and dropped half a jar of paint.

It splashed all over my feet and the hardwood floors, and I stood in shock for a minute wondering what to do. I didn’t want to waste any so I started dipping my brush into the goopy puddle on the floor and wearily continued painting. I painted until I couldn’t scoop up any more paint, and then I began the messy process of cleaning up my spill.
The painting continued the next evening. I dragged the iPad after me as it dutifully played Friends reruns. I slopped paint onto the glass of the doors, too — knowing it would be easier to scrape it off than to meticulously tape every pane. I realized I’d forgotten about the drawer fronts and moved into the living room to start their first coat.
Then I dropped my second jar of paint on a fresh new patch of hardwood! Argggggh!
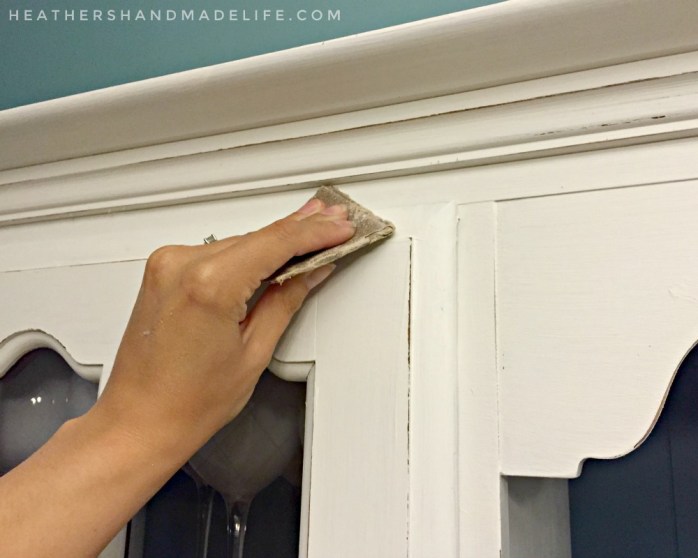
Somehow, coat by coat, both hutches went from dark orange-y wood to a warm, beautiful white. The fun part was using a bit of sandpaper to rough up the edges and show off the details of each curve, each corner, each bit of trim. Not only did the distressing make the hutches look old and interesting, but it also takes the pressure off trying to keep them pristine and scratch-free.
Finally it was time to rehang the doors and get everything back inside. The original hardware was perfectly tarnished and looked much better than any effect I could have tried to achieve with spray paint. They’re like the LEGIT oil-rubbed bronze I keep trying to imitate on other projects!
Now that the back paneling is a gorgeous dark blue, it’s been fun styling the shelves with different pieces — like these ornate white metal frames I bought at IKEA. If I decide I want a different accent colour down the road, it won’t take any time at all to quickly repaint that section.

Most importantly, though, is how much brighter the main level feels now with these white hutches. Instead of a looming wall of wood, we have an airy dining area that reflects the sunshine and still stores all of our junk — mainly glitter glue, scissors and construction paper.

It was scary to paint our dining room hutches, but I’m really glad I did. Yes, there’s a chance that I’ll regret it down the road and spend days trying to sand off the paint. But I think it’s more likely that I’ll get years of enjoyment out of their fresh new look.
xo
Products I used:

*This post contains affiliates*


As featured on …


