
Why you should paint your hutch

The only thing that makes a big painting project even more painful is when you drop a jar of paint and it splatters onto your hardwood floors . . . twice.
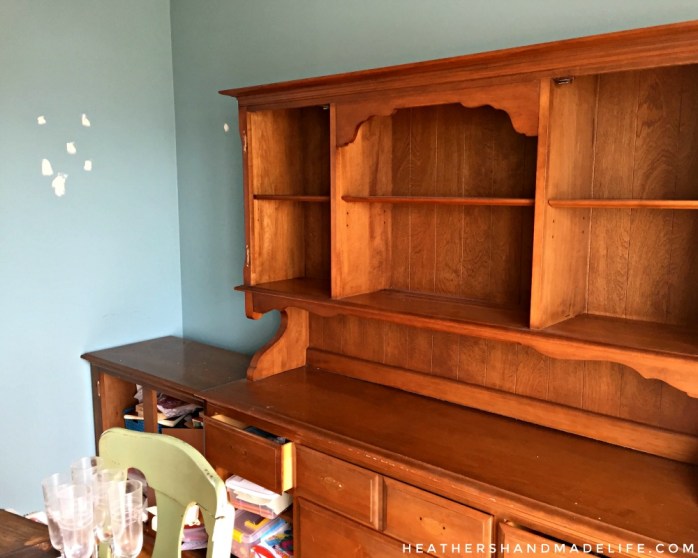
But let me back up. After deciding I was brave enough to redo our hand-me-down hutches, there wasn’t any question that I was going to paint them a chalky white. I wanted them to brighten up our dining area and go with our white kitchen cabinets and white beadboard peninsula. Plus, I just like painting things white, I think?

I went with Fusion Mineral Paint* since I wanted a matte finish without sanding or priming, and picked Casement* since it’s a neutral, warm white. I didn’t want the hutches to be entirely white, though, so I also picked up a jar of Homestead Blue* for the back paneling.
(Quick backstory: I was really tempted to pick a grey — like Ash* or Pebble* — since the walls are a grey-blue, but in the end I couldn’t resist the contrast of the deep, historical blue against the white.)
I unloaded the hutches onto the kitchen table and onto the floors — hola, giant mess! — and took off every door, knob and hinge. The entire main level became a maze of propped-up doors, errant drawers and wine glasses filled with tiny screws. It was at this point that I realized I’d gotten myself into a really, really big project.
I’m not going to sugar-coat it — the first coat was bad. But I kept reminding myself that I’d been spared the agony of a ton of sanding, not to mention priming (the worst task in the history of DIY). I went back over both hutches a second time and they started to look a lot better.

And then, just as I was about to stop for the night, I fumbled and dropped half a jar of paint.

It splashed all over my feet and the hardwood floors, and I stood in shock for a minute wondering what to do. I didn’t want to waste any so I started dipping my brush into the goopy puddle on the floor and wearily continued painting. I painted until I couldn’t scoop up any more paint, and then I began the messy process of cleaning up my spill.
The painting continued the next evening. I dragged the iPad after me as it dutifully played Friends reruns. I slopped paint onto the glass of the doors, too — knowing it would be easier to scrape it off than to meticulously tape every pane. I realized I’d forgotten about the drawer fronts and moved into the living room to start their first coat.
Then I dropped my second jar of paint on a fresh new patch of hardwood! Argggggh!
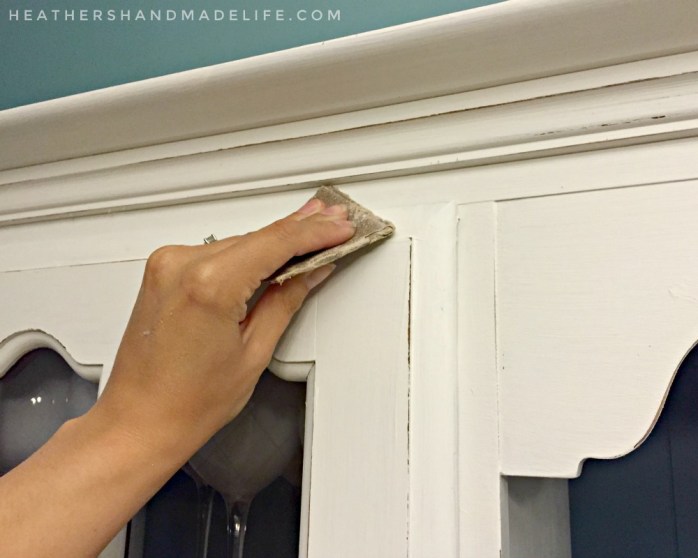
Somehow, coat by coat, both hutches went from dark orange-y wood to a warm, beautiful white. The fun part was using a bit of sandpaper to rough up the edges and show off the details of each curve, each corner, each bit of trim. Not only did the distressing make the hutches look old and interesting, but it also takes the pressure off trying to keep them pristine and scratch-free.
Finally it was time to rehang the doors and get everything back inside. The original hardware was perfectly tarnished and looked much better than any effect I could have tried to achieve with spray paint. They’re like the LEGIT oil-rubbed bronze I keep trying to imitate on other projects!
Now that the back paneling is a gorgeous dark blue, it’s been fun styling the shelves with different pieces — like these ornate white metal frames I bought at IKEA. If I decide I want a different accent colour down the road, it won’t take any time at all to quickly repaint that section.

Most importantly, though, is how much brighter the main level feels now with these white hutches. Instead of a looming wall of wood, we have an airy dining area that reflects the sunshine and still stores all of our junk — mainly glitter glue, scissors and construction paper.

It was scary to paint our dining room hutches, but I’m really glad I did. Yes, there’s a chance that I’ll regret it down the road and spend days trying to sand off the paint. But I think it’s more likely that I’ll get years of enjoyment out of their fresh new look.
xo
Products I used:

*This post contains affiliates*


As featured on …


