
A very merry half-birthday

It’s one of those things I always enjoyed seeing on other blogs and kept *meaning* to do. And then I’d remember, like, weeks after the kids’ half-birthdays had passed.
But then! I smartened up and put Oct. 25 and Dec. 6 in my Google calendar as The Official Half Birthdays.
So on Oct. 25, our beautiful girl turned four and a half, officially. And we had the neighbours over for Halloween-themed cupcakes, lovingly baked and decorated by these two.

Now D can’t wait until his half-birthday on Dec. 6 when he turns six and a half.
(It freaks me out that he’s going to be SEVEN in June, but I’ll try to ignore that fact for now.)

I joked to Darling Husband that I don’t think we’ll be celebrating our own half birthdays (which would be Feb. 13 and May 17, I guess?). Who wants to be like “Ooooh, I’m 33 1/2 now!”?

Half-birthdays. Highly recommend.
xo
What we’re getting the kids for Christmas

I feel like there’s a lot of interest in what people are getting their kids for Christmas — or, at least, how much they’re spending.
I’ve written before about how we use a special system that limits how much we get for the kids, and the types of items. We have stuck with it every single Christmas since D was six months old, and we love it:
- Something You Want
- Something You Need
- Something To Play With
- Something To Read
- And a new pair of jammies for Christmas Eve
Our six-year-old son:


 |
| The Berenstain Bears’ Class Trip ($4.73) |
 |
| The Berenstain Bears’ Sleepover ($4.50) |
(Pssssssssst: They’re offering 15% off everything online, through Sunday Dec. 4 with code 15GIFT)
Our four-year-old daughter …

 |
| Endless Hair Kingdom doll, except the one I ordered has purple hair ($12.49) |
 |
| Petite Merida Princess doll ($16.99) |
 |
| The Berenstain Bears’ New Neighbors ($5.97) |
 |
| Berenstain Bears’ Mad, Mad, Mad Toy Craze ($5.98) |
 |
| Lego Mixels Hydro ($5.99) |
 |
| Shopkins Season 4 two-pack ($3.99) |


If I wasn’t limiting myself to our five items + Santa gift, it would be sooooooo easy to go overboard and pick up lots of cute toys I know they’d love. This system keeps me reigned in, keeps their expectations manageable, and just works for us.
What do you think? Are we way off here?
The first haircut is the hardest


Even when she had an unfortunate baby mullet, I left it alone. I nurtured it and brushed it and whispered for it to keep growing. I celebrated her first birthday by putting in the world’s tiniest sprouted pigtails — each no more than a couple of centimetres above her scalp.
I jokingly told people she’d be in her teens before we trimmed a single strand, and our daughter was totally on board. She loved when I rinsed the shampoo from her hair because it made it “long like Rapunzel.” She begged me to straighten it sometimes just to make it longer. Every little bit it grew felt like an accomplishment.
She loved her long hair until suddenly, at exactly four and a half years old, she didn’t. She wanted a haircut — a short haircut, preferably the length of her brother’s hair — and bangs. Immediately.
Continue reading in my weekly parenting column, The Mom Scene …
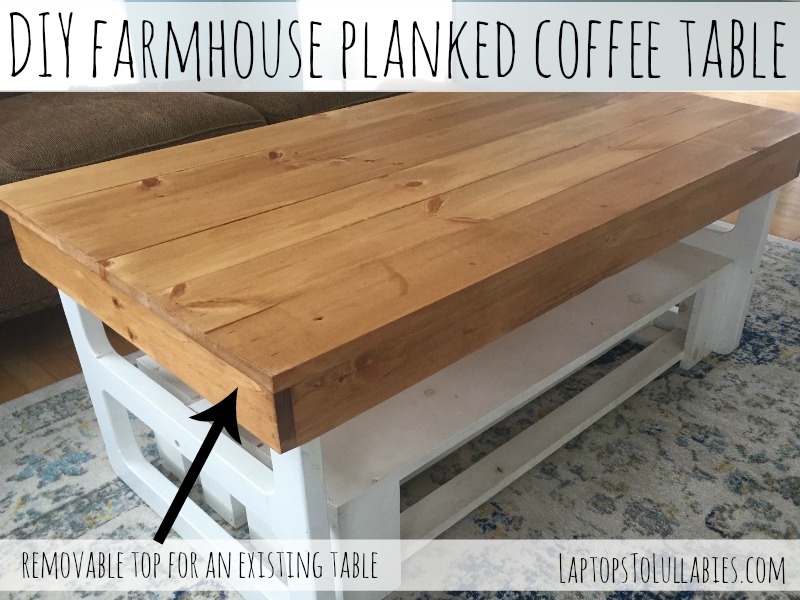
DIY farmhouse coffee table topper

The thing about having a house with a finished basement and no garage is that there is no “someday” when it comes to furniture. It’s just “use it or lose it.” There is nowhere to store anything that is not an integral part of your decor.
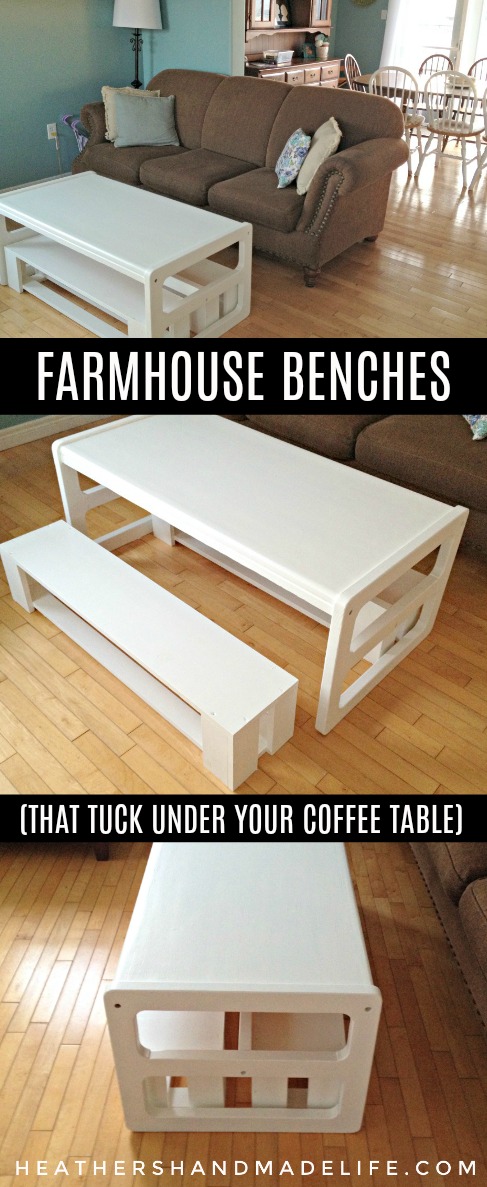
So when it came to our living room coffee table, I had to either make it work or kick it (back) to the curb. Yes, this is the same coffee table I rescued from a curb one spring. I painted it white and my handy husband built two little benches that slide perfectly underneath.

It worked well for a long time, but then our living room underwent two dramatic adoptions: a puppy and a rug.

Both new additions meant that our children (ages four and six) are no longer allowed to eat in the living room. (Partially because I don’t want the puppy to get sick from errant chocolate chips from their pancakes, but mostly because this rug was hella expensive and the idea of it being stained with chocolate makes me feel faint.)
(EDITED TO ADD: Ohhhhh, but look what happened to the dog anyway.)
The white-painted coffee table with its modern lines didn’t look right against the vintage-looking Turkish rug (which, by the way, is from Wayfair and I love it). The coffee table was suddenly a yucky cheap (well, free) eyesore and we weren’t even using the benches anymore.
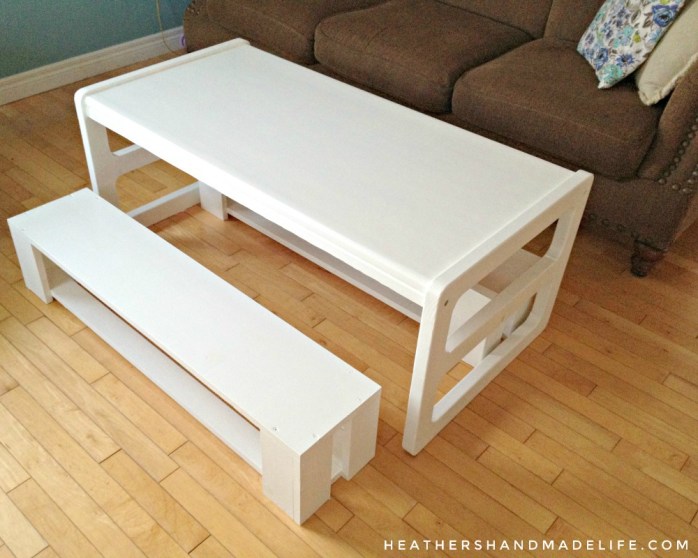
We’ll likely sell the coffee table (and benches) at some point, but for now I wanted a temporary solution.
I love the look of planked farmhouse coffee tables so I decided to create a “topper” that would slide onto the existing table — a giant upside-down tray, essentially.
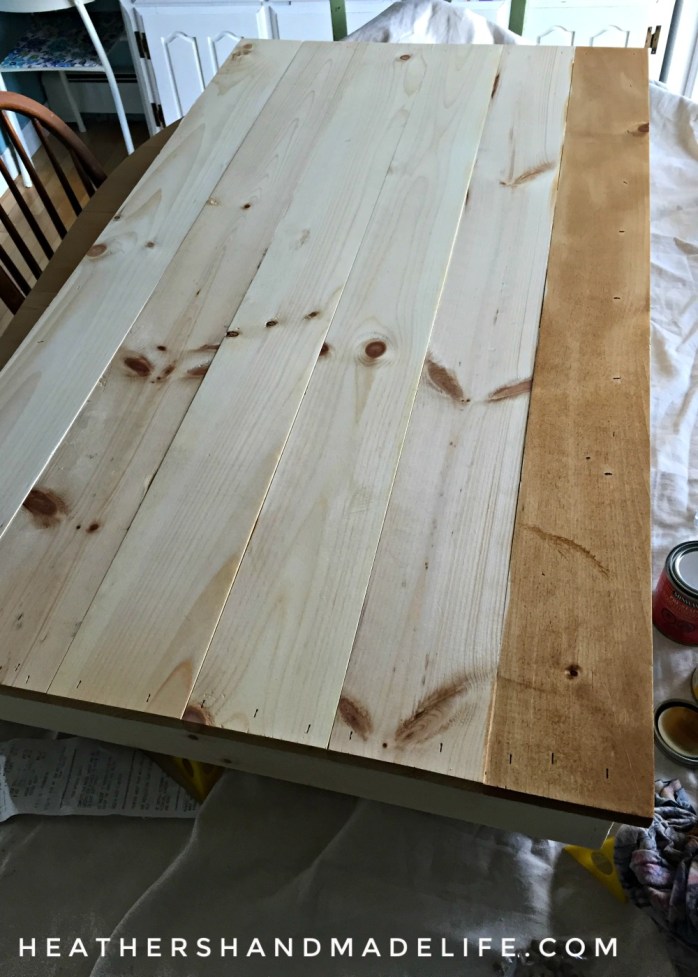
I bought a couple of 1×4” boards to use as an “apron” that would wrap around the entire coffee table. There was absolutely no measuring involved — just holding the boards up against the sides of the table and marking my cuts with a pencil.
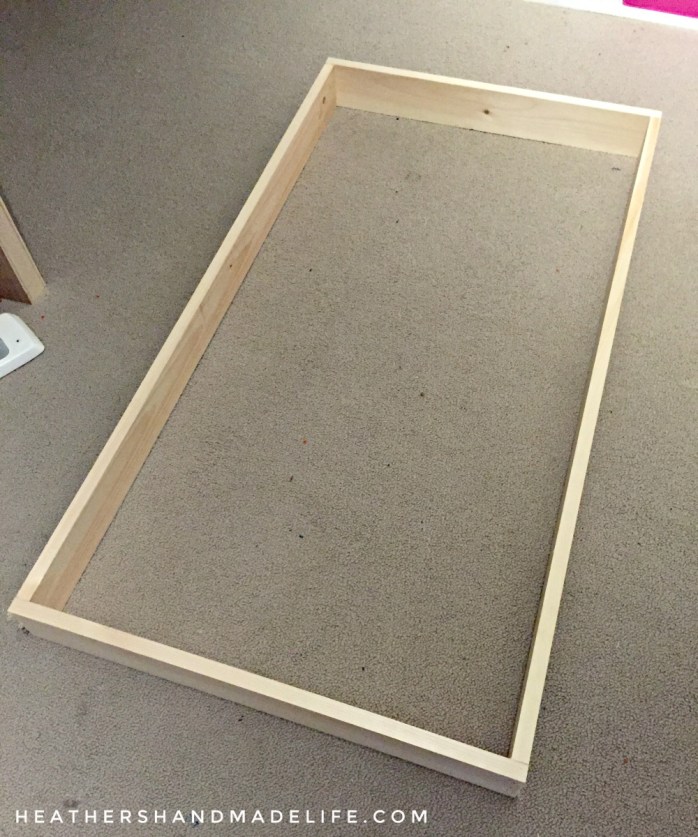
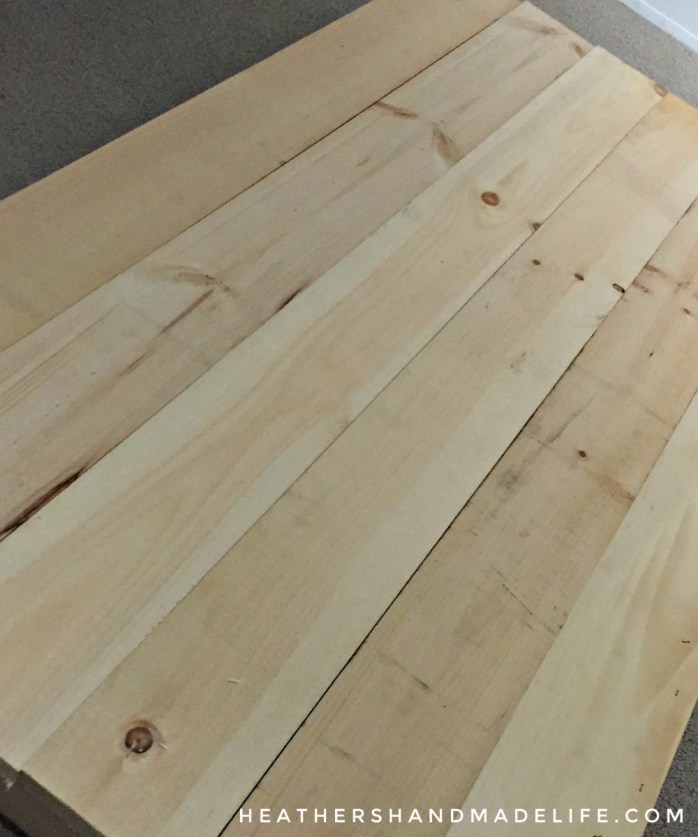
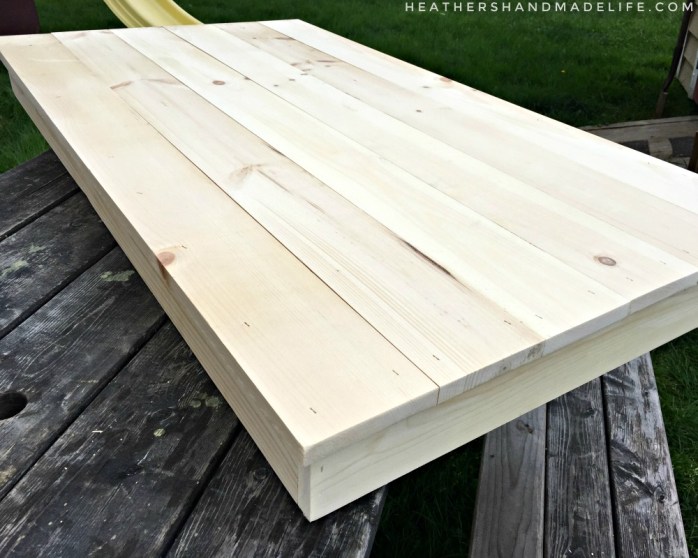
Once I had a simple rectangle that was slightly larger than the coffee table, it was time to cut the planks. I cut six 1×6 boards to fit across the apron, with a few inches of overhang on all sides. I attached them quickly with my brad-nailer and the construction process was done. (Plus, now I know how to build a tray if I ever decide I need one!)
Whoops, not quite done. I flipped the whole thing over and noticed some of the boards weren’t quite flat, so I nailed a few scrap pieces to the underside for stability.

“This feels like something you would do,” I announced to my handy husband, who was nearby playing video games.
He glanced over. “Yeah … but I would use longer supports that ran from one end to the other, not just little scraps in the middle that—”
Anyway.
After a quick sanding session in the backyard …
I brought the table-topper back inside for staining. Since this was the first woodworking project I’ve done that was going to be used every single day, I wanted it to be perfect. I brushed on wood conditioner so the stain would go on evenly, followed up by two coats of stain and a couple of layers of poly. (I picked “Golden Oak” by Minwax so the table would match our hardwood floors as closely as possible.)
The very next day, the table-topper was snugly in place. It looked like we had a brand-new coffee table!
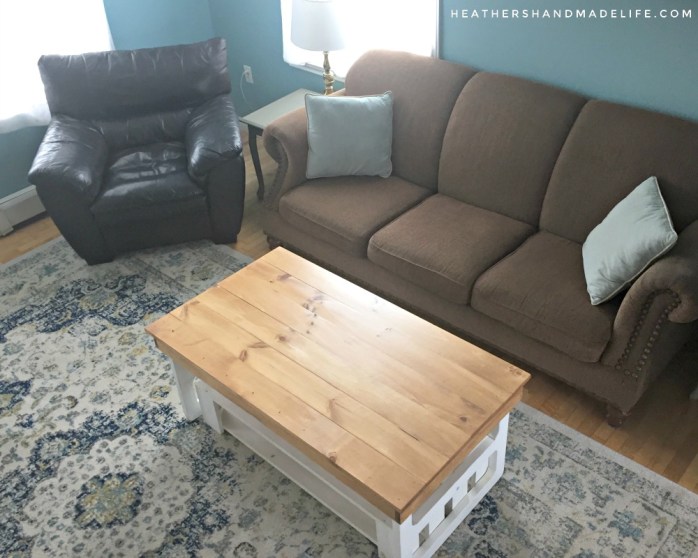
The topper is easy to remove if we ever decide we want the simple white table back, and I could even turn it into its own table by adding legs in the future. Now that’s a hard-working piece of furniture!

And here’s the original coffee table bench tutorial, if you liked it better the old way …
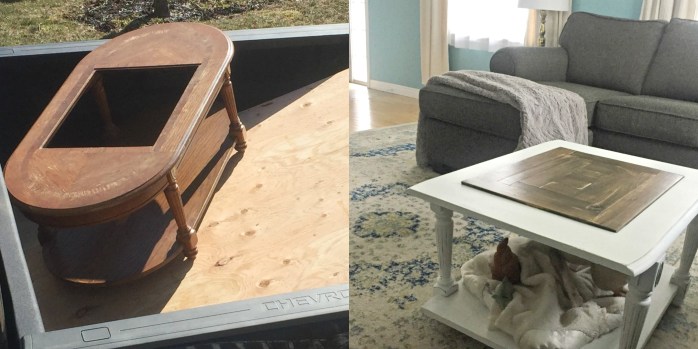
UPDATED TO ADD: Here’s our current coffee table — nabbed from a curb AGAIN (woohoo) — and cut down to a more manageable size.
DIY farmhouse coffee table
The thing about having a house with a finished basement and no garage is that there is no “someday” when it comes to furniture. It’s just “use it or lose it.” There is nowhere to store anything that is not an integral part of your decor.
So when it came to our living room coffee table, I had to either make it work or kick it (back) to the curb. Yes, this is the same coffee table I rescued from a curb one spring. I painted it white and my handy husband built two little benches that slide perfectly underneath.
It worked well for a long time, but then our living room underwent two dramatic adoptions: a puppy and a rug. Both new additions meant that our children (ages four and six) are no longer allowed to eat in the living room. (Partially because I don’t want the puppy to get sick from errant chocolate chips from their pancakes, but mostly because this rug was hella expensive and the idea of it being stained with chocolate makes me feel faint.)
(EDITED TO ADD: Ohhhhh, but look what happened to the dog anyway.)
The white-painted coffee table with its modern lines didn’t look right against the vintage-looking Turkish rug (which, by the way, is from Wayfair and I love it). The coffee table was suddenly a yucky cheap (well, free) eyesore and we weren’t even using the benches anymore.
We’ll likely sell the coffee table (and benches) at some point, but for now I wanted a temporary solution …


Continue reading in my weekly DIY column, My Handmade Home …
And here’s the original coffee table bench tutorial, if you liked it better the old way …
 |
| Building benches for a coffee table |


As featured on …


