
Easy TV cabinet makeover

My new home office is so close to being finished. After painting the walls, redoing furniture, building custom pieces and working on artwork and accessories, I thought I was ready for the big reveal.


And then . . . I realized there was a blue elephant in the room.

A couple of years ago, a friend gave me an old hutch she no longer needed. I painted the lower half white, and it now blends in with the hutch in my dining room.

The top half went down to our basement where it became a media cabinet — holding the digital box, DVD player, etc. below our wall-mounted TV.

At the time, that room was a family room/playroom/guest room with plenty of colour and activity. It was only the basement, so I had fun with the hutch and painted it a rich royal blue (Liberty Blue by Fusion Mineral Paint).
That colour worked well for years, and I figured it would be fine in my new home office. But once the toys were removed and the board-game wall was dismantled, I realized I loved the “peaceful” direction the room was taking.
We repainted the deep grey walls and now they’re a creamy light greige (Benjamin Moore’s Edgecomb Gray). All of the furniture is now white or a soft wood tone. There are pops of gold and a healthy dose of a “millennial pink,” and the bright blue media cabinet started looking monstrous against the white shiplap …

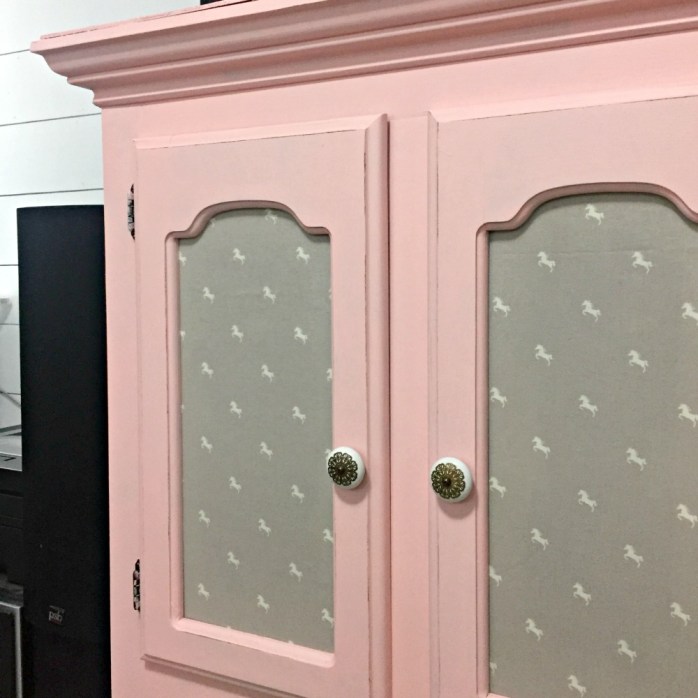
This was one of those spur-of-the-moment DIYs where I have absolutely no intention of starting something, and two and a half hours later the whole thing is finished. I had half a bottle of pale pink paint leftover from doing our daughter’s lockers (“English Rose” by Fusion Mineral Paint), and I thought “Yep, let’s do it.”
I unscrewed the knobs, took out the glass panes in the cabinet doors, gave the whole thing a quick wipe — it was VERY dusty — and went to town painting it before I realized what I was doing.
Since I wasn’t sure I had enough paint, I cheated and only did the front, the top, and the side that’s visible. (The other side is hidden by the mini-fridge.) I managed to cover the blue paint using every last drop of pink.

While the paint dried, I looked at the panes of glass. I thought about frosting them so they’d hide the ugly electronics we store in the cabinet, but I didn’t feel like going to the store. Scrapbook paper was too short. Thick sketchbook paper was pretty, but also too short.
My next thought was to use wrapping paper, but the only possibilities were black and white stripes (cute, but too bold for the rest of the room) and a clashing pink pattern. Now, I could have easily gone out and found the perfect wrapping paper — maybe something white and gold? — but when I’m mid-project, I do NOT want to stop and go shopping.
I started digging around in my fabric bins and decided on a soft grey cotton printed with tiny white horse silhouettes (“Equestrian” by Camelot Fabrics).

After a hot, steamy iron to get out the wrinkles, I cut fabric rectangles slightly larger than each pane of glass. Then I pressed the glass against the fabric (“good” side down) and wrapped the fabric back around the edges — securing it with strips of painter’s tape. #usewhatyouhave
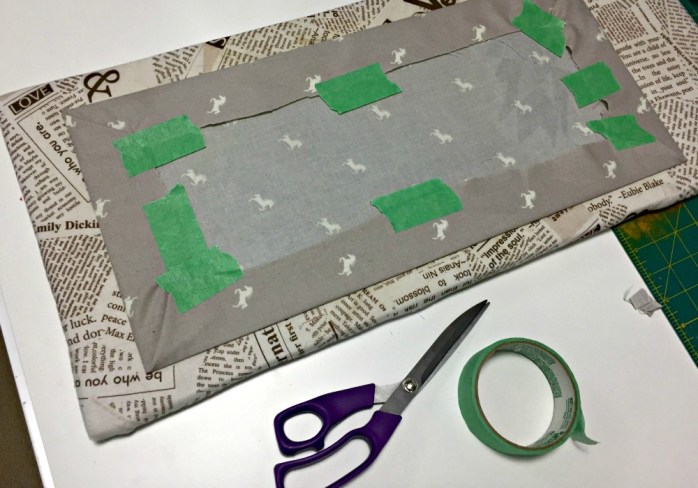
The fabric-wrapped panes slipped back into their places easily, except I couldn’t tighten the screws as much since they were thicker. The paint was dry, so I roughed up the edges with a bit of sandpaper to distress the finish.
The final step was cutting the remaining fabric into a long strip, hemming the bottom, and stapling it to the underside of the hutch — making a little curtain to hide the larger electronics stashed underneath. I’m very glad I no longer have to look at them every day! When you marry someone who insists on keeping every cord, every speaker, every dusty piece of equipment — “just in case” — you have a lot of electronic junk that needs hiding.

Now, when I turn the corner to walk into my new home office, there is no longer a huge blue beast jumping out against the white shiplap wall. There’s a soft pink cabinet that blends in beautifully with the rest of the white, wood, and pink room.

Of course, now it’s the TV — right above it — that’s kind of a distraction. It’s a big black rectangle against the white wall. I tried to minimize it by hanging a white ceramic ram head above it, and we *do* use it as a computer monitor so it can’t really be helped.

Still, I wonder if anyone’s ever sewn a slipcover for a TV? 😉


As featured on …


