
Build your own slide-out pantry

You never hear anyone say “Oh, I have so much cabinet space, and I really don’t know what to do with these empty drawers.” That’s because canned goods multiply when we’re not looking, and packages of spaghetti are procreating faster than we can go through them.
Yes, storage space was at a premium in our kitchen. That’s the trouble with these new-fangled open-concept homes. Fewer walls = fewer places to stick cabinets and drawers.
So when I saw a pull-out pantry on Pinterest, I knew we had to make one. Our fridge isn’t very wide because it doesn’t have double doors or an ice-maker (*tear*) so there was a good-sized gap between the fridge and the wall.
Measuring bores me, because I’m always eager to get started, but we got out the measuring tape and carefully wrote down all of the dimensions. By sliding the fridge up against the counter on one side, we were able to make a 6 1/2 inch nook for a slide-out pantry. We decided it should be exactly the height of the fridge, taking into consideration that it would be standing on rolling casters, and that it should be just as deep as the fridge so it held as much as possible.
During a quick trip to the home improvement store, where the kids delight in oversized carts and free suckers at the cash register, we bought the wood. We chose lightweight 1×4 boards for framing and 1/2-inch square dowels to use as “railings” to keep the food from falling overboard.

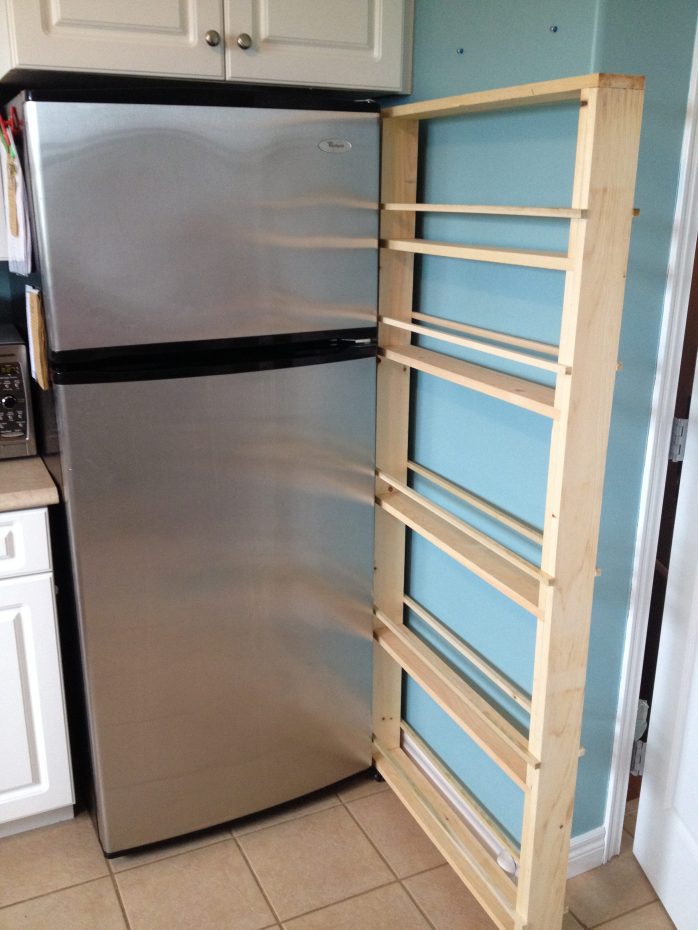
Michael quickly cut and assembled the outer shell, which was just a very tall rectangle. Then he cut 1×4 boards to fit on the inside as supports for five shelves. This way, we wouldn’t have nail holes or screws running down the front panel — leaving it smooth like the rest of the cabinet and drawer fronts in the kitchen.
Once the shelves were in place, he cut the square dowels to size and used his brad nailer to add them in front and behind each shelf. We chose to use square dowels instead of round ones so that they’d blend in a bit better, but they’re harder to find.
He added two casters to each of the ends, so the pantry could roll smoothly out from its hiding spot, and then we lugged it down to the basement for stain and paint. I had to lean it up against a tall ladder while I worked on it because it was so tall and skinny that it kept tipping over.
I opted for stain on the inside (Minwax’s “Dark Walnut”) because I’d just suffered through many, many coats of white paint on last week’s coffee table/bench project. I painted the front panel white, though, so it would match the rest of the kitchen.
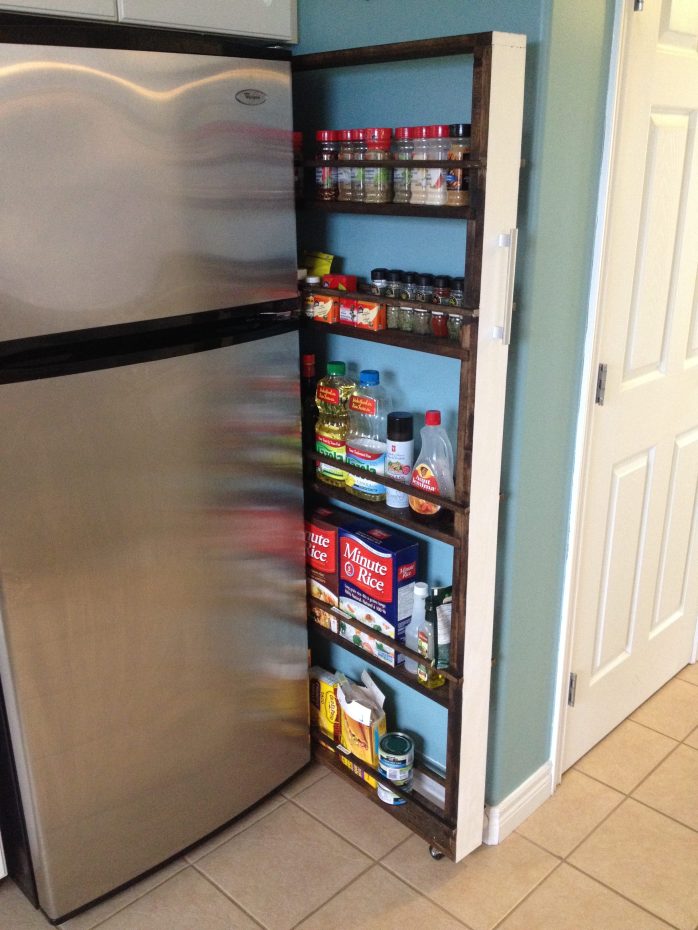
The final step was adding a brushed nickel handle, which we chose to roughly match the cabinet and drawer hardware. And then it was time for the most exciting part of all: sliding it in its spot next to the fridge, and loading it up with groceries. I saved the task until after the kids were in bed, put on some music, and really got into it (yes, I’m super lame).
//pagead2.googlesyndication.com/pagead/js/adsbygoogle.js
(adsbygoogle = window.adsbygoogle || []).push({});
We’ve had the slide-out pantry in place for about a week now, and it’s been unbelievably convenient. I was able to get all of our spices and oils out of a cabinet near the stove, so I designed a new “coffee and tea” cabinet for the items we use every morning. The pantry now stores a bunch of rice packages and taco shell boxes that we’d normally had in our “food cabinet” (yes, there’s only one!) so it’s freed up a lot of room in there for other categories, like pasta, bread and crackers.

The only negatives would be that I wish we’d make shorter shelves near the top, so we could have fit a couple of more — there’s a bit of wasted space above the rows of spices. The casters clunk a little when they’re sliding over the grout lines, but I don’t think that could be helped.
We like that this slide-out pantry isn’t attached to the walls or cabinets in any way, so it’s easy to remove if we — or future owners — want to upgrade to a fancier fridge. I’m still dreaming of an ice maker, so it could happen. But for now, we’re very content with our magical little pantry.

YOU MIGHT ALSO LIKE …


 |
| DIY dog crate cover |

 |
| How to paint a hutch (and why you should do it) |
18 Comments on “Build your own slide-out pantry”
So what do you think?


As featured on …


nice
LikeLike
I like the idea of this pull out pantry so much, I was thinking of making one for beside the washer and dryer. Paper towel, window cleaner and every day cleaners up above, open to view. then cleaners etc seldom used below. It could look very nice and clean out under the sink.
LikeLike
Oh, that's a great idea about one for the washer and dryer!
LikeLike
Great idea and much needed incentive, I am going to the hardware store now. Cheers
LikeLike
I've seen a couple of these, some that turn it into a “wall” w/ hooks to hang brooms, etc., on.
LikeLike
Moving into a rental, fixer-upper. There’s an odd shaped insert in the guest bathroom. About 1.5’w x 4′ deep x 9′ tall. There’s nothing in there. It’s just an empty space. THIS IS PERFECT!!! Can’t wait to get started. Thank you for all the details.
LikeLike
I’m so pleased you’ll be making one, Marisa! It will be a great spot for storing toiletries and towels.
LikeLike
Hello. I just wanted to say thank you for sharing this. I am going to be making this for my wife to use in our kitchen.
One thing you mentioned in your write up is that the caster wheels on the bottom clunked a little across the tiles… what about sliding a board underneath so the casters had a smooth surface to travel across? It should only raise things up about an inch or so and could be painted so it would be less noticeable. Just a thought. Thank you again for sharing.
LikeLike
That’s a great idea, Daniel! 🙂
LikeLike
Heather this looks awesome I want to make one myself.
What do you mean by “Then he cut 1×4 boards to fit on the inside as supports for five shelves.” In looking at the pictures I just see the shelves and it’s not clear how they were attached.
Also how did you keep it square? I don’t see any supports in the corners. How do you keep the top it from “swaying” into a parallelogram?
Thanks
LikeLike
Good question! If you look very closely, you’ll see there are 1x4s framing up the “outside” of the pantry, and then smaller 1x4s cut to fit above and below each shelf. It’s hard to see unless you really study the photo, but that’s how he’s kept the shelves snugly in place. And as for keeping it square, we didn’t do anything — I think the two layers of 1×4 have kept it nice and straight.
LikeLike
Have a quick question. Do you find that the items you have stored on the shelves get hot from being next to the refrigerator?
LikeLike
Nope, we haven’t noticed that at all, Ida. We keep all of our spices there, as well as pasta, cooking spray, oil, etc. and it’s never been an issue.
LikeLike
Thank you.
LikeLike
Pingback: 15 Super Brilliant Ways to Organize Your Kitchen
Do you have the exact dimensions for this? I think I could make one that is exactly like yours for my kitchen! Thanks so much! Breanna
LikeLike
Pingback: 30 Unique DIY Hidden Storage Ideas (Space Saving and Secret)
Pingback: Easy DIY sofa tables - My Hub List