
Kids silhouette art

My kids are both in the stage where they don’t want me to take their picture. Ever.
Well, the five-year-old doesn’t want his picture taken and the three-year-old copies her brother and refuses, too. So our days involve a lot of pleading to take just one picture and then turning off the shutter sound on my iPhone and sneaking a few more.
When I got the idea for this project, I tricked the kids by telling them I didn’t want to take their picture, but I wanted to take their silhouette — and they didn’t even have to smile. They were intrigued and I was able to grab a few shots while I rambled on about silhouettes and profiles and the shapes of their faces.
Do you, too, enjoy tricking your children into taking their photo? Well, here’s how to make your own silhouette artwork …
Have your subject stand in front of a window and face off to one side, so you can take their picture. I probably could have found a good “profile shot” of each of the kids if I really tried, but it was easier to just snap new ones.
Pull up the photo on your computer and scale it to print at a good size for your frame. I wanted both of the kids faces in one 8 x 10 frame, so I printed each photo — landscape — on an 8.5 x 11 sheet of plain printer paper.

Carefully cut out each silhouette, preserving the details as much as possible. Cutting out around my son’s hair-flip and my daughter’s curls wasn’t easy, but you don’t want to lose those features.

Trace each cut-out onto a fresh piece of paper — white, black, patterned, anything. I toyed with the idea of using pink and blue scrapbook paper, but decided it would look better using plain white. If you have two subjects and you want them to be facing each other, you might want to flip one of them over and trace it in reverse. (I did, since I’d accidentally stood both kids in front of the window facing the same direction.)
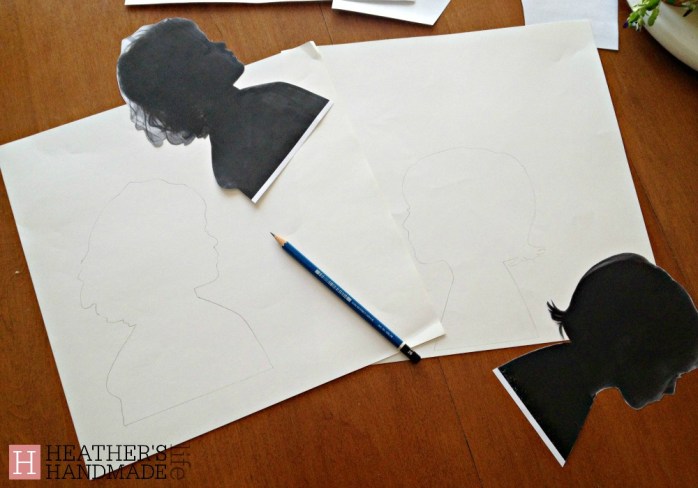
Once each cut-out is on fresh paper, check the height against your frame. You can easily lop a few centimeters off the bottom of their shoulders if necessary. I trimmed away some of their “shirts,” as well as my daughter’s hood so her back didn’t look puffy in the finished product.

When you’re happy with your silhouettes, open up your floating frame and stick them to the back piece of glass with a few pieces of tape. You could definitely use a standard frame, but I loved the idea of defining the silhouette by seeing the wall colour behind it. Put your frame back together and you’re done!
I have to say, this project really surprised me. I’d figured the end result would just be a nice frame with cute silhouettes of a boy’s face and a girl’s face.
But these little paper cut-outs are so distinctly our children — from the little flip of our son’s hair to our daughter’s pouty lips and curls.
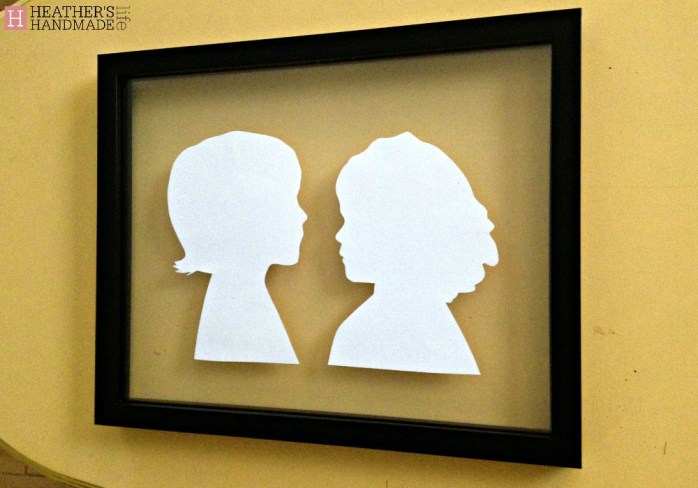
I catch myself looking at it all of the time and it makes me really happy. I want to try a larger frame next time and use silhouettes of all four of us. My husband hates getting his picture taken too, but maybe I can trick him.
“Honey, could you just stand by the window for a second to, um, look over there at the wall? And hold really still? … ”


As featured on …


