
The one thing that stopped me from using a real camera for YEARS

This post is brought to you by Fujifilm and their X-A3 camera. All opinions, as always, are my own!
***
We’ve lived in our house for almost six years (!!!), so for almost six years, I’ve watched our next-door neighbour meander around with a real big-girl camera.
She just always looked so professional with this big camera hanging on a strap around her neck. I’d hear the little click-click-click sound that I naturally associate with a “good” and “real” camera.
(Meanwhile I’m over there tapping my iPhone’s digital shutter button and maybe hearing a little “ch-chhh!” fake camera click. If my phone isn’t on silent.)
And when I saw her finished photos later on? I would be blown away by the difference. Sometimes she’d take my kids’ photos, too, and they would automatically be my favourites. Their hair, their eyes, the sunlight in the background — EVERYTHING looked a million times better than my sad little iPhone photos.
But still, for almost six years, I did not upgrade to a real camera.
(The last camera I owned was a tiny point-and-shoot that I abandoned once my smartphone cameras had more megapixels — or whatever we used to say, back in point-and-shoot days of yore.)
I stubbornly continued to take ALL of our family photos (and my WORK photos) on my iPhone.
For one important reason.
Timing.
***
You see, my neighbour’s photos were STUNNING. There was no denying that. She is crazy talented
She is crazy talented AND she was using a quality camera, so they blew my iPhone photos out of the kiddie pool (which we’d both be photographing as our kids played).
She would take dozens of beautiful photos of our kids splashing around together in the backyards — crouching down and tilting the camera to get the best possible angle.
I would half-heartedly lean over from my lawn chair and snap a couple on my iPhone. Then I’d sit back and upload a couple of the best ones to Facebook or Instagram, and pass her the phone to take a look.
“Those are great! Can you text them to me?” she’d sometimes ask.
Why did she want my only-OK iPhone photos?
Because they were IMMEDIATE.
They were photos she could text or share right away.
Not beautiful photos trapped in her camera.
It would usually be weeks before she sat down with her camera, the connect-y cord and her laptop to start the arduous process of transferring everything off her memory card. The photos would certainly be great when they eventually got on social media, but the immediacy was lost.
It was a long, annoying process she didn’t care to do very often.
And that’s what convinced me I wasn’t cut out for a “real” camera.
I needed the ability to snap some photos and get them onto social media, in a text, in an email for work, etc. RIGHT AWAY.
***
So when I attended an ECM Media workshop earlier this year and our fantastic instructor, Matt Corkum from Fade to White Photography, told me there was a camera that would do exactly that, I was intrigued.
Enter the Fujifilm X-A3 …
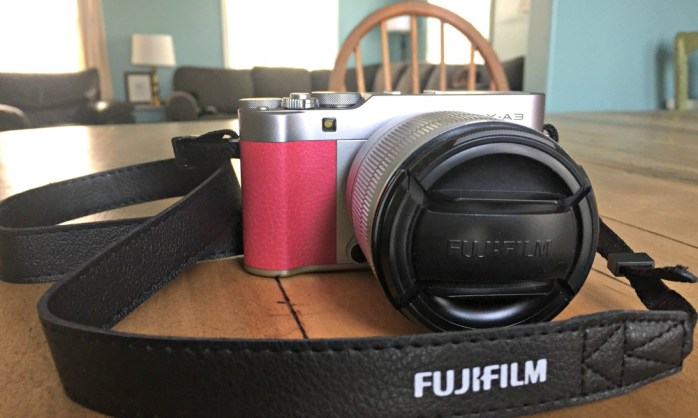
Fujifilm was kind enough to send me a gorgeous pink X-A3 in exchange for me sharing a bit about how to use it. Thank you, Fujifilm!
So, since getting the photos OFF a camera was what kept me from getting a camera for so many years, this feels like a natural place to start.
I’m going to walk you through how easy (and fast) it is to take photos from your REAL camera and zap them over to your smartphone for sharing, posting, texting, etc.
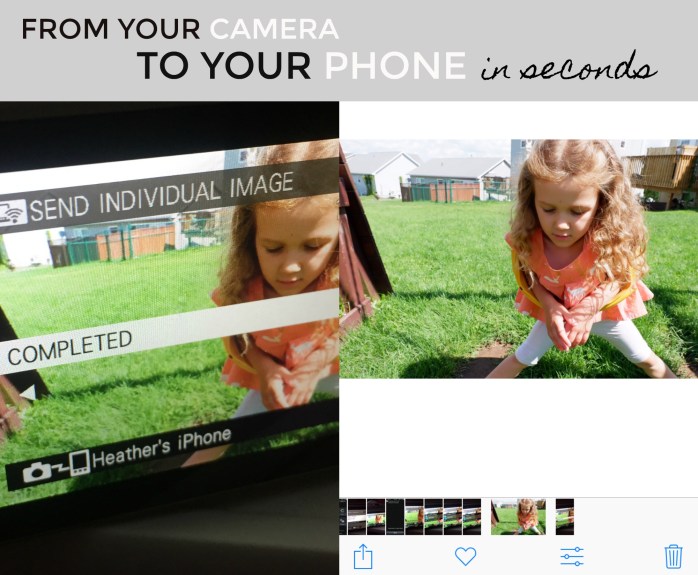
STEP 1: Open the Fujifilm Camera Remote app on your smartphone

STEP 2: When you’re in view mode (looking at photos, rather than taking them) hit the MENU/OK button on the camera twice.

(It’s once for the playback menu, and once more to select “Wireless Communication)
STEP 3: Select the camera’s network

Your camera will be like “This phone cool? We know this person?”
“Yup, they’re good!” you reply as you hit “MENU/OK.”

STEP 4: Click “Receive” in the app to immediately scroll through all of your photos.
When you see one you want to send to your phone, just hit “MENU/OK.”

STEP 5: The photos you selected are MAGICALLY in your phone’s camera roll.
Share on social, text them, email them — whatever you want!
Being able to take GOOD photos on a REAL camera has been a gamechanger. I’m still working my way through all of the features — especially the intricacies of the lens, shutter speed, white balance, etc. — but I can already see such a difference in my photos.
(Like the ones in yesterday’s post!)

I needed a real camera, and I’m glad the good folks at Fujifilm invented a way for (impatient) people like me to take great pictures AND be able to share them instantly.
Next time I’m going to share my secrets for how to easily back up important photos.
(Well, ANY photos, actually — if I go through my photo folders, I find plenty of random screenshots. That’s how I remind myself to buy/do/ask something, since I’m always scrolling through my camera roll.)
Happy photo-taking!
(Saying “Happy shooting” just didn’t feel right. You know?)

When your baby goes off to Primary

Dear Ms. B,
I’m about to loan you something very precious to me: my baby girl.
She’s the last baby I’ll ever have, and she’s starting Primary this week. She’s spent the last two years wishing for you as her teacher, and she almost can’t contain her excitement as she packs and re-packs her new mint-coloured backpack printed with little hearts.
When I wrote to my son’s Primary teacher, two Septembers ago, I told Mrs. M how I would be crying on the first day. How I would be fighting back the urge to follow the bus and lurk outside the classroom — sneaking peeks of my baby boy on his first day of school.
But this time, it’s different. You already know my little girl, Ms. B.
You know her sparkling hazel eyes, pointed chin and musical little laugh. You know how she loves to watch those annoying Elsya and Anya videos on YouTube, because your little girl watches them too.
You know her dresses are handmade and her temper is fierce. You know she is funny and friendly and so eager to be good for you.

This little girl is my lucky star. She fills me with light and challenges me in ways no one else does.
You know her because we’ve been a part of the school for two years already. She’s been my helper at the breakfast program, and she’s proudly handed out apple slices and banana halves to the big kids. She’s skipped down the halls and visited you in your classroom.
She’s going to march in on the first day like she owns the place.
As for me, I won’t have the same worries I did two years ago. I know exactly what her classroom looks like because I’ve been there many times. I know what she’ll need to bring every day. I understand the hot lunch tickets and the baggies of money to send for the book fair.
I know the teachers and the principal and the custodian and even a lot of the students. I know what she’ll learn and how much it will amaze me to see her learn to read.
I know how quickly this year is going to fly by, and how you, like dear Mrs. M., will always be adored, appreciated and remembered fondly by all four of us.
I won’t be in the classroom on the first day of school, Ms. B. I won’t be one of the first-time Primary parents hovering nervously at the doorway, taking just a few more pictures before going to cry in the car. I’ll be putting my baby girl on the bus, along with her big brother, and zooming down the hill to get myself a well-deserved pedicure before settling into my work.
It’s not that I won’t miss her, of course. I’ll have butterflies in my stomach all day as I wait for her to get off that bus. I’ll be dying to know who else is in her class, what you said, what she did, if she ate her lunch, if she had trouble putting on her indoor shoes and who she played with on the playground. I’ll be counting down until she gets off the bus, grinning as she throws her tiny body into my arms.
It’s just that she’s my last. I know the drill. I trust you and the wonderful people at our school.
This is the moment when I let go of her impossibly tiny little hand.
Thank you in advance for taking care of my baby. She’s ready for you, Ms. B.
And I’m ready, too.
Sincerely yours, a seasoned Primary mom

YOU MIGHT ALSO LIKE … 


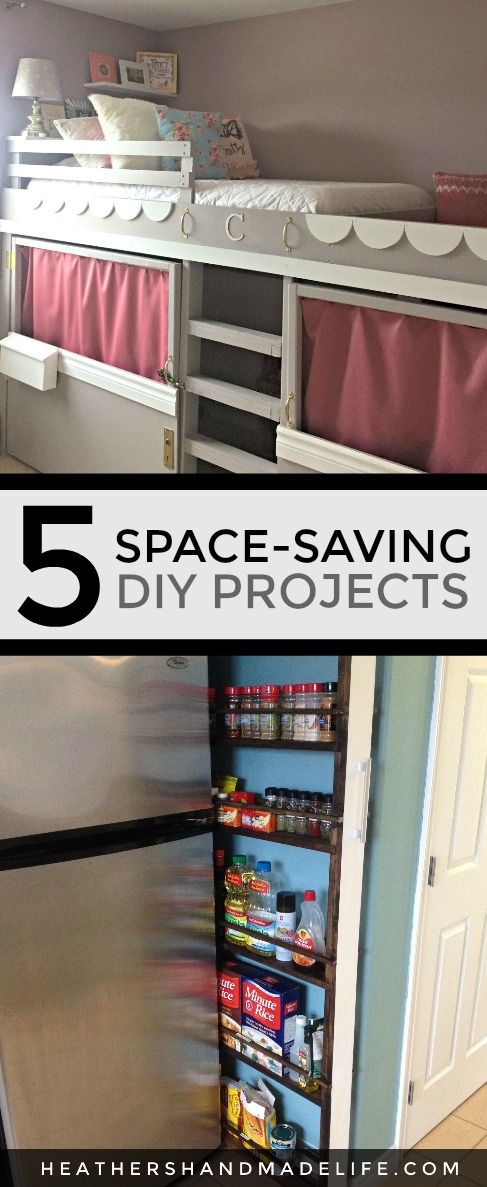
Five space-savings DIYs

As much as I love the ways we’ve prettified and decorated our Handmade Home, I’d have to say it’s the functional changes that have made the most significant improvements. Our house isn’t that big, but we squeeze every inch of space out of it.
Ready to get creative?
Here are five of the most popular space-saving DIYs I’ve completed over the last couple of years of My Handmade Home . . .
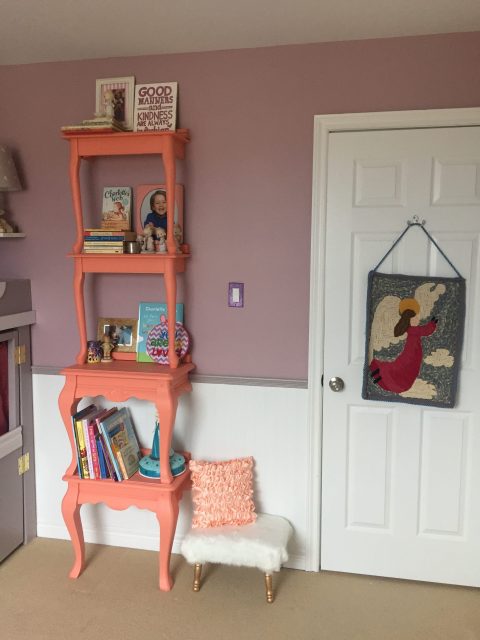
1. Turning one end table into two nightstands.
Cut an end table in half to get two nightstands (that take up less room than bulky store-bought ones).
This is a quick project if you have a circular saw handy. Just draw a straight line down the middle of an end table and saw it in two.
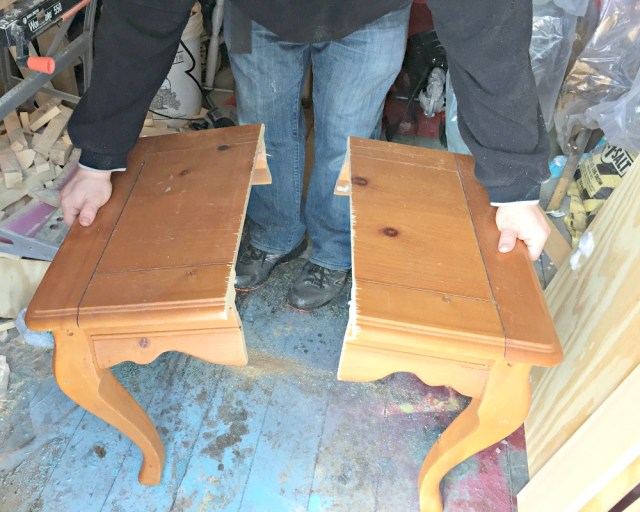
Then you can paint or stain the two skinnier tables and secure them to the wall.
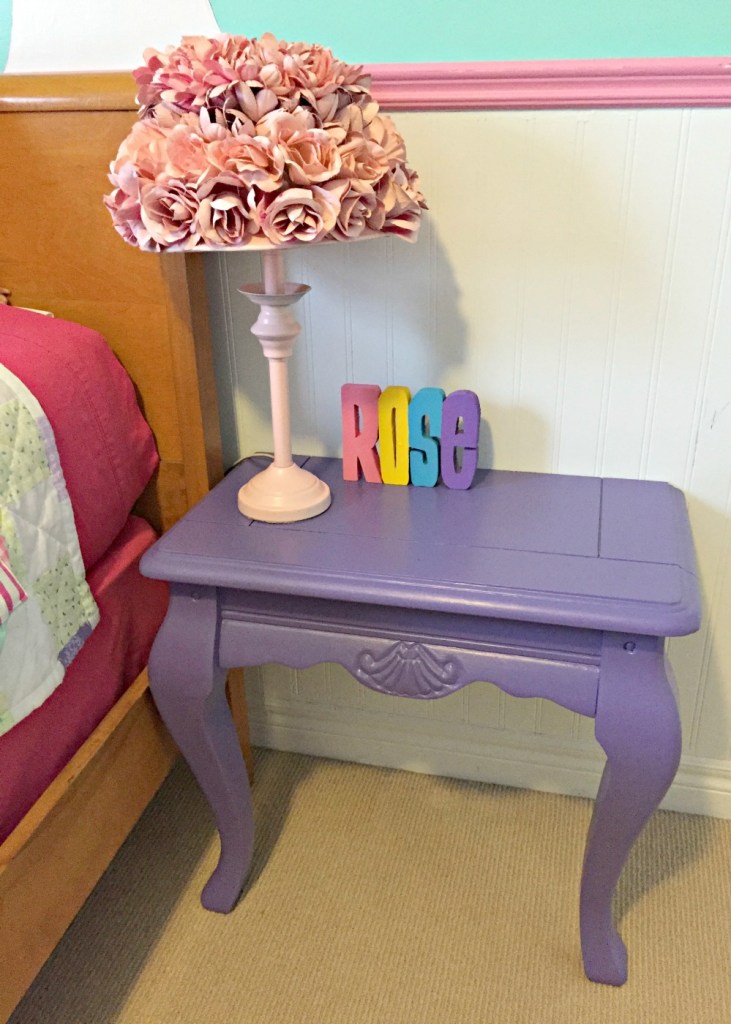
Down the road if you don’t need the nightstands, try screwing them together and stacking them to make a unique bookcase.
2. Transforming a crowded closet into a mini-mudroom.
It took me years to get our front hall closet to a place where it was functional and attractive. The key was removing the hanging bar and installing plenty of hooks for jackets, bags and hats. I also installed low bins on the wall (technically they were dish drainers, I think) for the kids to use for their shoes, hats and mitts.
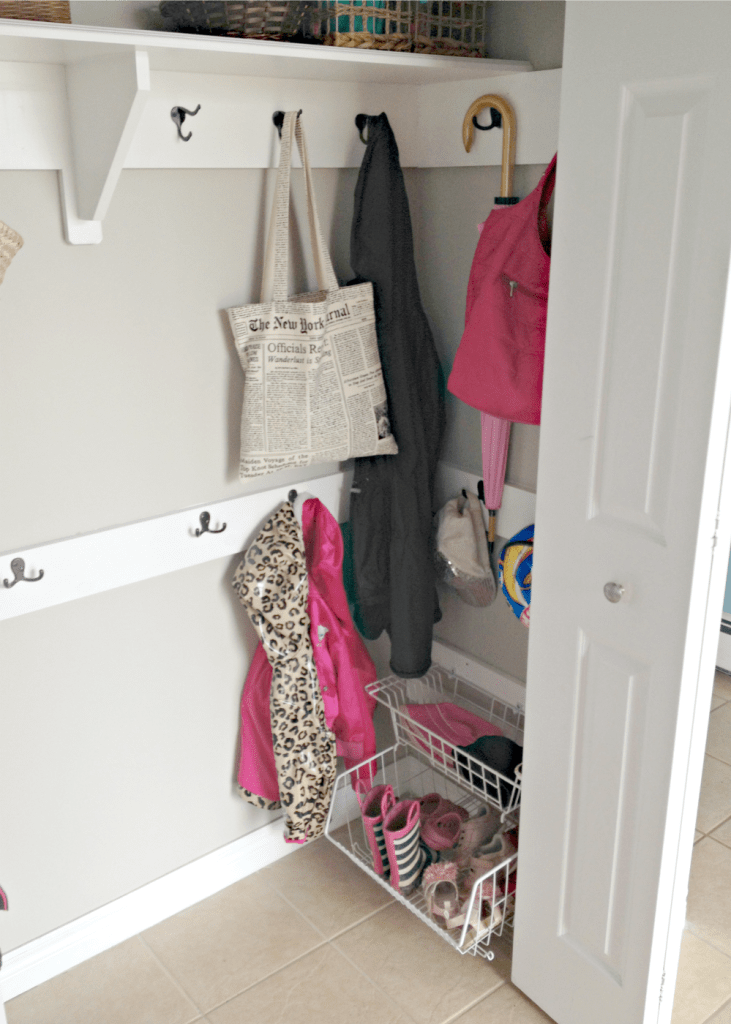
The final phase was changing the bifold doors into French doors that opened wide. That left us with even more space for hook storage.
3. Creating a custom sky-high loft bed.
Our daughter’s cramped bedroom just didn’t have enough room for her furniture and toys to spread out comfortably. So we designed and built a loft bed that stretched from wall to wall — giving her an elevated play area in the space left after her mattress ended.
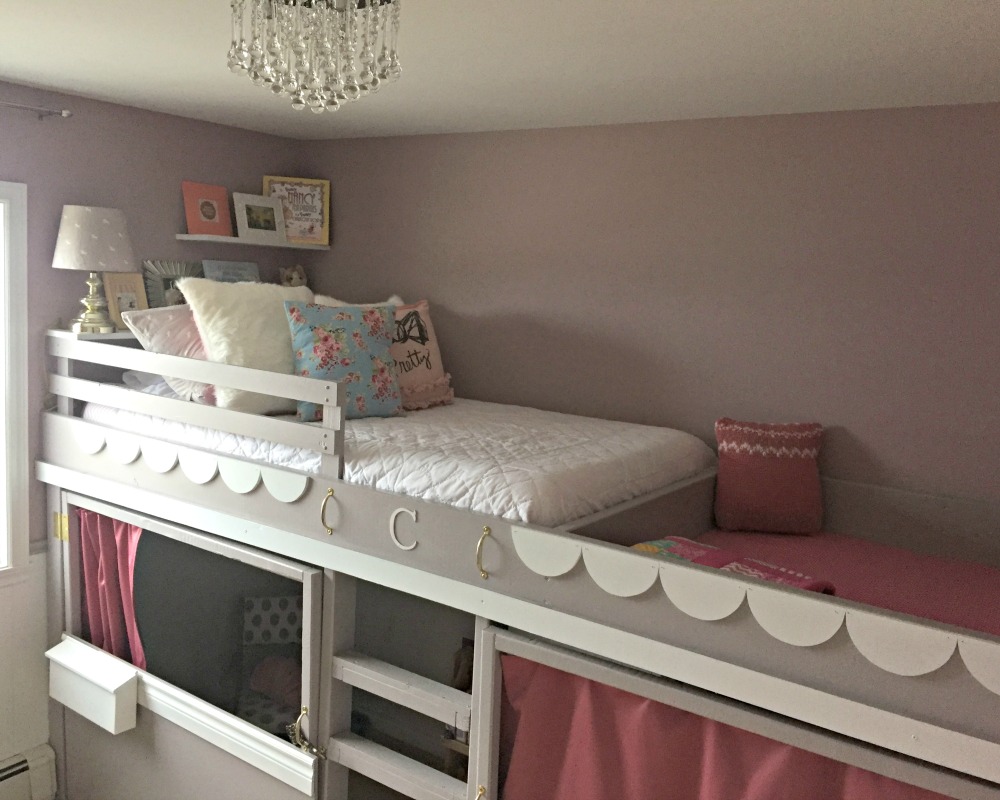

We also turned the entire area below the bed into a cottage-style playhouse, complete with swing-out doors with their own little curtains. Even though it’s a massive piece of furniture, it was like we doubled the size of her bedroom by giving her a second level.

4. Building a slide-out pantry.
Our fridge wasn’t wide enough to fill the gap left for it, so what did we do with those wasted few inches of space? We built a tall, skinny pull-out pantry on wheels.

It stores tons of spices, bottles, boxes and packages in that 6” wide nook, and helps us manage our limited cabinet space.

5. Turning a dresser into a “guest room” in a box.
We don’t have a guest room in our three-bedroom, four-member house. What we do have is a daybed in our basement playroom, and it wasn’t feeling very guest-y — just like a bed stuck in the middle of toy chaos. It was also a pain to drag bedding and towels down two flights of stairs whenever we had company.
So I snagged a hand-me-down dresser, gave it a cool paint colour and new hardware, and used it to create a “guest room in a box.” When we don’t have guests, the drawers hold the sheets, quilts and pillows for the daybed — along with a hairdryer, hangers and travel-sized toiletries.

Most of the drawers get emptied when I make the bed just before our company arrives, and then they have a nice place to unpack their suitcase. It also keeps that corner of the room feeling more like a guest space, rather than a toyroom.
xo
Don’t forget to share the love by pinning these tips! 😉
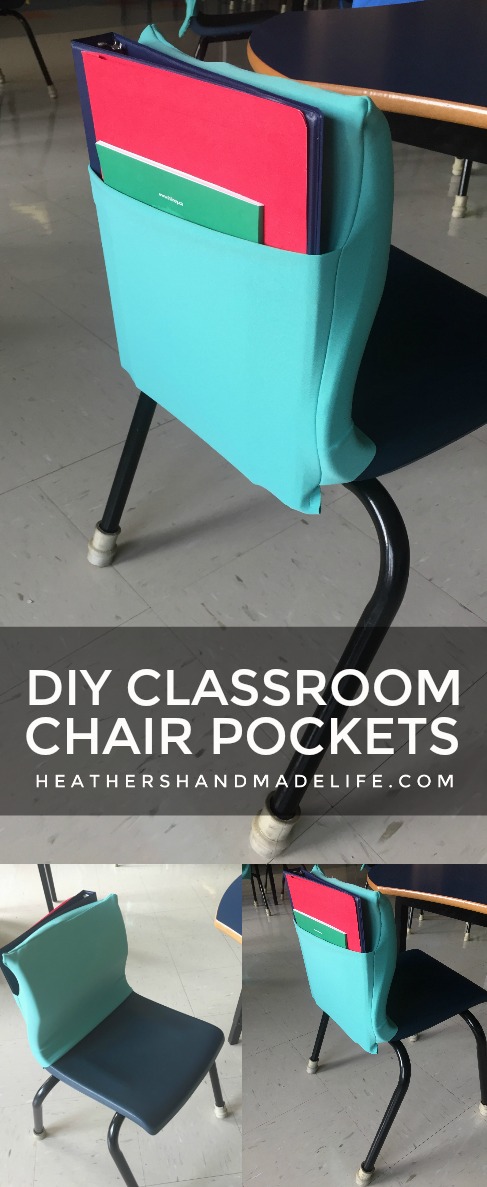
DIY chair pockets for classrooms

We’re less than a week from starting school (!!!) and a lot of my friends are teachers, so sometimes they let me help them decorate their classrooms. (Literally the one thing I think I’d enjoy as a teacher, other than writing on those big pads of paper on the big stand.)
(Literally the one area I think I’d thrive as a teacher, other than writing on those big pads of paper on the big stand.)
My good friend has her very own Primary class after years of working part-time, and I was SO pumped to make her something for the occasion.
For less than $20 in stretchy fabric from the discount section, I was able to make 20 of these chair pockets for the tiny (adorable) chairs in her classroom.
Want a set for your own classroom (holla, teachers!) or for a special teacher in your life? (They are ALL special, for real.)
Here’s how to make your own …
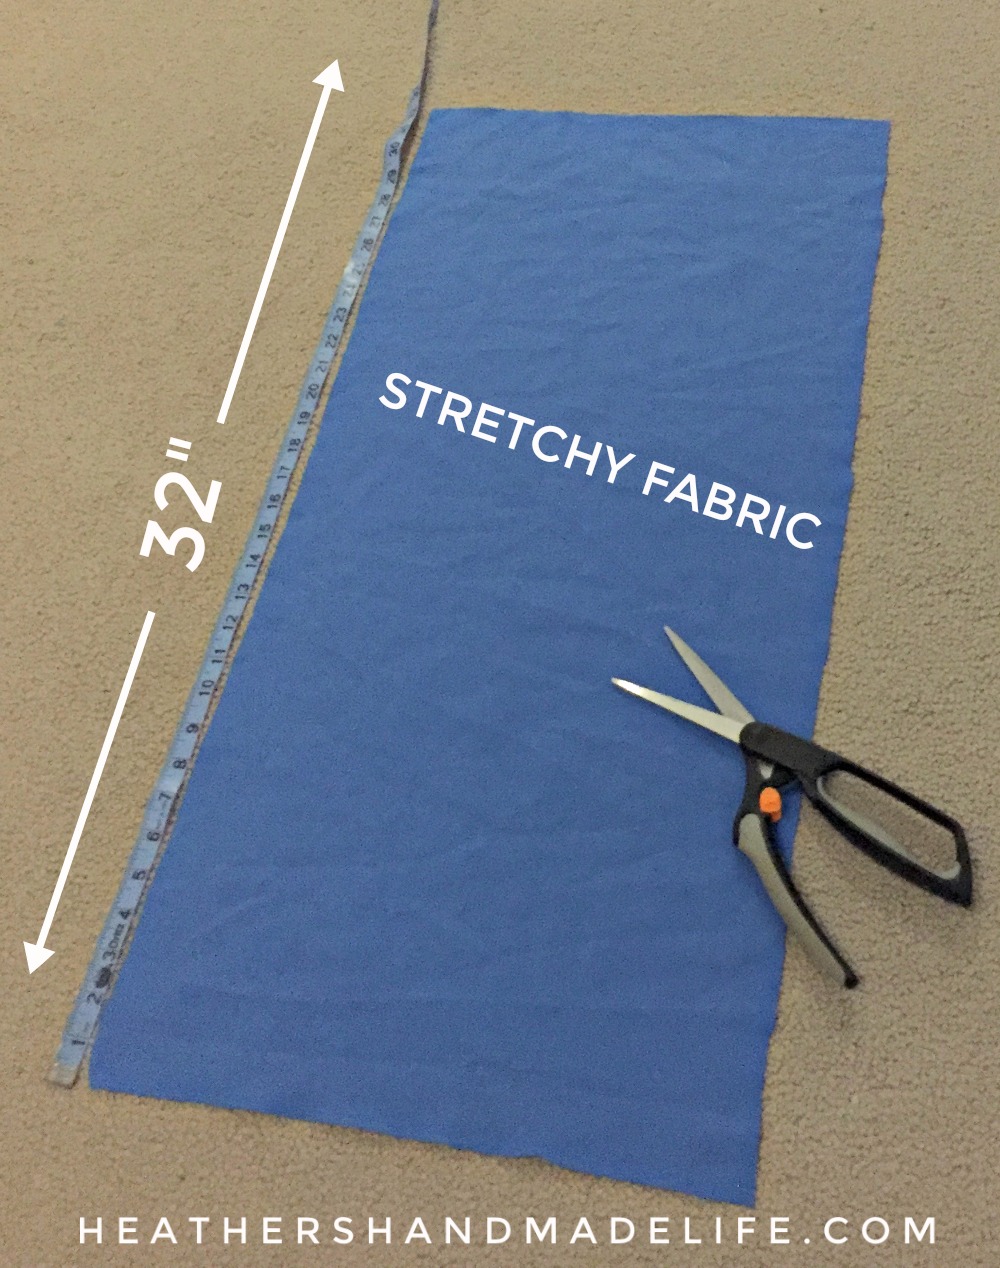
Cut a length of STRETCHY knit fabric that’s about 32″ long and 12″ wide.
It honestly does NOT have to be exact, thanks to the stretchiness.

Chop your piece of fabric in half, about 12″ from the bottom.
I didn’t measure except for this picture, TBH.
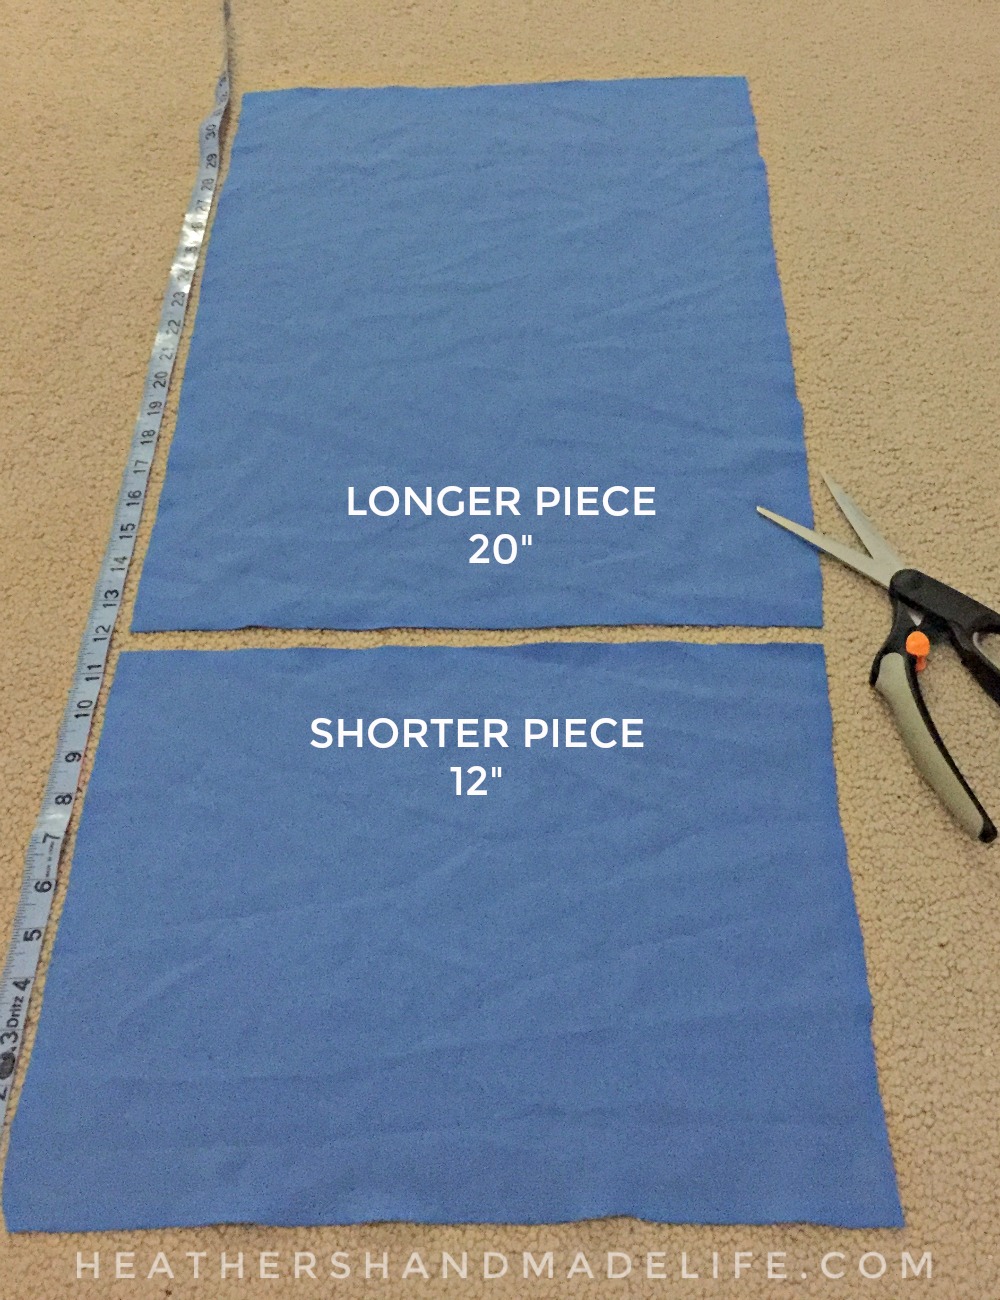
Now you’ll have two pieces — a longer (20″ or so) and a shorter (12″ or so).
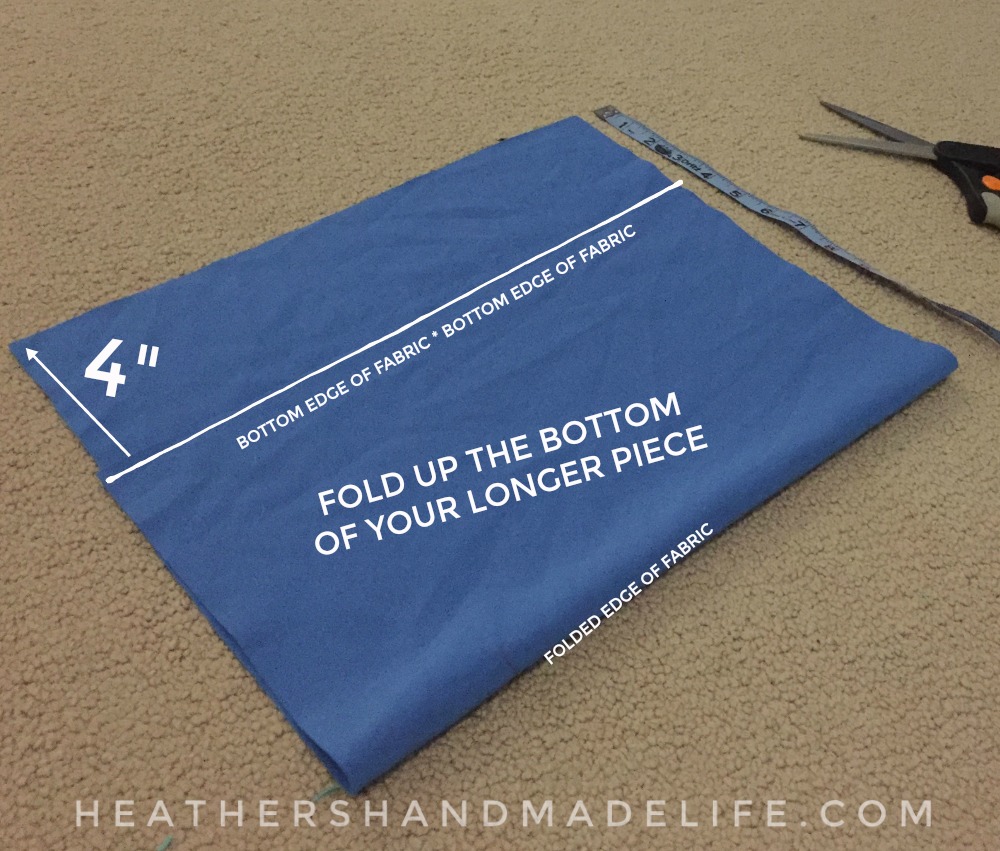
Take your longer piece. Fold up the bottom until it’s about 4″ from the top.
(You’re making a pocket.)
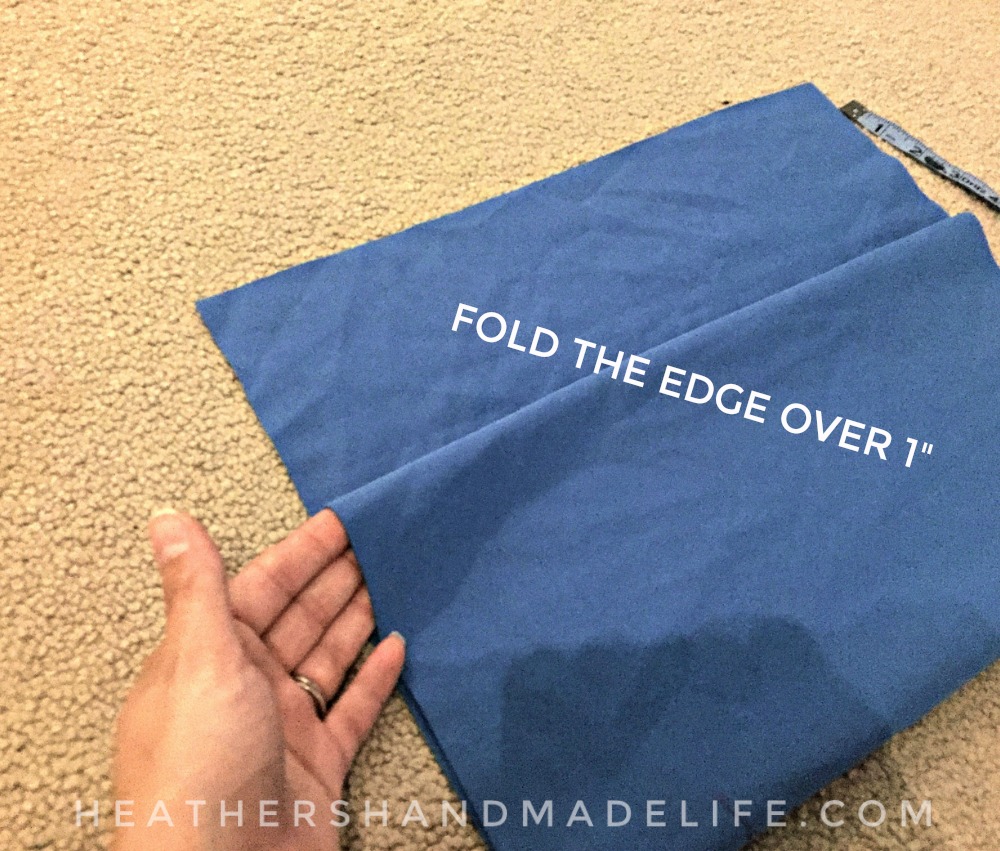
Take the edge and fold it over about 1″.
This is to make a nice folded-under edge on the finished product. (No need to hem because stretchy fabric won’t fray — it just looks nicer folded under.)
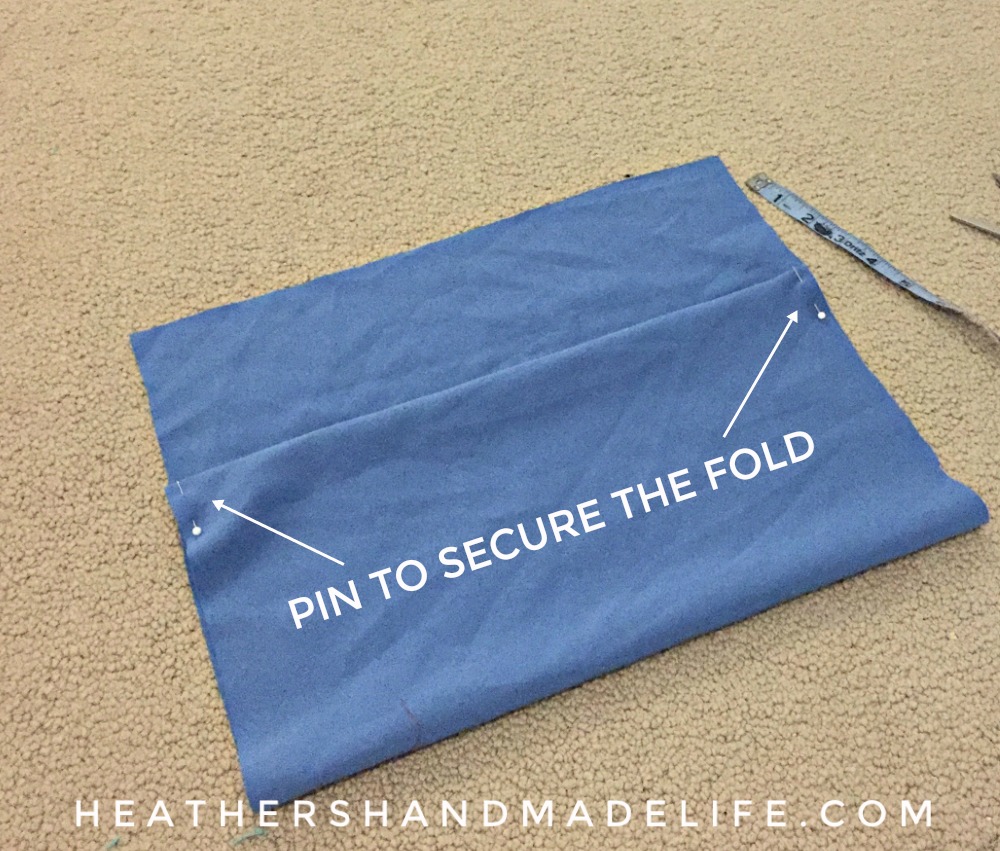
Pin the edges to prevent your fold from unfolding.
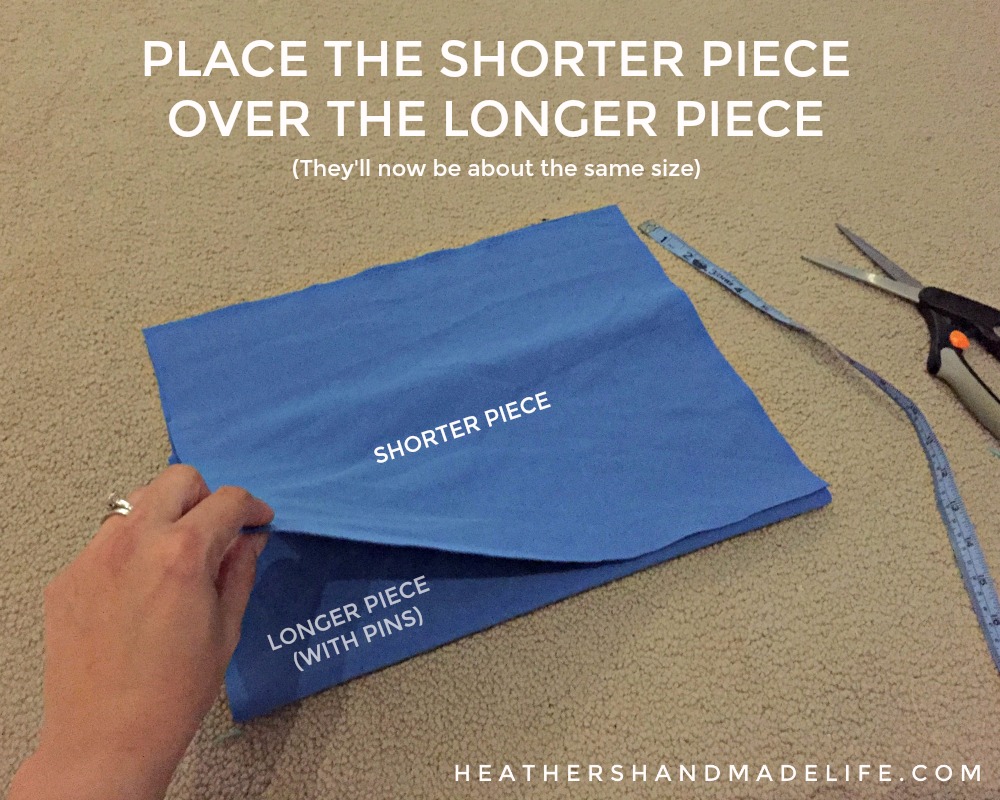
Place your shorter piece over the longer piece.
They should be roughly the same size, but do NOT sweat it if they’re not. This is supposed to be fun, and I never stress over measurements. Obviously.
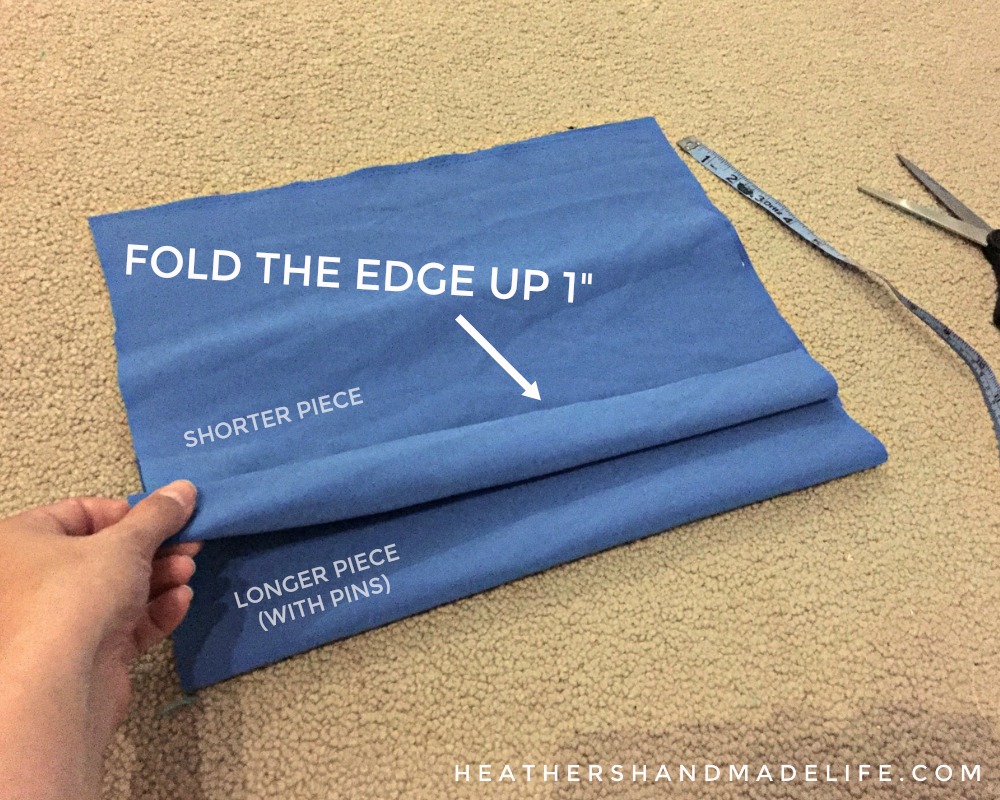
Take the bottom of the shorter piece, and fold the edge UP 1″.
This is the opposite of what you did last time, and it’s all very confusing, but basically this part will be an “inside” of a pocket, so the edge is going to fold in. Just trust me.

Pin the edge to secure the folded-under bit, and then pin around all three edges.
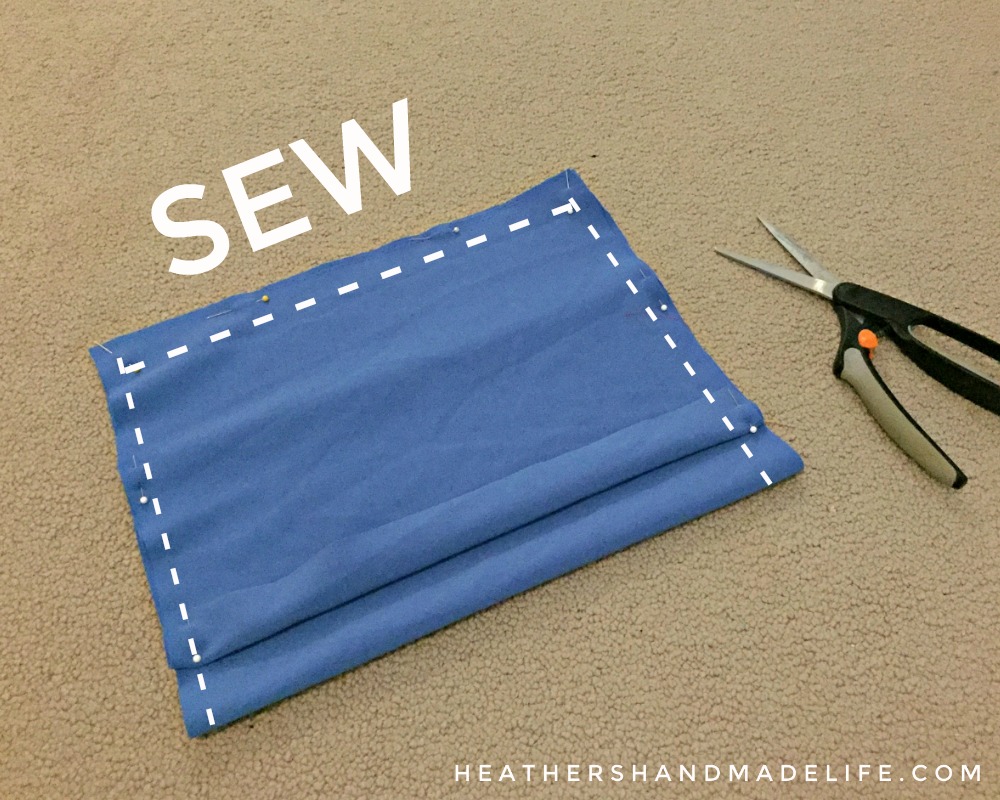
Sew or serge around those three edges.
You can use a stretch-stitch (or zig-zag) on a regular machine.
Then turn your creation right-side out, and you’ll see a complicated-looking thing with a pocket on each side (one facing up, and one facing down).
One pocket slides over the back of the chair, and the other pocket holds books, school supplies, or whatever else the little urchins want to store in there. Because it’s made from stretchy fabric, you don’t need to buy (or mess around with) elastic.


Thanks for checking out my first teacher tutorial! Let me know if you make these for a classroom — I’d love to see photos.
Now back to your regularly-scheduled programming of counting down until the first day of school.
(Five days, 21 hours and 58 minutes until mine are on the bus. But who’s counting?)
The wiggly tooth that drove everyone crazy

Our son is now missing three baby teeth, but I can’t really say he “lost” any of them.
Two were yanked by the dentist (they were interfering with adult teeth trying to grow in) and the third was yanked by yours truly during a bloody encounter in our living room, in front of company.
You see, his first-ever wiggly tooth was stubbornly refusing to fall out. He wiggled it and pushed it and tried to twist it, but it couldn’t move much because of the adult tooth growing in behind it. The only place for it to go was out — as in sticking straight out — and from a distance it looked like he’d already lost it.
“Oh, you’ve lost your front tooth!” neighbours and friends and strangers would exclaim at his gappy smile.
“No,” we’d reply. “It just looks that way.”
Whenever he smiled or spoke, I was grossed out by the jutting-out tooth. He looked like one of those cartoon characters who gets punched in the mouth and grins with a mouthful of crooked, falling out piano keys. It was so tempting to just reach over and …
“Mmmmphh!” he’d shriek, his lips pressed together tightly and his little shoulders shaking with laughter.
Continue reading in my weekly parenting column, The Mom Scene …


As featured on …


