
DIY clothing tree

Now that our youngest has started Primary, I’m responsible for getting two people up, washed, brushed, combed, dressed, fed and out the door by 7:20 a.m. Oh, while also making two lunches, preparing two breakfasts, packing two backpacks and steeping a huge travel mug of tea to sustain me at the bus stop.
For the past two years, I’ve laid out our son’s school outfit the night before — just tossing the shirt, pants, undies and socks onto a spot on his carpet for him to put on in the morning. At seven, he still has absolutely no interest in picking out his own clothes — which I love because that means I get to choose what he wears. #victory


But with our daughter starting school, too, I realized I’d be spending twice as long picking out outfits every evening. It would be faster to pick everything out for the week at once, and I’d also know whether or not I had any urgent laundry to do.
I thought about making cute hanger tags with the days of the week, but our daughter can’t reach her hanging bar — and our son’s is only a towel rod, thanks to his neat closet makeover.

I needed something the kids could easily reach and wouldn’t take up much space in their rooms. So the solution would be to build some sort of tower with hooks — like a hat rack, almost — that could hold numerous hangers without tipping over.
I started with a stand for our son’s clothing, and screwed a simple base (two short 2×2” pieces) onto a long 2×2” board. It wasn’t the steadiest thing, but it would work. But how were the clothes going to hang on it?

I raided my hardware bin and discovered I had two or three coordinating hooks and knobs in various finishes, but not five that matched. I was home alone with two sleeping kids, so I couldn’t run out to buy more — and, naturally, I wanted to build it immediately.
I looked around my studio slowly, trying to think of what I could use as hooks. Plain screws? Nah. What about L-brackets? No. Small pieces of wood? My eyes fell on a bin on scrap wood — organized by size, of course — and I saw a bunch of plain wooden pieces from a knock-off Jenga game. Those could work!

I predrilled a hole in each stick, and screwed them into the front of the 2×2” post — going back and forth from the right to the left to maintain the balance.

I painted the whole thing dark grey (“Ash” by Fusion Mineral Paint) and added distressed red letters spelling out “DEX” to the top. Then I turned my attention to building one for our daughter.
I decided to experiment with a different base, so this time I screwed a 1×2” post into a scrap of 1×6” wood — putting the post at the back to balance out the weight of the clothes that would hang off the front. Then I cut 45° angles on both ends of a smaller piece, and screwed that in front of the post for more stability. This was definitely a better base.

I used more Jenga pieces as hooks, but I attached them differently — pointing to the front and back, rather than side-to-side like the first set of hooks. This was because our daughter would require multiple hangers for some outfits, like skirts with a top and a cardigan.

I painted our daughter’s clothing tree a soft pink (a mix of mostly “Buttermilk Cream” by Fusion Mineral Paint, with a bit of “Fort York Red” poured in) and added a sparkly “C” to the top for a decoration. The final step was painting the front of each hook grey (the same paint I used on her brother’s stand) and taking a tiny paintbrush to hand-letter the days of the week.

Instead of just having a hook for Monday through Friday, our daughter’s stand includes a spot for her taekwondo dobok and ballet leotard, as well as one weekend outfit (mostly because I wanted to balance the hooks on each side).
Because the hooks are staggered (front and back, left and right) there’s room for a week’s worth of hangers without getting things tangled up. When you start filling the hooks from the bottom and work your way up to Monday, it means you don’t have to rifle through layers to find what you need. Remove Monday’s outfit, and Tuesday’s is right there on top.
Our kids LOVE their new clothing trees, and had me filling them up before the school year even began. (“Uh, it’s summer — throw on any shorts and any T-shirt.”)

These outfit-organizers been super useful since school has started, when we’re all rushing around and everyone’s sleepy. I tuck underwear and socks (or tights) into each outfit when I “fill the tree” Sunday evening, so the kids just grab that day’s hanger and have everything they need.
Fingers crossed this system keeps working for at least a couple of years, because I must admit I love picking out their outfits — and I know that can’t last forever!

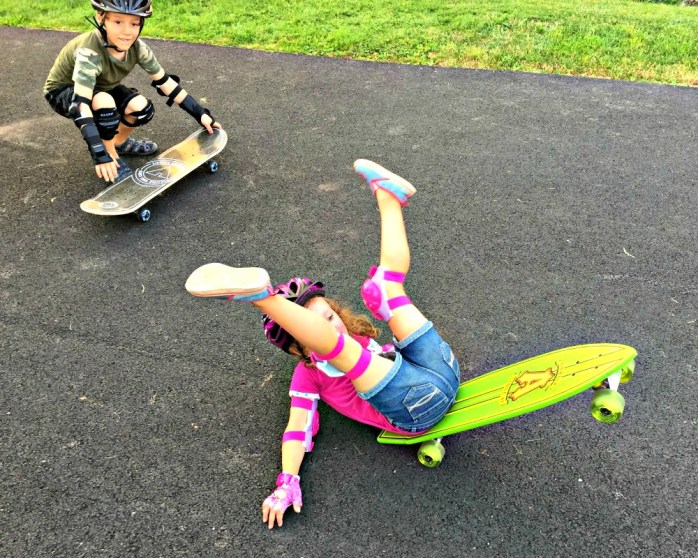
When little kids skateboard

All it took was a few longing glances at the skateboard ramps, while playing on the Halifax Common playground, for our kids to become obsessed with the idea of becoming skateboarders.
The first time they asked me for skateboards, I laughed and said I’d think about it when they were teenagers. We have the same conversation, regularly, about getting them their own smartphones — the promised land of teenhood always seems to appease them.
But they didn’t let up this time. They wanted to do tricks. They wanted to learn to turn and jump and spin and who knows what else. They promised to wear helmets.
“You’re too LITTLE to skateboard,” I kept protesting. “Five-year-olds and seven-year-olds don’t skateboard! They . . . they ride bikes! They use scooters!”
My only skateboard experience during elementary school was sitting on one and motoring it around with my feet. It would never have occurred to me to STAND UP on that scary, skinny board with little wheels. I mean, I’d fall! Immediately!
(I got my own skateboard one Christmas, as a teenager, and used it exactly twice. It was not as easy as it had looked, and I decided I was no Avril Lavigne.)
Eventually, though, I found myself steering the minivan into the parking lot at the hardware store to check out the skateboards. The kids immediately hopped on and started testing the different models, and I was surprised by their ability to balance and coast along.
They proudly paid for their own boards up at the register, announcing they were using birthday money and allowance. I tagged behind, paying for two sets of child-sized knee pads, elbow pads and wrist guards to go along with the bike helmets they already had.

They tore into everything on the short drive home and tried on their new safety gear. We have a paved driveway that’s flat-ish, so I parked the van across the bottom to act as a barricade before the street. Then it was just a matter of strapping on their helmets, tightening their new pads and nervously stepping back to watch.
I don’t know if it was the setting sun or the excitement on their faces, but they were positively beaming as they cruised down the gentle slope of the driveway. There were a couple of wipe-outs and a few tears, but they quickly got back on and kept going — with their little arms stretched out for balance and their knees carefully bent.
Honestly, I didn’t know if I’d ever seen them so happy.
A few neighbours dropped by to admire their new boards and watch them glide down the asphalt. We lucked out and even had a pro-level skateboarder stop by and show them a few tricks. They skated (or is it “boarded”?) until it was too dark to see, and went to sleep asking if they could do it again as soon as they woke up.
The skateboarding obsession waned after a few weeks, as kids’ obsessions mostly do. But it’s become a regular outdoor activity to go along with the old standbys of biking, scooting and driveway-chalking. They convinced a couple of their friends to get skateboards, too, and sometimes I’ll lay 2x4s along the end of the driveway to stop runaway boards from rolling into the street.
Sometimes we hit up the local skatepark, where they can challenge themselves on steeper inclines. I’d never been to a skate park in my life until this summer, but they’re quite fun actually. I love watching the teenagers whipping through the air and landing solidly on the metal rails, and have to keep resisting the (nerdy) urge to clap for them. (To these boys, I am literally 45-ish and the absolutely lamest.)
I always bring Band-Aids, but sometimes we don’t even need them. Our daughter usually sits down on her board for these slopes, but she’s still way more daring than I ever was. Our son is focused on perfecting something he calls “tick-tacking.”
I don’t know if skateboarding is a passing interest or something they’ll continue to do well into their teens. But for now, I’m glad I decided to let them buy those skateboards.
It’s an awesome, bizarre feeling when you see your children do things you never could — or is it “never did, but still sort of want to”?
xo
The messy fun of learning to read

Disclaimer: I’m a registered blogger in Put Me In The Story’s Share a Sale affiliate network. I earn a small commission on personalized book sales purchased from this link. All opinions are my own.
***
A is for the after-school snack she insisted would be popcorn.
B is for the bows that match her skirt. (Naturally.)

C is the for cute book we just added to our collection: Charlotte’s Messy Alphabet Book, custom-made by the nice people at Put Me in the Story.

D is for Dexter, who listened to us read aloud.

E is for how excited Charlotte gets when she recognizes words.
F is for the fibs she tells about how well she reads. (You’re still LEARNING, we keep reminding her.)
G is for the green sticker on her hand after school every day (the school’s way of reminding them what bus they’re on).

H is for Heather (me), one of the people sending mushy messages in the front of this book. (Adding your own dedication is SO MUCH FUN.)

I is for the iPad, sitting ignored on the kitchen table, as we read together.
J is for junk food. Popcorn’s kind of healthy, though. It has fiber in it!
K is for the kids in this living room, right now.
L is for livid — the angry feeling I was suppressing when I realized Charlotte’s glasses are bent and that’s why they’ve been drooping down her nose all day. 😡
M is for mooch.

(Hi, Annabelle. Yes, we see you. Yes, we know you like popcorn.)
N is for NO MORE POPCORN, TUBS. (The dog is on a doggie diet.)
O is for the option to add photos of your child! (I always add a current pic, so I can remember when I made the book by looking at the picture.)
P is for the way these books are lovingly personalized.
(My kids are obsessed with finding every single spot their name is used. With each book, Put Me in The Story seems to find more ways to slip it in, which they LOVE.)

Q is for the quiet time we like to have after school each day.
R is for the roughhousing that surely follows.
S is for sponsored posts (like this one — but, remember, I ONLY write about things I actually like.)
T is for typos, and I have yet to find a single flub in any of these books (and we have a lot of them). I’m the person who gets really upset when menus spell it “ceaser” (shudder) salad.
U is for unusual. I love how this book uses unusual words for each letter, instead of the standard apple, bear, cat, dog blah-blah you see in 99.9% of alphabet books.
(Couldn’t escape X is for xylophone, but I get that. Darn old X is a tough one.)

V is for how very thirsty I felt eating that salty popcorn.
W is for water, which I’m drinking in this pretty Bando cup.

X is for the (Fujifilm) X-A3 camera I used to take all of these pictures! Hooray for using a big-girl camera! More on that here.
Y is for YOU, the person who should really buy this book for a cool kid in your life. You want them to know the alphabet, don’t you? Think of all the credit you could take for their life accomplishments, down the road.
Z is for … zippers, which I’m pretty bad at sewing?
(I really didn’t end on a good note.)
For real, though. These books are gorgeous hardcover treasures that you will keep forever. (You can take a trip back in time to see ours. There are so many sweet ones.)
And look how EASY they are to customize!

Let me know if you order, and what you think of them! I know you’ll love them as much as we love ours.
Disclaimer: I’m a registered blogger in Put Me In The Story’s Share a Sale affiliate network. I earn a small commission on personalized book sales purchased from this link. All opinions are my own.

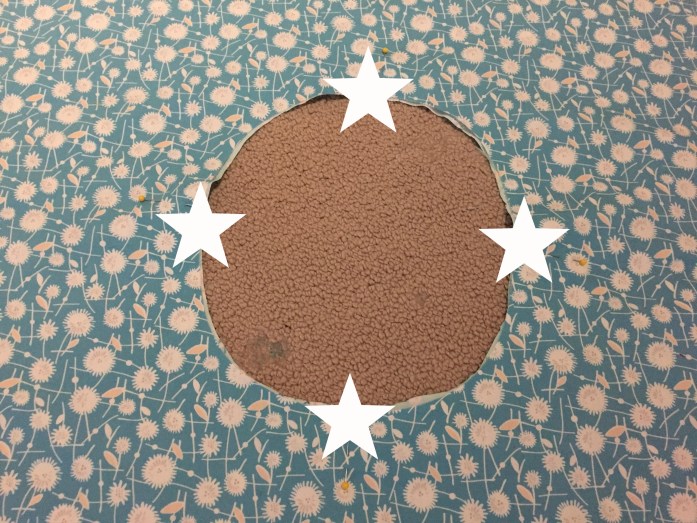
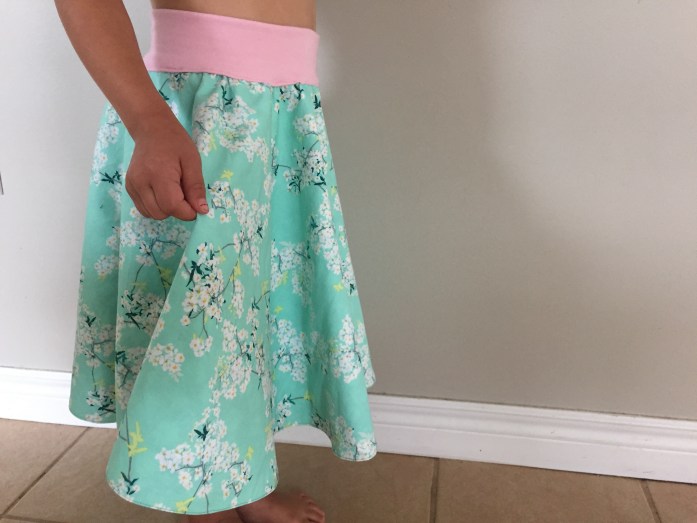
Sew a reversible circle skirt

If you missed my video tutorial on Facebook last week, today I’m breaking down EVERY step of sewing a reversible circle skirt.
No pattern required, and you’ll only need two (2) metres of fabric (or two yards, for my American readers) plus a bit of stretchy knit for the waistband.
I used Art Gallery fabrics from Atlantic Fabrics, and can’t you just die for the prints? The fabric is soft and floaty, too — perfect for a skirt.
READY? Here we go!
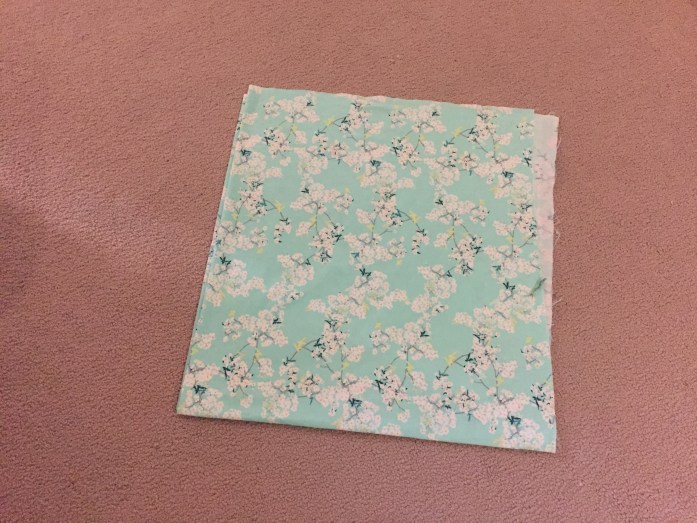
Start with 1m of fabric.

Fold it into quarters.
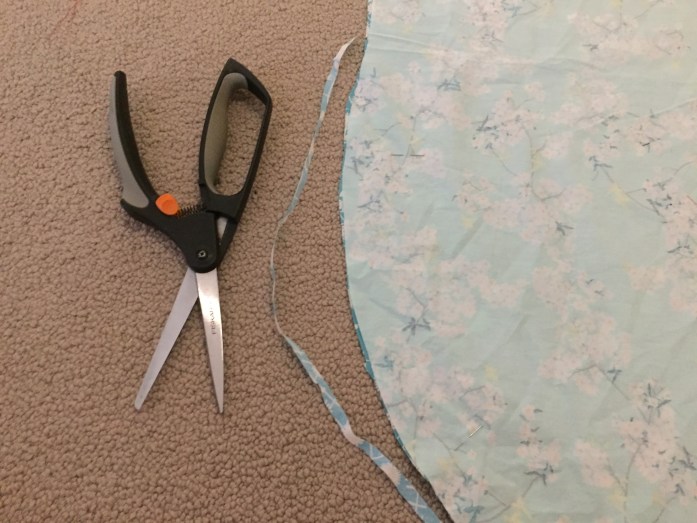
Draw an arc from one end the fabric to the other.
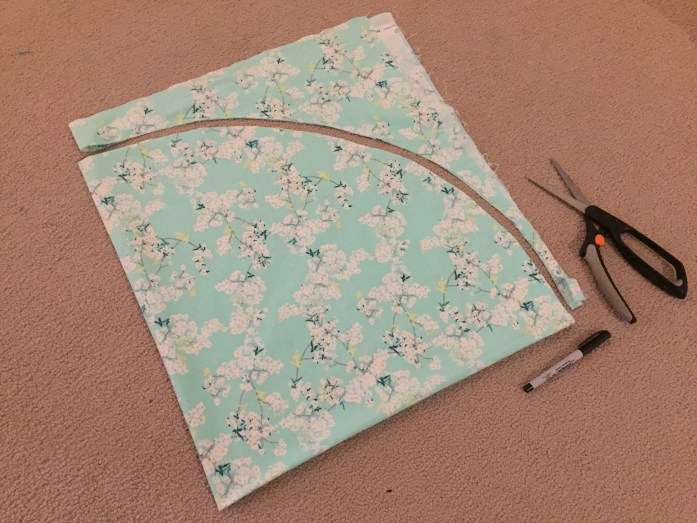
You don’t have to measure — you can just roughly eyeball part of a circle. Just make sure you’re not cutting anywhere near the corner of the fold. (Otherwise you will NOT end up with a circle.)
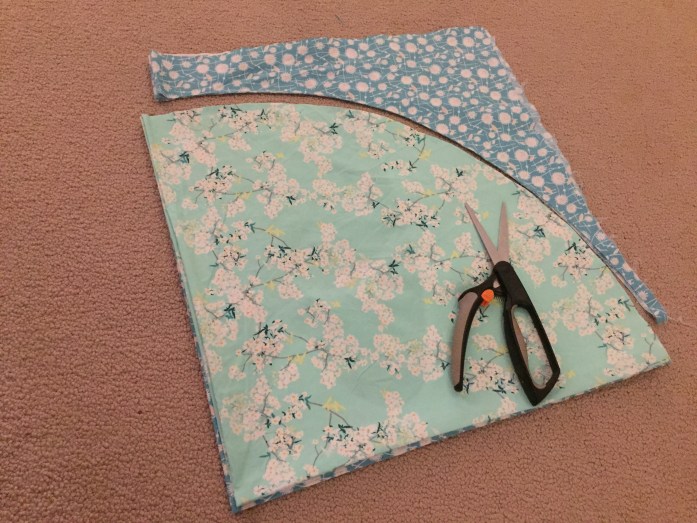
Now do the same thing with your second metre of fabric. You can use your first circle as a template.
Now you want to cut a little bit off the center of the circle — that’s the part where the waist will be.

When you open up your fabric, you should have two circles just like this!


Now place your circles (right sides together) so the good sides of the fabric are touching and pin all the way around the outside edge.

Don’t worry if your circles don’t exactly match up, because mine sure didn’t! You can just take your scissors and trim all around the edge until they’re the same size.
Then sew all the way around the outside of your circles.
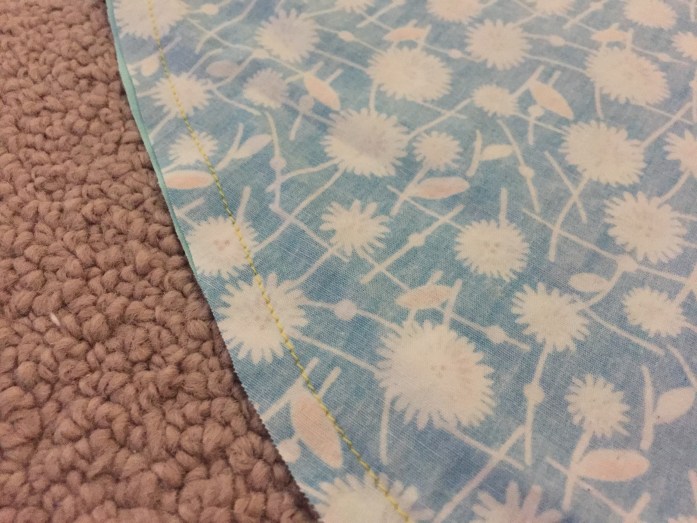
If you want your skirt to have a really smooth, clean edge, cut little notches all the way around the outside of the skirt where you just sewed.
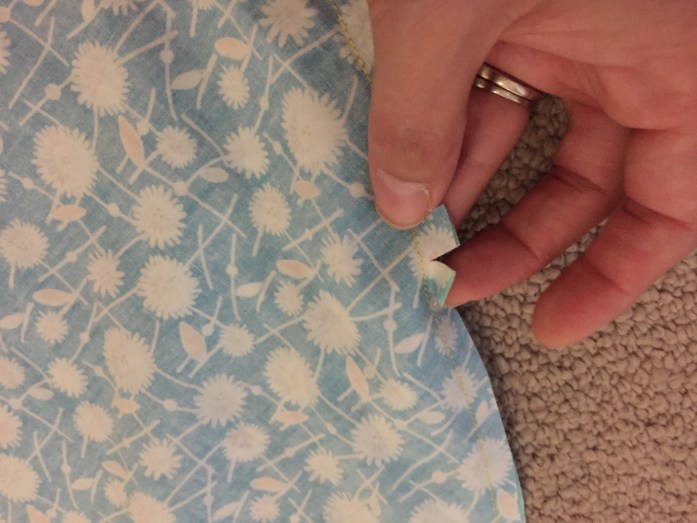
This will make a nicer curve when you turn it right side out.
See? Right side out! 😉
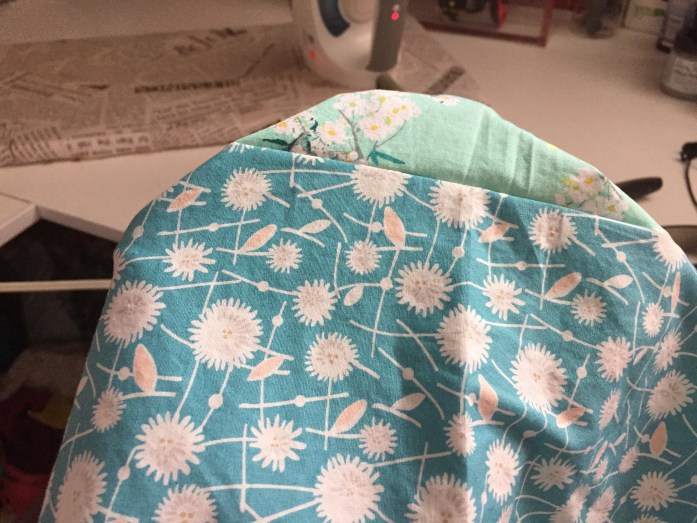
Now you have to press those two layers together and iron all the way around the edges to make it nice and crisp. When you’re done, it should feel like one piece of fabric that’s just different on both sides.

Now the skirt is finished, but you need to make a waistband — and it has to be one that looks good on both sides (so you can reverse the skirt).
Take some stretchy fabric and cut a rectangle.

It should be as wide as you need to wrap all the way around your child’s waist, or about twice the width if you hold up a pair of their leggings and look at them, and 4X as long as you want the finished waistband to be, because it’s going to be folded a lot.

Fold your stretchy piece of fabric in half and then sew all the way down one side.

Turn it right out and you basically have a wide long tube of fabric that kind of looks like a yoga pants waistband. One end is soft and comfortable and the other end is just raw edges.

Go back to your skirt. It’s time to attach the waistband to the hole in the skirt. Take four (4) pins and put them at the top, the bottom, and each of the sides.
Then do exactly the same thing to the bottom of the waistband (the part with the raw edges).

Now you can drop the waistband into that circle and match up each pin.

Once you’ve matched up the four centre points, you can add a bunch of other pins all the way around, to make sure the waistband is even.
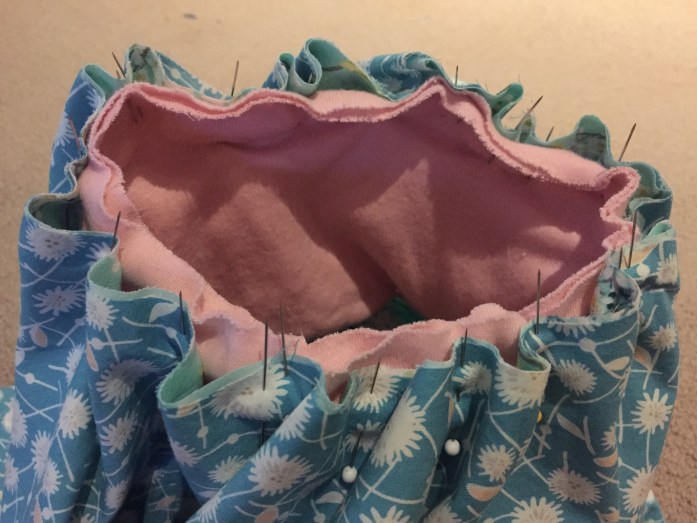
Because the waistband is stretchy and the skirt is made of cotton, you’re going to stretch the waistband as you go around the skirt to make sure it matches up with the skirt. Then just sew all the way around the circle.

When you’re done, you’ll see the waistband is attached to the skirt, but one side still looks kind of wonky because you can see all the stitching.


That’s why we made the waistband really tall, so there’s room to fold it over and make the other side look pretty, too.


Of course, it’s not going to STAY folded over nicely, so you have to do one more line of stitching to go around and secure the bottom of the waistband to the other side, so both sides look good. Just pin it all the way around, making sure you’re covering that stitch line, and sew it one last time.


Now, no matter which way you flip the skirt, both sides should have a really nice-looking waistband.


And then we’re DONE!


Circle skirts are so much fun, because they’re full and twirly!
And, of course, I love a good yoga waistband because they’re soft and comfortable and they grow with your child.

Making a reversible skirt means they have the fun of being able to change their outfit (without actually going through another outfit). #laundrylife

Full video tutorial’s over on Facebook, too!
Let me know if you make your own reversible circle skirt! I’d love to see it!
xo

First day of school = a very happy mommy

The day we’d been waiting for — for what felt like FOREVER — arrived yesterday, right on schedule.
The first day of school a.k.a. NO KIDS AT HOME FOR SIX HOURS EACH WEEKDAY OMGGGG.

It was a huge milestone for C, going off to Primary, but it was also a massive milestone for me, as a work-at-home mom.
For the last seven years (SEVEN YEARS!!!) I’ve always had one or two kids at home with me WHILE WORKING, except for the couple of hours C was in preschool.
And then yesterday, they were both climbing onto that big yellow bus of fantasticness.

I didn’t cry. I knew I wouldn’t.
I didn’t cry when D went off to Primary two years ago, but I did obsessively think about him all day long).
C was different. *I* was different. That girl could have started Primary last year and not blinked an eye. She was READY.
Oh, and we inadvertently dressed her as the little girl in Katy Perry’s “Wide Awake” video (one of C’s favourite songs). Of course we did.

I walked home alone, and it still didn’t feel strange. C often stayed at home while I’d taken D to the bus stop. She could have easily been on the couch watching YouTube videos on the iPad, asking me to make her breakfast. But she wasn’t.
Normally, I’d go down to my office and start working (like I am today), but not yesterday. Yesterday was a ME DAY!
I made breakfast for myself and Darling Husband (celebratory bacon) and then I hustled myself to the nail salon for a pedicure.

(It was lovely except the massive chair pummeled me in the back and I had to turn it off. I’m a baby.)
After my toes were dry, I wandered slowly through the mall. I used three different giftcards (the best kind of shopping). I bought myself three new pairs of PJs. I bought art supplies. I bought socks and underwear for the kids (which is fun to pick out, since it’s really their only “store-bought” clothing).
And, of course, I took happy selfies in the minivan with my iPhone’s timer.


I came home. I made myself lunch. I talked on the phone. Suddenly it was 2 p.m. and I had to go get the kids at the bus.
And there they were, full of smiles and stories.

We came home and baked chocolate-chip cookies together. (I’d sort of planned on having them ready when they came home, but clearly my ME TIME got in the way of baking.) I asked a million questions and they indulged me by answering all of them. We walked through their days in chronological order — starting with the moment they stepped onto the school bus that morning — while licking batter and waiting for the first batch to bake.
Today is different. I came home, had tea and eggs, and zoomed downstairs to start by work-day. I’m still in my (brand-new) PJs and it doesn’t matter, because I’m not going anywhere for hours. I don’t have preschool drop-off or pick-up. I don’t have kids to fetch or errands to run. The house is quiet — nothing but the sound of the washing machine churning in the next room, and the clacking of this old keyboard with the letters rubbed off some of the keys. (A, S, C, N and L, interestingly.)
I’m excited to see them this afternoon, but I’m also so relieved to be alone right now. This new life for all us just feels so RIGHT.
Working in my office — not in a McDonald’s or a playplace or a park or close to the back deck — feels so right. It feels right to be away from them — to have this time by myself, to work and think and BE — and then to happily welcome them home after school. I guess what I’m saying is that it’s as good as I knew it would be.

Now I’d better get back to work. Two o’clock will be here before I know it. 😉


As featured on …


