
How to re-cover patio furniture cushions

I was sweating as we wrestled furiously on the carpet, each of us struggling to win. It was strong, but it was no match for me. With one final shove, I beat it into submission and fell back against the floor, exhausted.
Yes, you might say that sewing with waterproof outdoor fabric is a workout.
It all started when a neighbour asked if I would mind recovering their set of patio furniture cushions. The original cream-coloured cushions were getting dirty and worn from regular use at their lake cottage. The fabric was thin and ripped easily, so she was hoping to have new covers made from heavy-duty outdoor fabric.
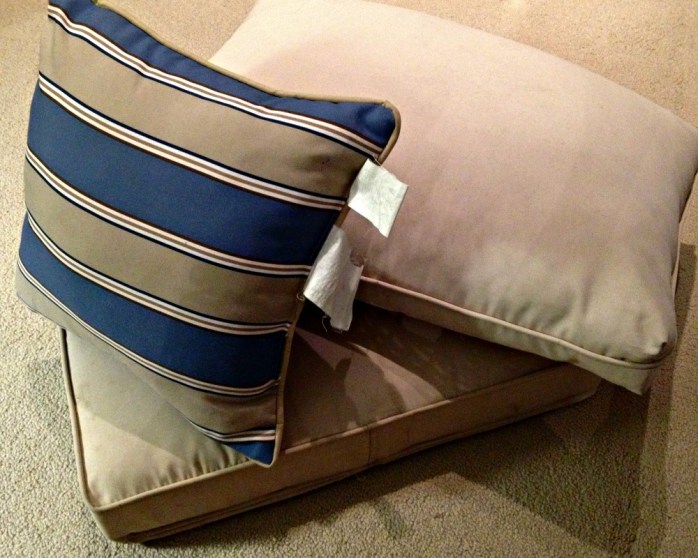
I measured them and told her how much fabric to buy, and didn’t give it another thought. I hadn’t sewn with outdoor fabrics before, but I’d certainly made a lot of throw pillow covers.
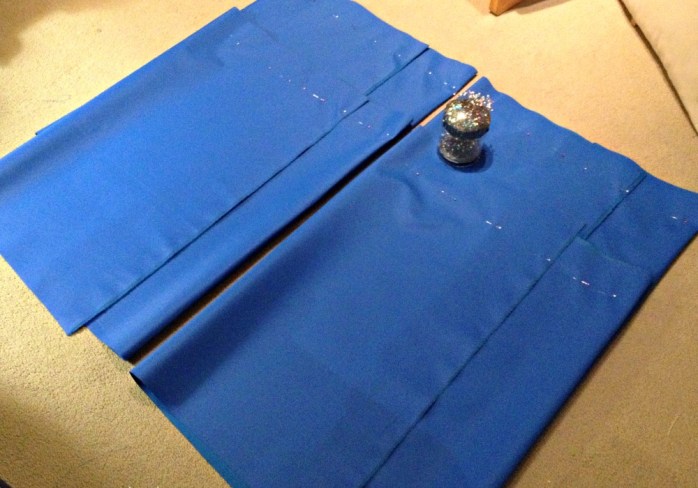
When she dropped off the fabric, I was surprised by the weight of the blue waterproof one she’d chosen for the seat cushions. It was like carrying a roll of carpet down the stairs! I started to worry about my ancient Singer Simple, and if the little guy could handle something so heavy.
//pagead2.googlesyndication.com/pagead/js/adsbygoogle.js
(adsbygoogle = window.adsbygoogle || []).push({});
In the end, of course, Mr. Singer pulled through for me. It helped that each cushion cover only require two lines of stitching — just a straight line up each of the sides.
Outdoor fabrics can be pricey, but it’s usually still much cheaper to recover existing cushions than it is to buy brand-new ones — especially when you have a full set of furniture.
So if you have a set of worn-out patio furniture on your back deck this very minute, here’s how you can spruce them up with fresh new cushion covers …
1. Lie your first cushion onto your outdoor fabric (so the “good” side of the fabric is facing up). Make sure you have enough fabric above and below the cushion to overlap a little, just like you’re wrapping a present.

2. Trim up the sides, leaving 2-3 inches of fabric peeking out from either side of the cushion. The fatter the cushion, the more buffer you’ll want to leave so the cushion cover can contain its puffiness.

3. Fold the top and bottom fabric flaps over the cushion so they overlap, and use pins to close up one of the edges. Remove the cushion and set it aside.
4. Stitch up that side of the cushion cover, and trim off any excess fabric.
5. Stuff the cushion back into the half-sewn cover, and mark where you need to sew the other side. Repeat step 4.

6. Turn the cushion cover right-side out. If you’re fighting with heavy waterproof fabric, this step is tiring on the arms!

7. The front of your cushion cover should be neat and smooth, and the back should have an overlap which forms the pocket. Gently pull the pocket open and stuff the cushion inside. The thicker the fabric, the more you’re going to feel like you’re struggling to cram a hippo into a hamster cage.

//pagead2.googlesyndication.com/pagead/js/adsbygoogle.js
(adsbygoogle = window.adsbygoogle || []).push({});
If you’re making covers for a bunch of cushions at once, it’s much faster to do them in batches. Once you’ve tried one cover on your “model” (the cushion) and it looks good, turn it inside out and use it as a template for the others.

I like to line mine up next to each other, and just fold and pin the fabric so they all match up. Then — magic! They’re all done much faster.
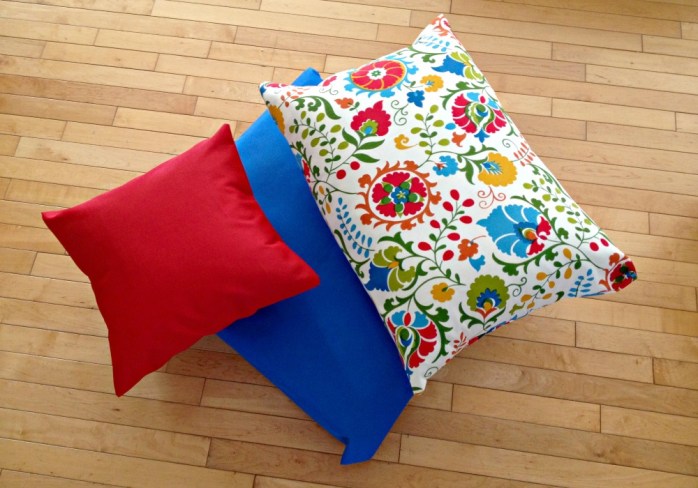
Once all 12 cushion covers were finished, they went straight back to their home on beautiful Shortt’s Lake.

The bold colours will hide the dirt better than the old pale cream cushions, and the waterproof blue fabric on the seat cushions will dry quickly — always be ready for the next wet bathing suit.

When preschoolers text
You know when you write something, and you have a feel this will be one of the pieces that gets readers sending emails and commenting — fast and furious? I shared my latest parenting column on my Facebook page about 30 seconds ago, and I’m bracing myself.
I have several anti-screen people on my Facebook friends list, and I *know* our stance on this is not for everyone. But I’m talking about preschoolers + texting in this week’s column …
 |
| Read the full column here |
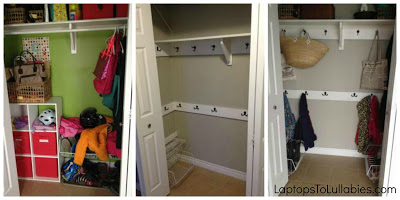
How we turned a disorganized hall closet into a functional mudroom

I’m not sure what went wrong. I listened to Pinterest — at least, I thought I did. I implemented storage solutions. I used pops of colour (perhaps too many pops). I accessorized! Yet my first attempt at turning our entryway closet into a mudroom went down in jumbled apple-green blaze of disappointment.

After living with our brightly-coloured trying-to-be-a-mudroom front hall coat closet for more than a year, I started making a list of everything that was wrong with it:
- The green wall colour (Pittsburgh Paint’s “Asparagus”) was certainly cheerful, but it was too intense for an already-crowded space. Ditto for the red cube storage bins, ugh.
- The cube bins did a good job of holding hats and mittens, but the kids regularly mixed them up because (duh) they couldn’t read the labels. We also didn’t need that many bins, so often a few of them were empty.
- There wasn’t a spot for their increasingly large collection of sports gear (T-ball helmet, bike helmets, baseball gloves, etc.) so it was thrown everywhere.
- The kids couldn’t reach the hangers, so we were constantly hanging up their jackets as well as our own (and they go in and out of the house a lot)
The only solution that really worked was the kids’ shoe storage bins. We had screwed large wire baskets into the walls to hold the kids’ shoes, and it worked brilliantly for keeping them corralled. Even when they just tossed them in, it didn’t look as messy as a pile on the floor.
My vision for the new mudroom was lots of white, a neutral wall colour, a board-and-batten treatment, and hooks at two different levels. I toyed with the idea of removing the doors entirely, and maybe adding a bench so it looked like a mudroom nook, but Michael vetoed the idea. OK, fine, the doors could stay.
The first step was emptying the closet, taking down all of the shelving and the hanging bar, and patching the holes.

Then we cut 2×6 boards and screwed them into the walls at two heights — one for adults, one for kids — to give the hooks a nice sturdy base. This also mimicked a board-and-batten look without having to go all the way with it.

Once the boards were installed, we painted over the too-bright green with our favourite neutral, Benjamin Moore’s “Revere Pewter.” Instantly, the closet felt less in-your-face. We painted the boards with untinted bright white trim paint (ideally, we should have done that before installing them), and hurried off to the store to buy the hooks.

Since we needed 20 hooks, it took a bit of rummaging to find them all in the same finish. There weren’t enough of any one size, but we found six large double hooks for across the back on the adults’ level, and 14 smaller hooks for across the kids’ level and on the sides.

We also needed to find a new system for storing hats and mittens, since the cube system wasn’t going back in. We ended up finding white wire drainer baskets designed to go across a kitchen sink ($11 each) that would coordinate with the existing white wire shoe baskets, and allow the kids to see inside easily.
Installing the baskets and hooks was easily the most fun part, because we could finally see it all come together. I squealed each time I held a smooth black hook against the white wood, because the contrast looked so good.

I’m in love with the neutral, classic look of our new “mudroom,” but I’m crushing even harder on the functionality.
The kids are able to put away every single item on their own — jackets, hats, helmets, shoes, backpacks. There are never any jackets crammed into the shoe bins, or slipping off hangers onto the floor. The wire shoe baskets are just high enough to let me sweep underneath them, and the wire drainer baskets are an easy place for them to toss sunglasses and hats.

I sometimes leave the doors open on purpose, just because it looks so good in there!
Lesson learned: sometimes you don’t get it right the first time, but every bad decision (er, bad paint colour) makes you that much more likely to get it right next time.
 |
When your kid keeps failing swimming lessons
Swimming lessons were never my thing. I passed Yellow, Orange, and Red, but got halted when it came to getting through Red-Maroon.
I hated getting water up my nose when I jumped in. I still hate getting water up my nose.
And I have yet to ever open my eyes under water — pool, lake, ocean, tub, anything — in my almost 32 years. Truly. I’m kind of proud of that one.
I wrote about our adventures (misadventures?) in swimming lessons for this week’s parenting column. Feel free to read it, if you’re the parent of a child who may possibly be stuck in the first level of swimming for the rest of their livessssss.
***
I didn’t need to see the progress report to know what it said. Our son didn’t pass. Again.
Swimming lessons had started off with such promise, a few months after he turned three. I’d purposely not done the parent-and-tot lessons because I wanted him to understand that swimming lessons were about going with the instructor.
He went with his instructor willingly, and did everything she asked. For a kid who’d cried and clung to me at a birthday pool party just days earlier, this was huge progress.
He didn’t stay at the head of the class for long. He continued to be enthusiastic and he enjoyed each lesson. But he wasn’t doing what he needed to do for the instructor to check the boxes on his chart. He wasn’t hitting his “outcomes,” or however they would phrase it in teacher jargon these days.
I watched from the sidelines during one lesson as the instructor demonstrated how to duck under the water. The students all copied her, while our son smiled and shook his head slowly. Stick my head under? Oh, no, thanks. Not doing that today. Still having fun, though!
When the term ended, it was no surprise that he hadn’t checked off all of the boxes. His little buddies passed Sea Otter with no trouble, and went on to Salamander and Sunfish and Crocodile and all of the other adorably-named levels. But we were still sad little Sea Otters.
So we did it again. And then again.
He’s like me, I thought. He’ll never be a good swimmer, but that’s OK. He’ll use a noodle or a floaty thing at pool parties, or afternoons at the lake. He’ll stick with swimming lessons for a few years, but reach a point where he won’t pass any further because he refuses to dive (ahem). I can dog paddle and swim on my back. I get by just fine.
But everything changed during our recent trip to Ontario. He was excited when he saw the sparkling aqua pool in my dad’s backyard, and went in cautiously — wearing a life jacket, clutching a kickboard, and clinging to our arms. He refused to so much as look at a pool noodle, or entertain the idea of taking off his lifejacket, and we didn’t push it.
The next day, we convinced him to try holding onto a noodle and we towed him around (still in his lifejacket). He loved it. Then we spent hours helping him swim around using the kickboard (still in the lifejacket). He was grinning constantly.
He graduated to swimming alone with the noodle and lifejacket. By the end of the week-long trip, he was leaping into the pool and swimming around solo, with either a noodle or a kickboard (and no lifejacket).
Nobody could believe it. Was this really the kid who has YET to pass the very first level of swimming lessons? Yup. But when you’re in the pool twice a day, every day, for a couple of hours, you have no choice but to get comfortable with the water — and that’s exactly what he needed.
Swimming lessons start up in less than two weeks, and both kids are registered. Yes, our son is going to be a Sea Otter for the fourth time (with his little sister as a first-time classmate), but I’ve given up caring about passing or failing. He’s learning to how to feel comfortable and safe in the water, and that’s the only thing that really matters.
 |
Of campers and camp-moms
After two summers (and two March Breaks) of longing to be old enough to join her big brother at camp, C finally got her wish today.
https://instagram.com/p/4yxZ9CNIWm
Two lunchboxes, two backpacks, two containers of sunscreen, two hats, two changes of clothes, two windbreakers. Two kids officially camp-bound.
I dropped them off, rushed back home, and went straight into the office to work. I wrote and edited and emailed steadily, without having to keep one ear open for them. Without having to break up fights or suggest new activities or roust them back up to their rooms. Without having to feel guilty for working.
They won’t go every day, all summer (although from D’s enthusiasm and C’s beaming recount of the details, they would love to).
But they will go enough to help out our we-don’t-have-childcare any-more situation.
They will be enough to (hopefully) help me get shit done and then be able to enjoy my free time without worrying about work as much.
I’ve been battling The Sads lately and generally in a funk, which in turn makes me feel like I’m being impatient and/or cranky and/or not-fun around the kids. Not a good place to be, when it feels like the world is on vacation slash cheersing at a BBQ slash having the best summer of their lives.
https://instagram.com/p/4us5BTtIfm
But today has been a good day. It feels good to carve out specific work-time that doesn’t make me feel torn or guilty about the kids. It feels good to know the kids are thoroughly enjoying their time at camp. It feels good to have a couple of fun things with friends on our agenda.
Yes, I’m dealing with not-happy situations in one part of my life, but I’m tired of letting it creep into all aspects of my life. I’m going to start trying to choose happiness.


As featured on …


