
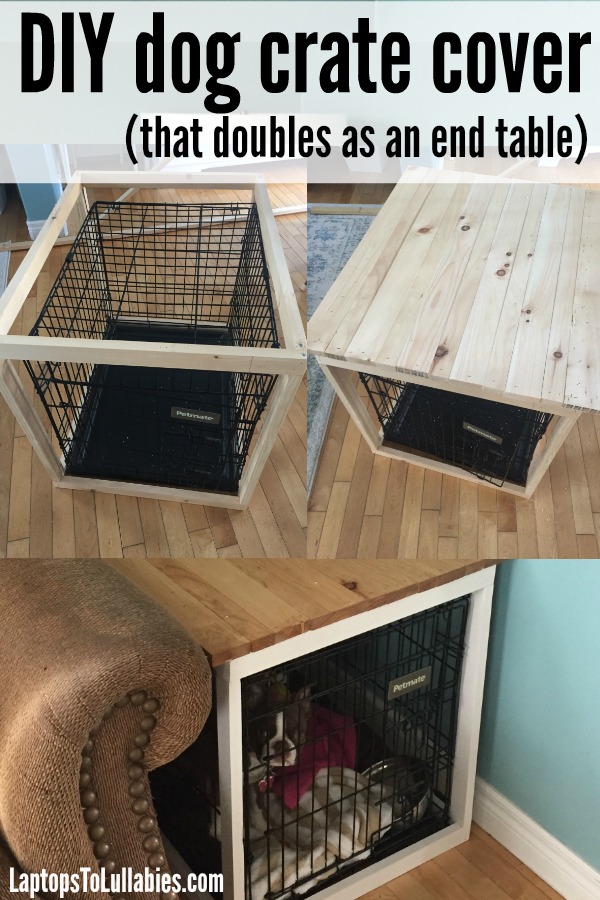
DIY dog crate cover

Annabelle is friendly, smart and always up for cuddles. She’s fit perfectly into our home and we’re quickly getting used to keeping everything off the floor and away from her teeth — shoes, Legos, Barbies, straight pins, socks, you name it.

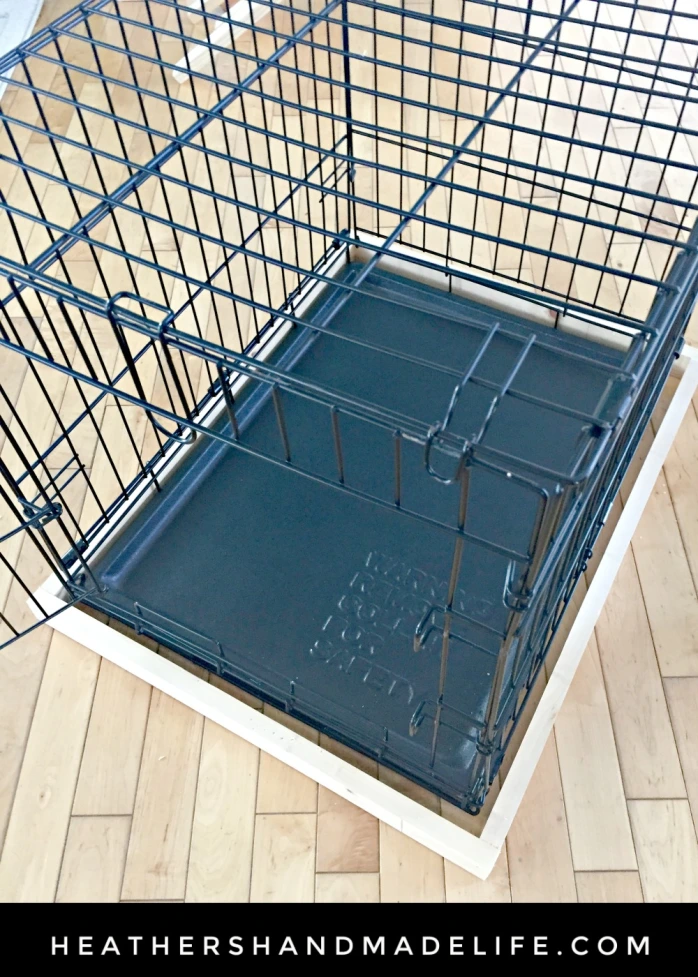
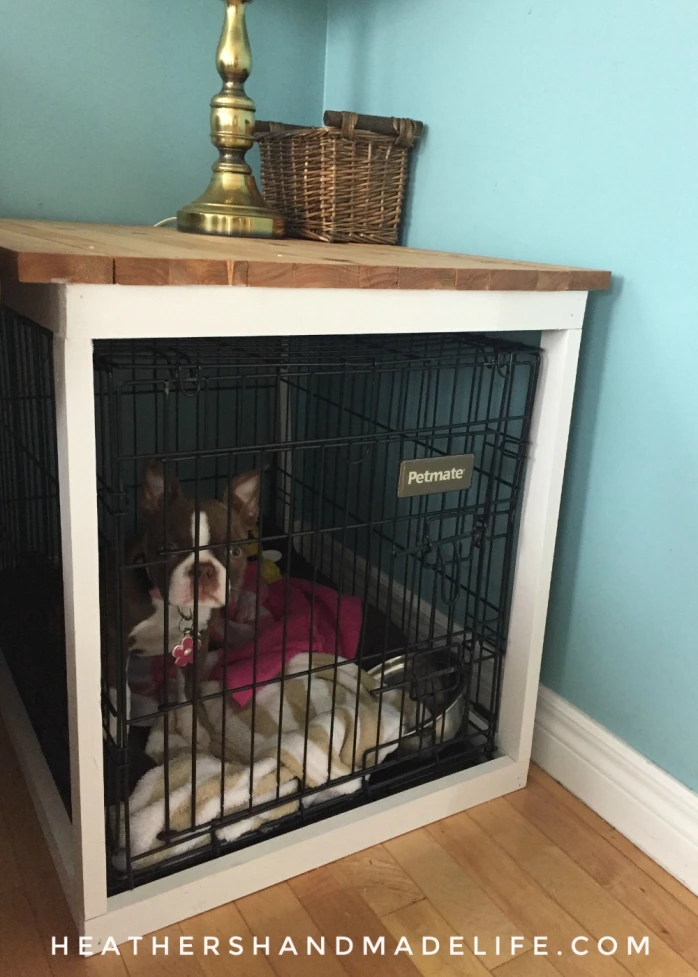
Annabelle is crate-trained, so while she sleeps in our bed at night (like a snuggly little hot water bottle), she goes into her crate whenever we leave the house. We received a great hand-me-down crate from her furry cousin, Tyson, and at first we stuck it in various corners of the living room or the kitchen — covered with a hot pink sheet to make it cozy. Ugly, but cozy.
I toyed with the idea of sewing a nice neutral slipcover for the crate to make it blend in with the main level decor. (Hot pink was not cutting it.) But that wouldn’t do anything about the fact that the crate was also taking up a good chunk of floor space. We had to rearrange the furniture and everything felt crowded.
So I decided to DIY two birds with one stone! I would build a removable wooden cover for the crate so it could take the place of an end table.
//pagead2.googlesyndication.com/pagead/js/adsbygoogle.js
(adsbygoogle = window.adsbygoogle || []).push({});
Now, of course, I did this entire project without measuring — that’s just how I roll. It was really easy, though.
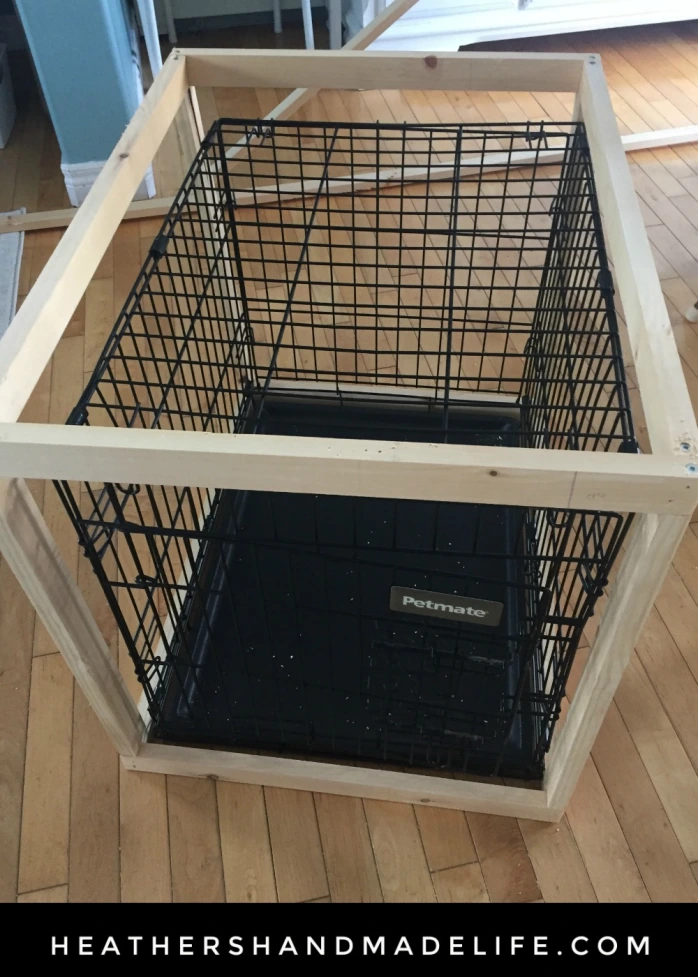
I started with a stack of 1x2s (my go-to boards because they’re light and easy to work with) and cut four pieces to make a little rectangle that fit around the bottom of the crate.
Then, holding more wood up against the rectangle, I cut four more pieces and build a second identical rectangle that would fit around the top of the crate.
Then I held another 1×2 against the crate, vertically, to see how tall the legs needed to be. I marked the height with a pencil and cut four identical pieces to use as legs and secured one in each corner — connecting the two rectangles and making a skinny wooden cube. It had an IKEA feel at this point!
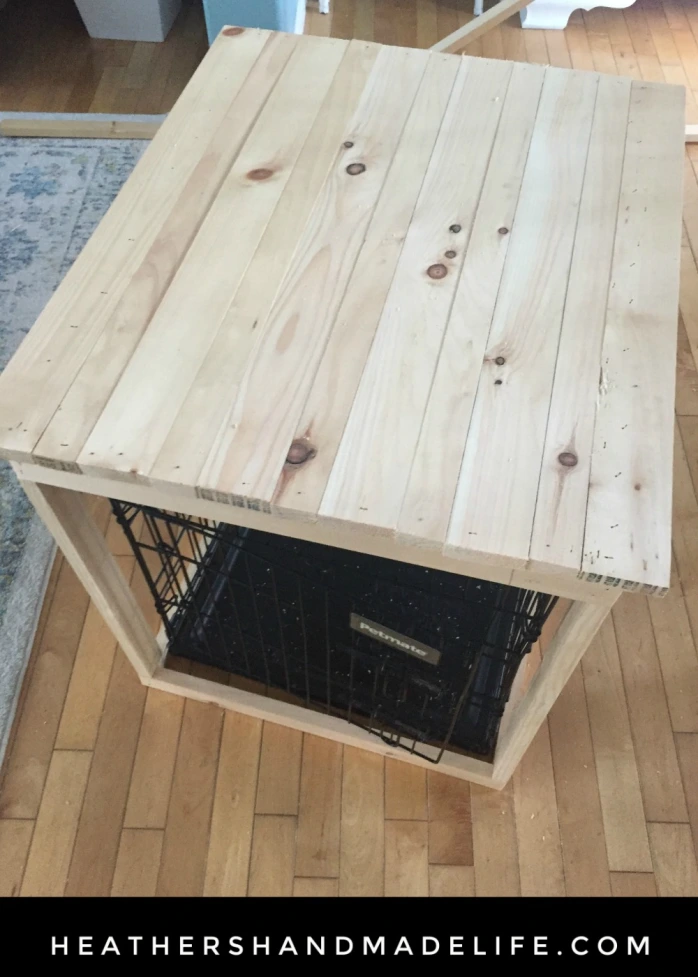
For the top of the table, I wanted to mimic the planked look of the coffee table topper I build a couple of weeks earlier (INSTRUCTIONS HERE).
I laid a 1×2 across the top of the cube and marked off how long each plank should be and kept cutting identical pieces until I ran out of 1x2s. Then I stole a couple of 1x4s from my handy husband’s wood stash and cut more pieces until I had enough to cover the entire top of the crate. Since I was using two different widths of wood, I alternated the boards to make a pattern.
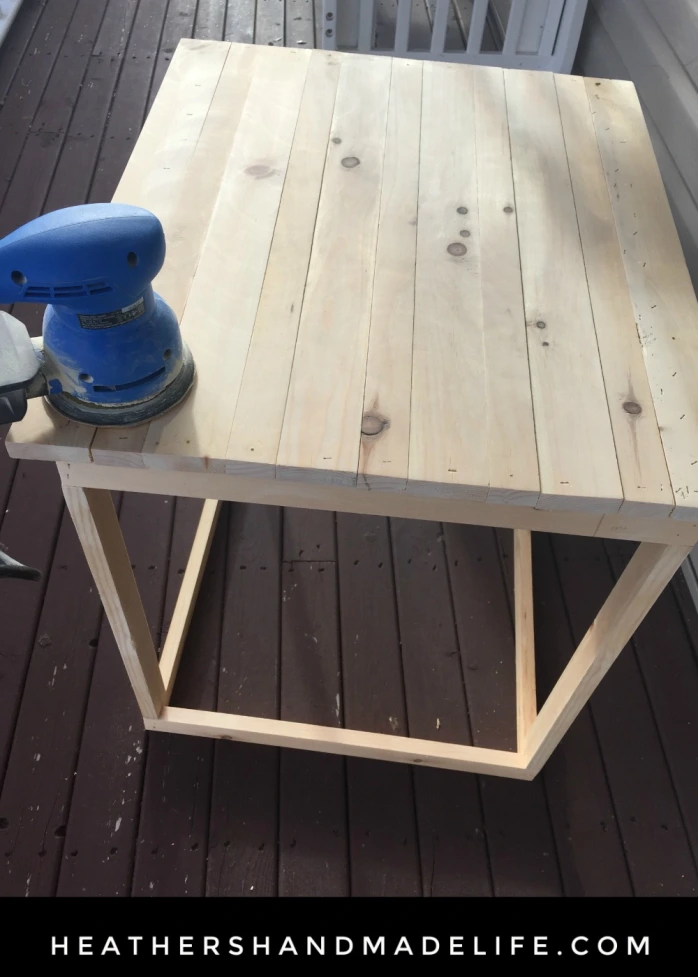
After a quick sand, I did two coats of stain on the top (Minwax’s Golden Oak) and three coats of white on the base (Fusion Mineral Paint’s Casement) while watching Dance Moms reruns. The paint was barely dry when I was excitedly lifting my new end table over the crate — a perfect fit — and sliding in between the couch and the wall.
And yes, this all happened on the same day — the building, the staining, the painting and the installation — because I’m completely impatient.
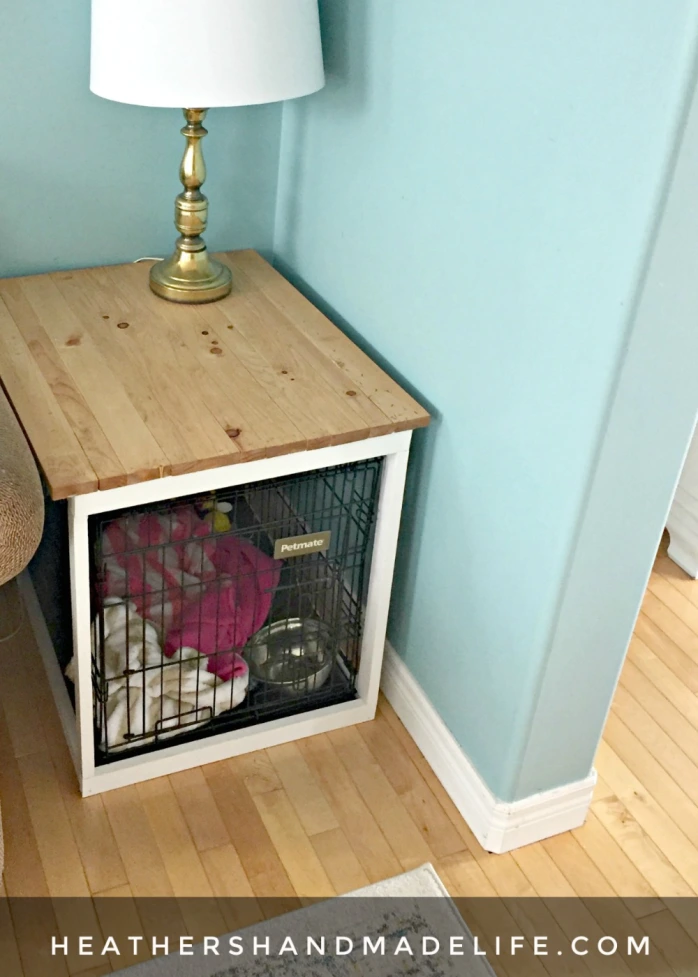
I’m so happy with this two-in-one solution. Annabelle still gets the crate she loves (and needs), but we’re not sacrificing a chunk of our main level to an ugly black metal box that crowds the rest of the furniture. The crate-cover matches our coffee table perfectly and looks so much nicer than a metal cage draped with a sheet.
Who knows? I might end up donating our other end table and building a new one to match this crate-cover. Maybe the kids would like a nice time-out crate? (#kidding).
DIY quilt made from old jeans

This is one of those projects I’d been meaning to do for YEARS and when I finally did it, I wondered what had taken me so long.
My mother-in-law had been talking for years about a jean quilt once gifted to my nephew. I never actually saw the quilt (still haven’t) but liked the idea reusing something old AND getting a nice heavy quilt.
I’d been saving old jeans for ages in a garbage bag (mine, my sister’s, and even my neighbour donated a few!) and I was sick of looking at the bag cluttering up my already-cluttered home office/studio.
So a few weeks ago, I spent a weekend afternoon (and evening, I think) watching Scream Queens on Netflix (I really liked it!) and tracing a zillion squares onto a zillion pairs of cut-open jeans.


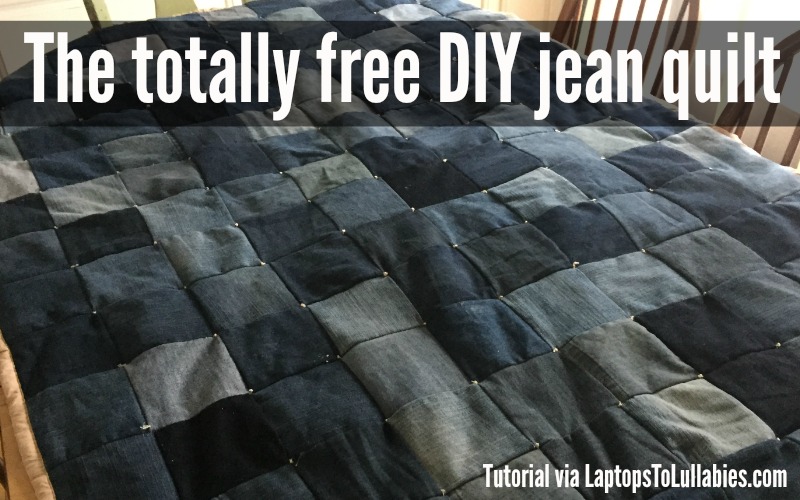
Annabelle has actually claimed this quilt, and it’s perfect for a dog because it’s a sturdy quilt that doesn’t mind a bit of drool.
I sometimes wipe my greasy potato-chip fingers on it and I’d never do that with one of my usual quilts! 😉
So what are you waiting for? Hoard those old ripped, outgrown jeans and make them into something awesome!
 |
| Pin this project! |
Wanted: More time for everything!
We talk about how 24 hours in a day are just not enough. That’s never been more true for me, as a self-employed whatcha-ma-call-it, because it’s hard not to feel like any working opportunity SHOULD be spent working.

Here is a complete list of all of the things I *want* time for in the run of a day …
- Time to work on income-generating projects (i.e. paying work)
- Time to work on an aspirational writing project (book, poetry, etc.)
- Time to blog / manage social media
- Time alone with husband
- Time alone with kids
- Time training/playing with the puppy
- Time together as a family
- Time tidying the house and making it presentable
- Time organizing the house so it keeps me sane
- Time for cooking decent-ish food
- Time working on a creative pursuit that’s strictly for fun
- Time working on a creative project for WORK
- Time shopping for supplies for my millions of projects
- Time to unwind completely alone (reading, bath, TV, nails, etc.)
- Time with friends
- Time with extended family
- Time to exercise (Zumba, walk)
- Paying work
- Half-assed attempts at cooking
- Paying work
- Small pockets of time with the kids
- Paying work
- Maybe exercise
- Paying work
- Seeing my husband in passing
There’s a constant ebb and flow of money and projects with minimal security. It keeps you in a heightened state of awareness where it’s difficult to know when you’ve done “enough” to stop.
My own mommy manifesto
I’m going to buy a big canvas and cover it with painted phrases that no one will really understand except me. That’s because the canvas will contain my manifesto — a list of personal commandments that will help me live my happiest life.
One of my favourite authors, Gretchen Rubin, believes in writing manifestos to remind yourself of what’s important to you. I started jotting down ideas to define what I want to be — specifically as a mother and wife — and here’s what I came up with …
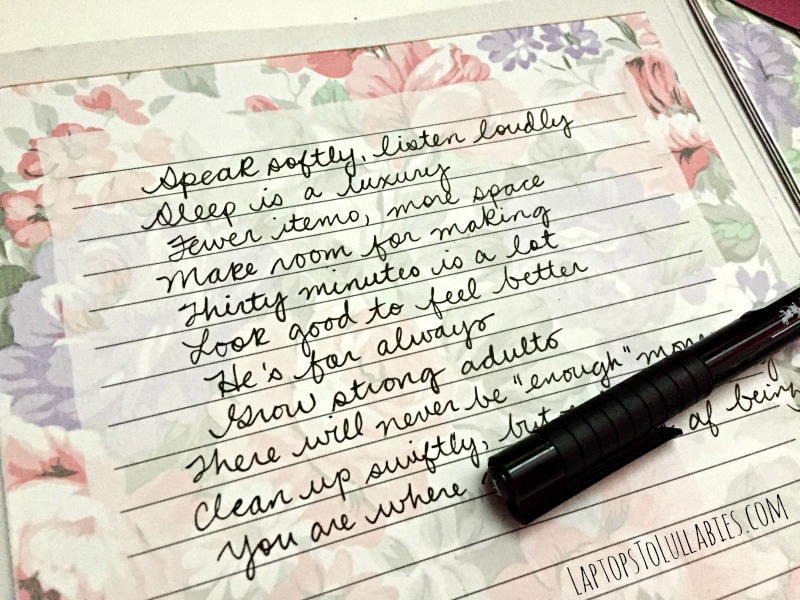
Speak softly, listen loudly
I’m prone to snapping. Speaking gently is probably the only useful parenting tip I’ve picked up from watching Michelle Duggar on 19 Kids and Counting, and it’s a work in progress. “Listen loudly” means actively hearing what the kids are saying, even when their stories seem trivial or hard to follow.
Sleep is a luxury
When I get enough sleep, I’m in a better mood and I’m able to get a lot more done in my waking hours. I usually don’t want to go to bed and sacrifice that blissful quiet that settles over the house once the kids are asleep, but I know it’s good for me.
Fewer items, more space
I’ve been slowly KonMari-ing our home for more than a year now, and it’s been liberating to pare down our belongings so we have more space for living the life we want. It’s hard to play when you’re overwhelmed by a mess of toys. It’s hard to do an art project when your supplies are a disaster and you can’t find the glue. Having the table cleared off means you’re ready to start a project at any moment.
Continue reading in my weekly parenting column, The Mom Scene …
DIY key rack, wood-burned keychains

This project started when I picked up a small wooden shelf for $2 at my favourite local thrift store (New To You, for Truro readers). It was probably designed to hold tchotchkes (which make me shudder), but I knew it would be the perfect key rack for our entryway.

I’d been in the habit of hanging my keys on a coat hook in the hall closet and then panicking when they got covered up with a coat and I couldn’t find them. My husband was in the habit of dropping his keys wherever he felt like it, which was often smack in the middle of the kitchen counter.
After two coats of creamy white paint (Fusion Mineral Paint in Casement), the shelf was looking a heck of a lot nicer.

I used my tiniest drill bit to pre-drill little holes, screwed in nine brass hooks and secured it to a wall near the front door. Done!
It was nice to get the keys out of the closet (or off the top of the microwave, the counter, the dresser, etc. for my husband). But our keychains were a garish mismatch of freebie dealership rings and carabiners (his) and sparkly pink doodads (hers), so the key rack wasn’t looking as nice as it could.
The answer came to me one day when I was looking at a package of wooden shims. Now, Wikipedia tells me a shim is “a thin and often tapered or wedged piece of material, used to fill small gaps or spaces between objects,” but I would define it as “a thin, cheap strip of wood that’s useful for craft projects.”
I knew shims would be the perfect material for custom keychains.
I got out the woodburning kit my sister gave me last Christmas, along with the set of metal letters that can be screwed on to the end of the tool. Burning words this way can take a long time, since each letter takes a couple of minutes to heat up.

I decided to speed up the process by doing all of the letters at once, rather than spelling out each word in sequence. Once I’d burned all of the Hs, I unscrewed the (really hot) metal H using my pliers, dropped it into a metal pan to cool down, and moved onto doing all of the Os.
When all of the words were burned — “House,” “Shed,” “Porch,” etc. — I trimmed down the shims using my mitre saw, leaving a space right before each word. Then I drilled a hole at the beginning of each keychain so it could go on a ring. I liberated the rings from our various old keychains so some of them — the thick, tightly-coiled rings — were difficult to coax over the wood.

It was exciting to match up the keys to their new keychains and hang them on the hooks. The key rack looks so nice now that everything coordinates.
It’s easy for us to grab the key to the shed or to the storage area under our porch, and our son can read the words, too. It used to be tricky to keep track of our neighbour’s house key for the few times a year we house-sit, but now it’s always in the same spot with a prominent “B&G” to remind us.

An added bonus is that because some of the words are long — like “Trailer” — the keychain is pretty hefty and less likely to get lost!
xo


As featured on …


