
Super easy quilt top for beginners

Whenever I share pictures of a quilt I’ve sewn, I hear a lot of “OMG I could never do that!” or questions about HOW I EVER LEARNED how to make quilts. They are a project that seems to baffle most people who have never tried to make one.
They might *look* complicated — and some quilts certainly are, but, um, not the ones I make — but quilts are actually REALLY easy to make. I swear. They’re just taking little bits (or big bits) of fabric and stitching them together, for the most part.
If you’ve ever thought about learning to quilt but were intimidated by the idea of making complex little blocks and assembling them, here’s a super easy way to buy fabric, take it home, wash and dry it, cut out blocks, assemble them, and put together AN ENTIRE QUILT TOP in … a single evening. Yup! It’s true.
(Oh, and did I mention there’s hardly ANY waste? You’ll use every smidgen of fabric, except maybe a raw edge or two.)
Step 1: Get thee to your nearest fabric store!
Find pretty fabrics that speak to your soul (ahhhh) and choose EIGHT (8) different ones. This is incredibly fun. I could pick quilt fabrics all day long and never get bored.
For this quilt, I went with my stepmother because I had been harassing her to start quilting for ages. She liked the idea of making a nautical-themed quilt for her guest room, so we found a collection with beautiful blues and greens — anchors, chevron, etc. To get a total of eight, we also added some plain/solid coordinating colours.
Once we had our top eight picks, we asked the sales associate to please cut 0.5 meters of each fabric — giving us eight tidy little bundles, for a total of 4m. This is going to make a nice-sized square quilt for snuggling up on the couch or spreading over a double bed.

Step 2: Wash and dry your fabric.
If you skip this step, may God have mercy on your soul. Quilts need to be washable — do NOT skip this step, although I know it’s annoying to wait when you’re eager to sew.
Step 3: Cut each piece of fabric into two (2) squares.
Once your fabric’s all warm and toasty from the dryer, lay it out and cut it into two (2) squares.
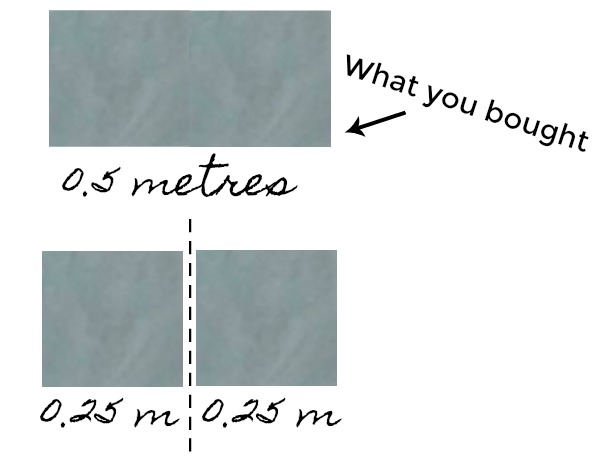
Now, this isn’t too “mathy,” when you think about it. A “fat quarter” is when you buy a square pre-cut piece of fabric that measures 0.25m — it’s like taking 1m of fabric and cutting it into four equal blocks. Since we bought 0.5m of each fabric, we’re just chopping it down the middle to make two fat quarters.
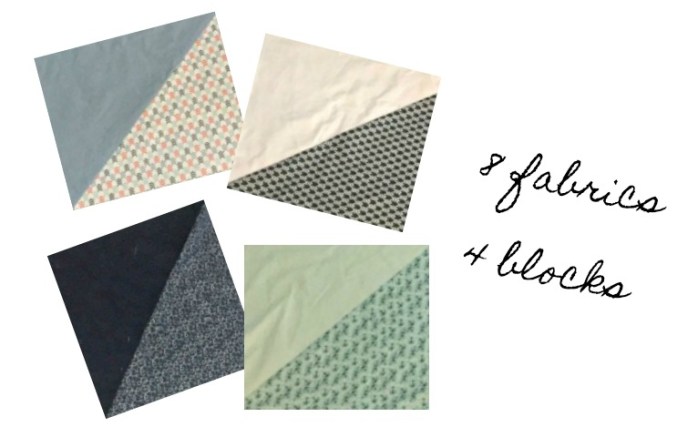
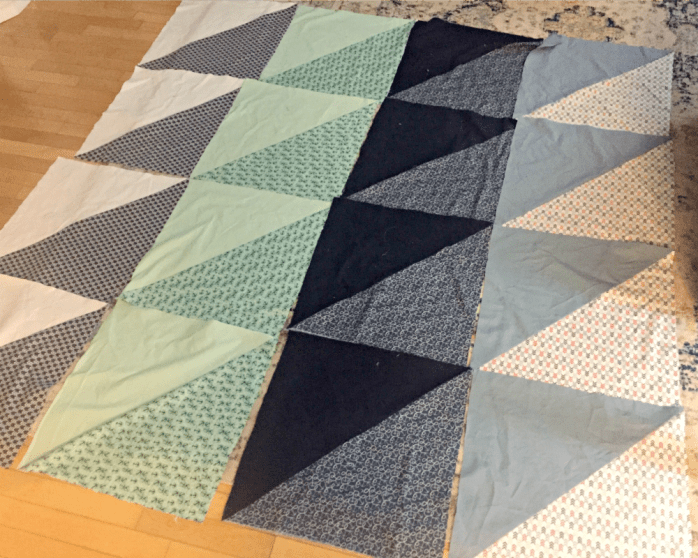
This will give you 16 squares from your eight (8) different fabrics. At this point, I stack them on each other and trim them so they’re all the same size. No actual measuring required, though. All that matters is that they’re the same.

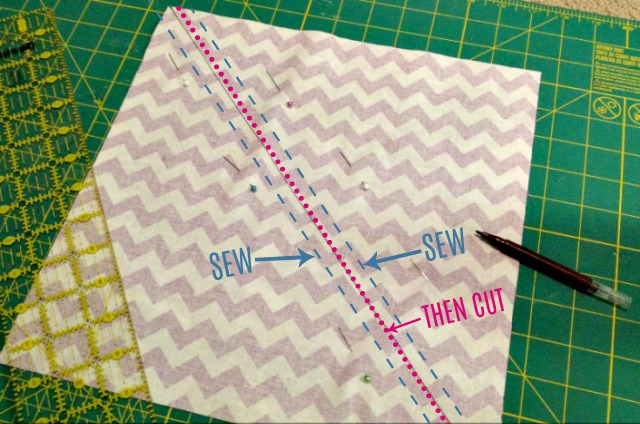
Step 4: Turn those 16 squares into 16 HSTs (half-square triangles).
This is the part that would have freaked me out before I started quilting. What the frig is an HST?! (Other than Harmonized Sales Tax, here in Nova Scotia.)
A half-square triangle is commonly used in quilting because it’s easy but looks cool. You’re just stacking two different squares, sewing diagonally down the middle, and cutting them apart to make two different squares. It’s a fast way to make a quilt more interesting than just a bunch of squares. PLUS you can make tons of different patterns with them, as you’ll see below.
Since we have eight different fabrics here, we chose to “marry” them into couples — navy to dark blue, white to navy-and-white, seafoam to a darker seafoam pattern, and light blue to a red-blue-and-white pattern. There’s no “right” way to do this — just see what combinations look nice together. After all, they’re going to be all mashed together in the finished quilt.
(More details in this post about my rainbow quilt, but this picture really says it all …)

Step 5: Play around with the layout!
Once you have your 16 “new and improved” squares, find a clear patch of floor and start laying them out to see how you like them. We spent a while playing around with ours and I must confess that my stepmother got REALLY nervous that we’d picked the wrong fabrics at this point.
This was the first arrangement we tried, and it was NOT a winner …
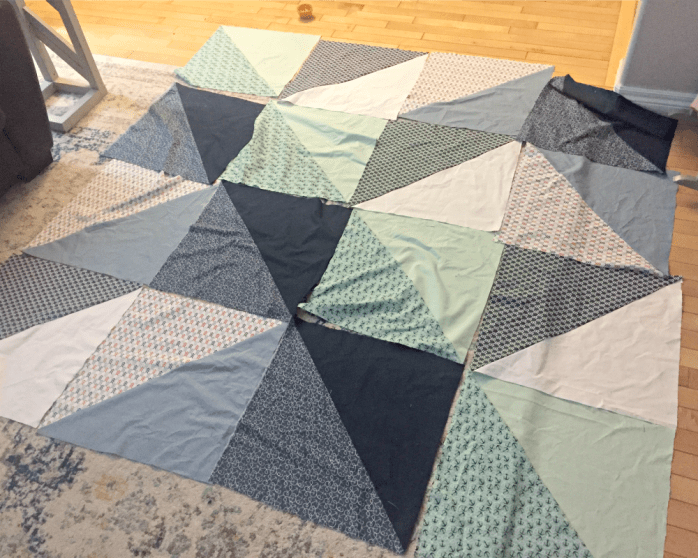
Then we tried arranging them to make squares surrounded by triangles. YUCK! This could look good if the squares were smaller and there was more “repeat,” but it didn’t look good in a 4×4 quilt like this one.

This one was interesting, but felt too “toothy” — like too many sharp edges. (Still, isn’t it neat that you can make so many different patterns with the SAME 16 squares?)

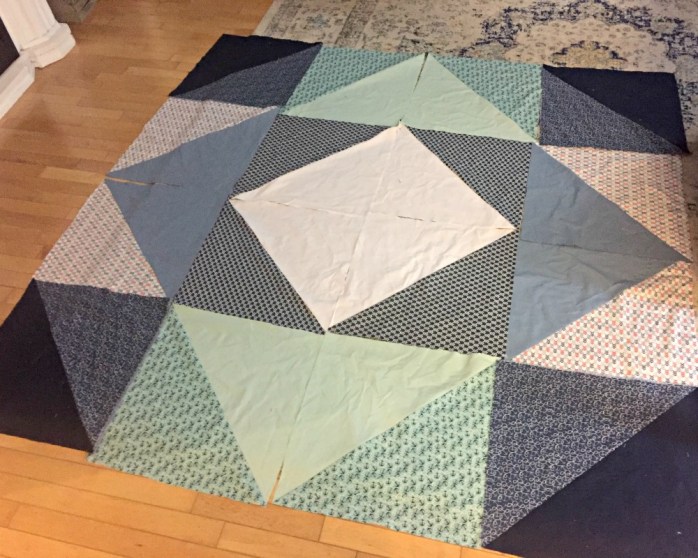
We tried this arrangement next, but it still didn’t feel right. My stepmother pointed out that the white triangles felt too distracting, and suggested we put them in the middle.
BINGO! She was exactly right — once we arranged the white triangles so they gathered together in the middle of the quilt, they were the perfect focal point. We had a layout we loved!
Once we knew the layout, the rest was easy. I pinned the squares together in four rows (four blocks each) and carried them downstairs to sew them together. Once we had four rows, we sewed those rows together and had … a finished quilt top!
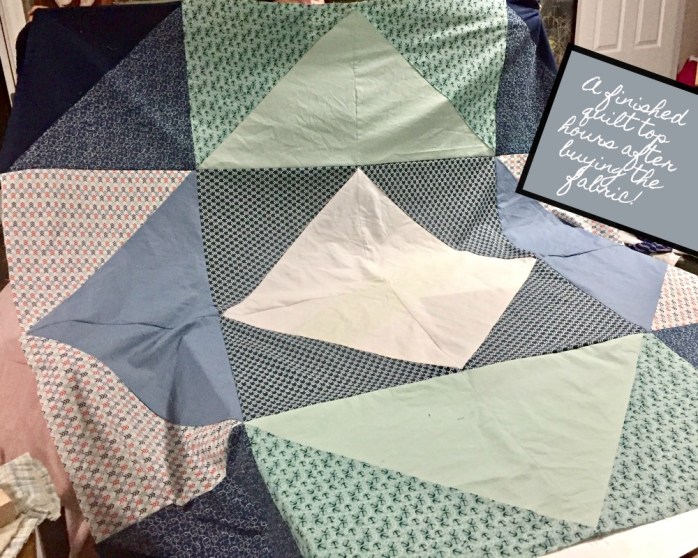
My stepmother couldn’t believe she was holding up a FINISHED quilt top, literally hours after we were at the fabric store PICKING OUT THE FABRIC.
We sandwiched it together the next day and I got her started on hand-quilting before she flew back to Ontario, so hopefully she’s been making good progress (ahem!) because I can’t wait to see how it looks all finished and binded.
I hope this takes some of the mystery out of quilting if it’s something you’d like to try. This is an easy way to get started, and once you snuggle up under the soft weight of a quilt you’ve made yourself, you’re going to want to make more of them — trust me! 😉

One Comment on “Super easy quilt top for beginners”
So what do you think?


As featured on …


Give us a how-to on the hand quilting!!
LikeLike