
Working from home … on vacation

We’re heading home today after nearly a week in sunny southern Ontario. (Yup, just like we did right around this time last year.)
What’s that thing people say — if you’re travelling with kids, it’s a trip, and if you’re travelling without kids, it’s a vacation? Well, when you’re self-employed? Whether it’s a “trip” or a “vacation,” it means you don’t usually get to put aside your work.
What I’ve discovered this week, though, is that I actually enjoy a vacation more if I’m working. Yes, you read that correctly.
Here are five reasons working on vacation when you’re self-employed is not such a bad thing …
1. You remain employed.
This is a biggie, obviously. But when you’re a self-employed, work-at-home freelance type, there is no one to cover your vacation. There is no one to mention in your vacation auto-reply, if you even do one of those (I don’t unless I will literally be unreachable, which almost never happens).
Over the last week, I’ve had social media clients still rely on me for posts. I’ve answered emails that would have resulted in missed assignments if I’d left them. I’ve written stories because I’d committed to those deadlines.
I’m not saying you have to work your entire vacation if you’re self-employed, but there is a certain amount of responsibility that comes with it. You can’t just shut down operations without harming yourself in one way or another.
2. You skip the end-of-vacation dreads.
When I have taken time off work, it’s almost haunted me because I could feel it — or, in the case of my inbox and calendar, see it — piling up. Waiting for me. Lurking.
Because I’ve worked almost every day of our trip — whether it was an hour or four hours — I’m not going home to a mountain of deadlines and unfinished stories. Everything is under control, and that feels really, really good.
2. You feel like yourself.
I don’t call myself a workaholic but I probably am … like if there was a quiz or something? I’m used to working. I love what I do, and I write every single day. So if I were to STOP, cold turkey, for a week? That would not feel normal. Since I’m a creature of habit (to the extreme), I like continuing to work — just with a lighter load — while “on vacation.”
While at my dad’s, I set up a mobile office in his dining room with my Chromebook, external mouse, notebook and pens. I worked very happily and comfortably there, and it never felt like I *had* to be in there or that I was missing out on anything.
3. You get a break from your family.
This doesn’t make me sound like a very nice person, possibly? But I know myself and I’m a huge introvert. I need quiet time to myself every single day, and one of the ways I get that — especially on vacation — is by working. It sounds dickish to say “OK, I just need to go sit alone in the other room now, guys,” but no one can question the need to work. And while you’re working, you get precious quiet solo nobody-bugging-me time.
4. They get a break from you.
Being in Ontario meant the kids got to spend special time with my dad and stepmother. They kept them busy with lots of fun activities and outings when I had to work, and everybody was happy. I can guarantee that if I was spending 24/7 with these little darlings during our vacation, nobody would be happy.
xo
The work-at-home summer

School is officially out for our eldest and our youngest has been home from preschool for more than a month now. A surprising chunk of my friends are teachers, so they’re reveling in two-month vacation glory. Others are on maternity leave or are stay-at-home moms.
Being self-employed on a freelance/contract basis without actual childcare, school and preschool are my lifelines. During the summer months, I wake up and stifle the frustration that not only do I have to work while everyone else hits up the pool, I have to work while also giving my kids a fun summer. This means summer, for me, always kind of sucks. I either feel like a slack, meanie mom or a frantic, rushing professional.
I really want this summer to be different. I love a good podcast and my favourite is Happier with Gretchen Rubin — the author of The Happiness Project and Better Than Before. In a recent episode, she talked about the benefits of designing a summer that felt different than the rest of the year. Some people, for example, vow to meet up with a different friend for lunch every Friday in July and August.
Lunch dates are out of the question, but I thought maybe there was something I could do to make the summer feel special — and to make me less cranky about the fact that I had to juggle my workload while making dozens of snacks, breaking up squabbles over Mash’Ems and wrestling off wet bathing suits.
What would make me happy? What would make the kids happy? A summer checklist works well for some families, but I know for me it would turn into a failed attempt that would cause me serious guilt.
I toyed with the idea of scheduling my work hours differently. Maybe I’d book off a specific time to work each day while the kids played solo, or maybe I could decide on a set number of hours to work each day but be flexible about when they happened? I considered working less, but realistically I don’t think I could or would choose to do that.
I thought about the plans we already had on the books: two camping trips and an airplane trip to Ontario. I remembered the ballet camp our daughter is attending one week, and the Clay Cafe dates I’ve promised our son.
I reminded myself of how we chose not to enroll the kids in T-ball (shudder) because we didn’t like dragging the kids to a dusty field multiple evenings a week. In order for this summer to be happier than the last one, we needed to avoid commitments that would leave us (read: me) feeling stressed out or guilty if we needed to skip a night.
In the end, I decided on a theme that was going to make our summer special: freedom.
We postponed the scheduled swimming lessons to the fall when we’re all in a more schedule-y kind of place. Instead, we bought a membership to the outdoor pool for the first time. It’s a three-minute drive or 20-minute walk from our house, which gives us the freedom to go for swims any afternoon or evening we feel like it.
On days my husband is off, I will throw myself into my work while he has fun with the kids. I will greedily soak up those hours in my cool, dark basement office, far away from sunscreen and bugs. I’ll take some of these days off and organize a family day trip, but I won’t feel guilty if this only happens once or twice.
On weeks my husband is constantly working or sleeping from working the night shift, I will decide which parts of which days I will be working, and I will stick to that. I’ll sign them up for half-day camps when I need to, or I’ll put on a movie for them if I get desperate. I’ll remind myself that summer is supposed to be a break for them, too.
I will make a point to do one meaningful activity with the kids every day, whether it’s baking together, doing a craft, going out on an adventure, or just reading a stack of books in front of a fan. But I won’t try to be a full-time Mary Poppins, constantly whipping out Pinterest-worthy activities to keep my little darlings entertained. I’ll give our kids the freedom to “be bored” and make their own fun.
I’ll also give myself the freedom to do things that I enjoy, and remember that just because it’s summer vacation doesn’t mean it’s all about the kids, all of the time. I’ll book babysitters so my husband and I can go on date nights here and there. I’ll continue to attend a couple of Zumba classes each week, and stick to my weekly evening of volunteering.
Most importantly, we’ll all go out for ice cream instead of dinner sometimes. That really is the ultimate summer freedom.
Other posts you may enjoy if you’re a cool sort of person …


DIY reversible wide-brimmed sun hats

Working at a drugstore cosmetic counter as a teenager set me up for a lifelong devotion to sunscreen and shade — as well as an obsession with face creams, actually. So during this time of year when my kids are spending hours in the hot sun, every single day? Sunscreen city.
But I’m also a hat-pusher. Hats! Shade! Put that hat back on, gahhhhh!
The kids each have a few ballcaps but I recently modified a great free sewing pattern from Liesl Gibson of Oliver + S in order to make hats with extra-wide brims to really protect their faces from the sun.
You need only half a meter of two different fabrics to make the hat reversible. I picked coordinating “Beautiful Garden Girl” Studio E fabrics from Atlantic Fabrics for my daughter’s hat, and simple kelly green and turquoise fabrics for my son’s hat.
Ready to make your own? Here’s what you need to cut …

- Two crowns (one from each fabric)
- Four sides (two from each fabric)
- Four brims (two from each fabric)
- Four brim-sized pieces of midweight interfacing

Start by sewing the two coordinating side pieces, right sides together, at the sides to make two circles that kind of look like headbands …
 |
| See? Two “headbands” … sort of. |
Then sew each circle to its corresponding crown, right sides together. When you flip it right-side out, you’ll have two fabric “bowls.” You have two hats, kind of, so now it’s time to focus on the brims.

Iron the four pieces of midweight interfacing to the four brim pieces to make them sturdier. After all, your kids don’t want their hats drooping down and flopping in front of their face when they’re on the swings.

Sew the coordinating brims, right sides together, at the sides — giving you two brims to attach to your two not-quite-finished hats. Pin each brim to its corresponding “hat,” right sides together, and sew all the way around each. You’ll be left with two unlined hats, and now it’s time to attach them so you have one reversible hat!
Lay both hats right sides together and attach them by sewing all around the outer edge of the brims — leaving a 10cm gap where you can turn the whole thing right side out. It will look like a weird two-hatted monster until you smush one hat inside the other and neatly sew up the little hole.
The final step is the fun part — sewing a few lines of topstitching all the way around the brim to give it even more stability.
It doesn’t matter which side you sew through, but make sure your top thread matches the brim fabric on top and your bottom bobbin thread matches the brim colour underneath. For my son’s hat, I topstitched on the turquoise brim using turquoise thread, and put green thread on the little bobbin so you can can only see green stitching when the hat’s flipped that way.

I think I’ll add elastic bands next time, for under their chins, since we live on a very windy hill. In the meantime, the weight of these interfaced brims keeps them in place pretty nicely.
The kids are crazy about their new hats and have already requested many other combinations. They think it’s so fun to reverse them any time they want and get a totally new-looking hat. All clothes should totally be reversible.
This project has been sponsored by Atlantic Fabrics’ six locations across Nova Scotia, including the brand-new Halifax store on Parkland Drive.

Heather vs. Public Humiliation
I had a lovely day in the city planned yesterday. Lunch with a good friend slash editor and some work stuff. Even a little shopping!
This should have been the first clue that my body would rebel and ruin it, because the stomach flu always finds me. Particularly when I have good plans. Most notably, when Darling Husband and I rented a hotel room to celebrate an anniversary and I THREW UP ALL DAMN NIGHT.
Soooooo yeah, yesterday did not go as planned …
Who’s the girl who fainted in Victoria’s Secret and then yakked in the food court? *raises hand in shame* 😖— Heather Laura Clarke (@HFXHeather) June 28, 2016
//platform.twitter.com/widgets.js
(I have a long history of embarrassing throw-ups, including on a NYC subway.) I blame my daughter who upchucked at the mall on Friday 😣— Heather Laura Clarke (@HFXHeather) June 28, 2016
Uh-huh. You read that right.
I was happily bra-shopping with L, about to pay for my two new bolder-holders (pebble-pockets?) when I started to feel unwell. I’d been a little iffy leading up to then — slight tingly stomach — but I didn’t think it was anything. But when the sweat started rolling down my face and I felt like the only thing in the WORLD I needed was to sit down, I weakly told the employee I felt faint and needed to sit.
I sat. (On a leather bench thing where she’d hastily brushed the bras to one side.)
This is nothing new for me, as I have low blood pressure and low blood sugar, but it doesn’t usually happen in public. I texted Darling Husband simply “Fainting” (I’m dramatic even when partially conscious) and hung my head between my knees but I wasn’t feeling any better. An employee brought me a bottle of ice water and told me to put it on the back of my neck. I did.
Then I slithered down to the floor, gratefully, to lie on that smooth fake wood with my head resting on the little shrug/sweater thing I’d sewed the night before. I started feeling better right away. L found me and ran to buy juice. I was able to stand back up and totter back to a dressing room where I sat on a bench and promised not to pass out.
L brought me two juice options and I drank one, but I still didn’t really feel better. Darling Husband had been out driving around, doing his own shopping, and he’d coincidental been on his way back to the mall when he got my one-word text, so he was there shortly after. He paid for my bras while I sat on a couch outside the store, and then the three of us went to the food court.
I needed something to eat. That was the verdict. Oh, and a regular Coke for more sugar. Surely that would help.
Um. Nope.
I ate two bites of poutine and had a couple of slurps of way-too-syrupy regular Coke when I started sweating again. I felt faint. I remembered how good it had felt to lie down on the floor of the damn bra store, so I begged Darling Husband to let me lie my head on his lap.
(He didn’t want to because, duh, it totally looked like … you know.)
I laid my head on his lap and stared at the legs of the table. Words were swishing all around me. I heard L ask him if I felt like I was going to throw up, and then it clicked. Oh. Shit. Yes. That is exactly what’s going to happen OH NO OH NO OH NO.
“Pass me the bag!” I moaned, my head still half-under the table.
L dove for the shopping bag and pulled out my precious new bras. I proceeded to sit up and throw up on the BOTTOM of the bag, which spilled all over my lap, and then flipped the bag over and threw up inside of it again and again.
It. Was. Humiliating.
Darling Husband ran for the car. L helped me outside and I dumped my vomit-y shopping bag in the trash on the way out. He drove me to my mom’s apartment 10 minutes away while I emailed my various meetings to cancel and apologize. I showered and dozed in Mom’s bed for the rest of the afternoon while she watched the kids (who had been there during VomitGate). We made it home around the kids’ bedtime where I was violently sick again.
 |
| Why oh whyyyyyyyyyyy |
And today? This morning when I woke up not feeling much better at all? Another self-employed “sick day” where I did interviews and wrote stories and tried not to die.
Lesson learned: near-fainting experiences are not always blood sugar or blood pressure related. Sometimes they are SIGNS FROM GOD to get your butt to a washroom pronto so you don’t embarrass yourself by yakking in a food court.

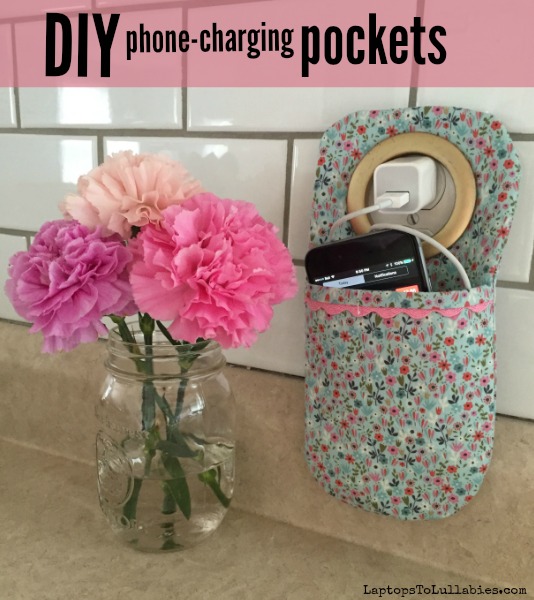
DIY phone-charging pockets

We’re an iFamily, so we have several iPhones, ancient iPods and a (very sticky, kid-friendly) iPad that always needs charging. I’ve been playing around with different wood bin/basket charging station ideas for a year now and I have yet to come up with a solution I’m happy with.
However, I did stumble across an idea for charging our phones that doesn’t leave a trail of ratty cord stretching across my kitchen counter.
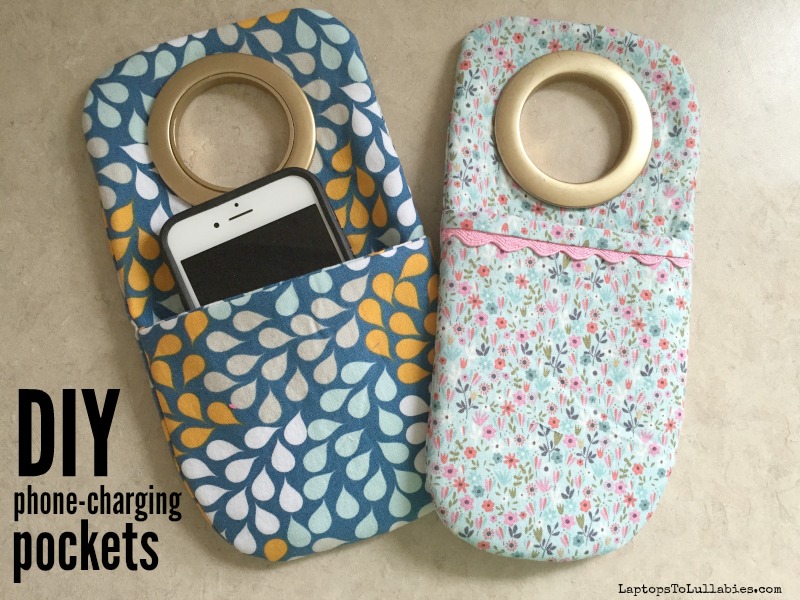
These hanging charging pockets can be whipped up in less than 10 minutes and customized to fit the decor of any room. It’s seriously cute and functional!
Here’s how to make your own phone-charging pockets:
1. Start by cutting two main rectangles out of your fabric. I picked 25 centimetres by 15 centimetres, slightly larger than my iPhone 6.
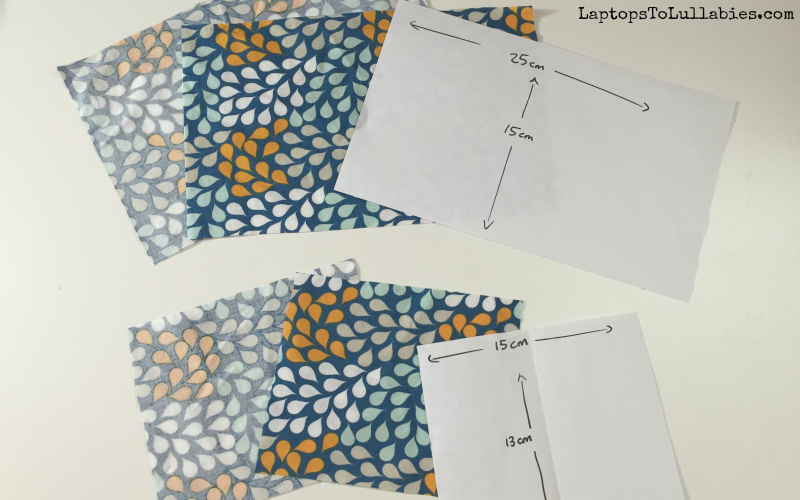
2. Cut two pocket pieces that are as wide as the first piece (15cm, in my case) and about half as tall (I picked 13cm). You can make these as large as you need to snugly encase your phone.
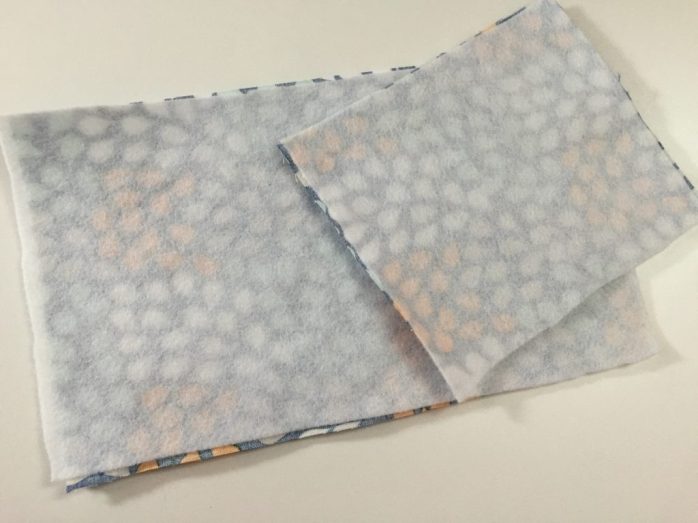
3. Next up, cut two pieces of fusible fleece — one of each size. Iron one piece of fleece to the back of your main rectangle, and one piece to the back of your pocket rectangle. This is just to make the project a little sturdier. (Side note: This was actually my first time using fusible fleece and I loved how it made the cotton fabric really thick.)
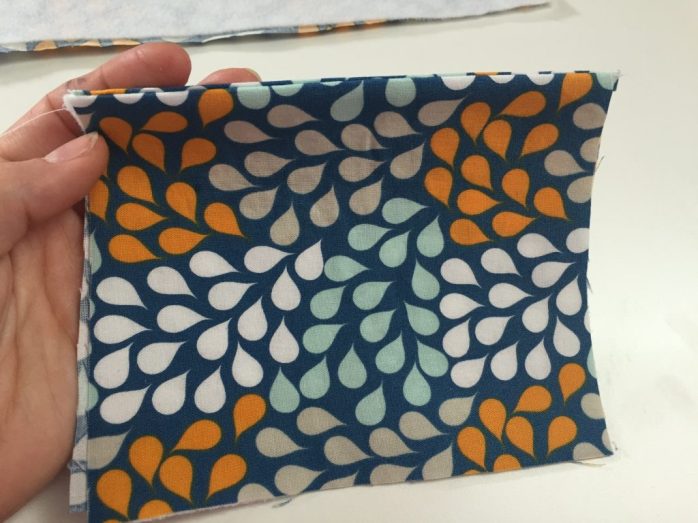
4. With right sides together, sew your two pocket pieces together along the top, and then flip the fabric and press so the right sides are on the outside again. Your pocket is done!
5. Take your pocket and pin it to the bottom of your main rectangle (the one with the fleece ironed to it). There will be raw edges all of the way around both pieces, except for the top of the pocket, and that’s fine. Sew the pocket to the main rectangle, rounding the corners if you’d like.
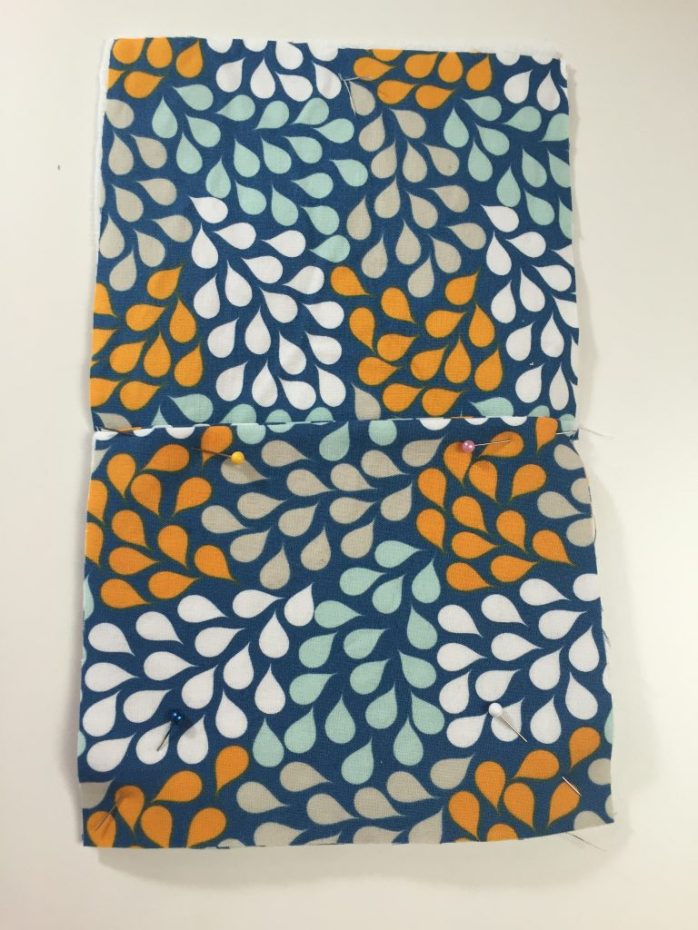
6. Lay the other large rectangle on top, good sides together. Sew all of the way around the edge, rounding the corners if you’d like and leaving a little gap so you’ll be able to turn it right-side out. Trim around the corners to cut away the excess fabric so it won’t be bulky, turn it inside out and hand-sew the gap closed.
7. The final step is adding the plastic grommet. These are used for curtains so they usually come in packages of 10 or 12. Use your thumbnail to pop the two pieces apart, and trace one of the circles on your finished piece where you’d like the charging cord to slip through.
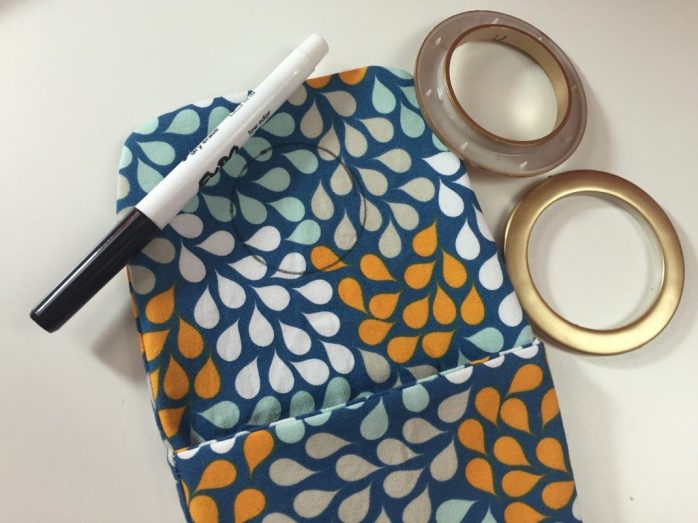
Cut out the circle, slip one grommet in between and one on top, and click them together to conceal the raw edges of the circle. (Side note: It’s very satisfying to snap the two circles together and now I’m plotting other grommet projects. Think of all of the things I could neatly hang on hooks!)
***
I experimented with a second charging pocket that was a little slimmer than the first one and it also fit my phone, so there’s a lot of flexible with this “pattern.” You could even sew a larger one for iPads or tablets, but I wonder if they’d be too heavy to hang off the power adapter thingy?
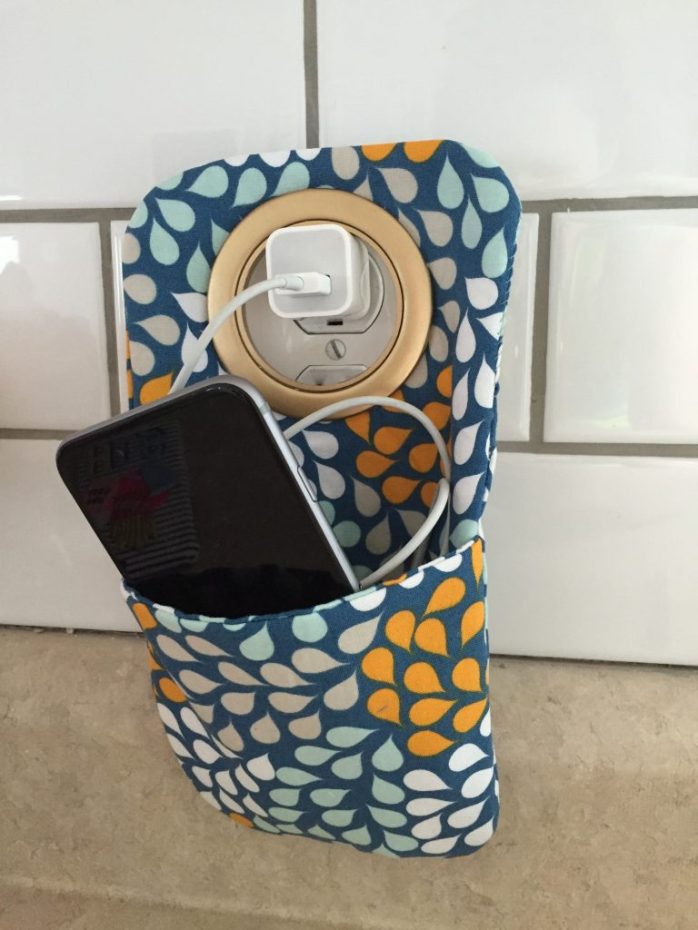
These charging pockets are so fast to sew up and hang nicely on the power adapter while your phone is charging. There’s plenty of room to stuff the cord inside the pocket to keep it off the counter, and you can even grab the whole pocket and take it with you — like a purse for people who are always misplacing their charging cord (hi, Mom).


As featured on …


