
Oversized ironing board tutorial

I made this a longggg time ago and it somehow never made it to the blog, so today’s as good a day as any, right?
I always say that I don’t iron clothes — just fabric (and hair, back in high school when my sister perfected a method for pressing our heads up against the ironing board).
The thing about sewing is that you need to iron a LOT. I still don’t like it, but it’s a necessary evil. Ironing fabric before you work with it (sometimes), ironing pieces in progress, ironing quilts, pressing seams, blah. Sometimes I skip it and sometimes I can’t.
So …
Since I only use our ironing board for fabric, I decided to give it a little upgrade and treat myself to a bigger ironing surface!
Let’s get started …
 |
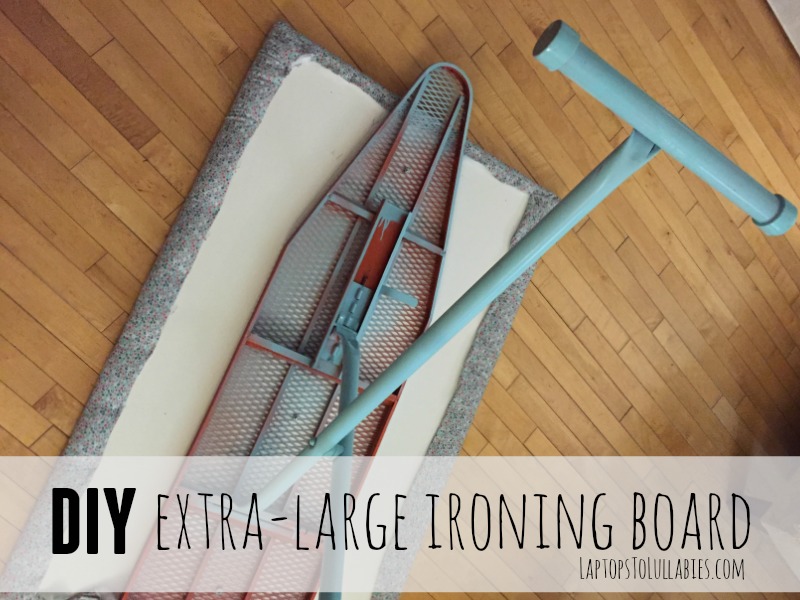
| Ye olde ironing board (super sturdy and stolen from my mom) |
 |
| I sprayed it (well, the parts that would be visible) with Krylon’s Blue Ocean Breeze. |
 |
| I snagged a leftover piece of melamine countertop-y board (from my DIY desk) and traced the ironing board onto it with a pencil. |
 |
| I marked the spots where screws could fit through the grates and pre-drilled holes. (Apologies for the dark photos — this was a spur-of-the-moment DIY conducted late at night.) |
 |
| I spread fabric out on the floor (“Beautiful Garden Girl” by Studio E fabrics from Atlantic Fabrics — also used for my daughter’s bucket hat), added two layers of quilt batting, and set the board on top to make sure it would fit. |
 |
| Then I bolted the ironing board to the white board, set the whole (HEAVY) thing back down on the batting, and got to work wrapping and stapling the edges. |
 |
| When I was done stapling, here’s how it looked from underneath (not so pretty, but who cares about the bottom?) |
 |
| Oh, but wait! I had a weird end jutting out. Hmm, I guess the board wasn’t long enough? What’s a DIY-er to do? … |
 |
| A shelf! I can add a shelf! (Another stolen chunk of a wood from a scrap pile, screwed through the grates of the ironing board). |
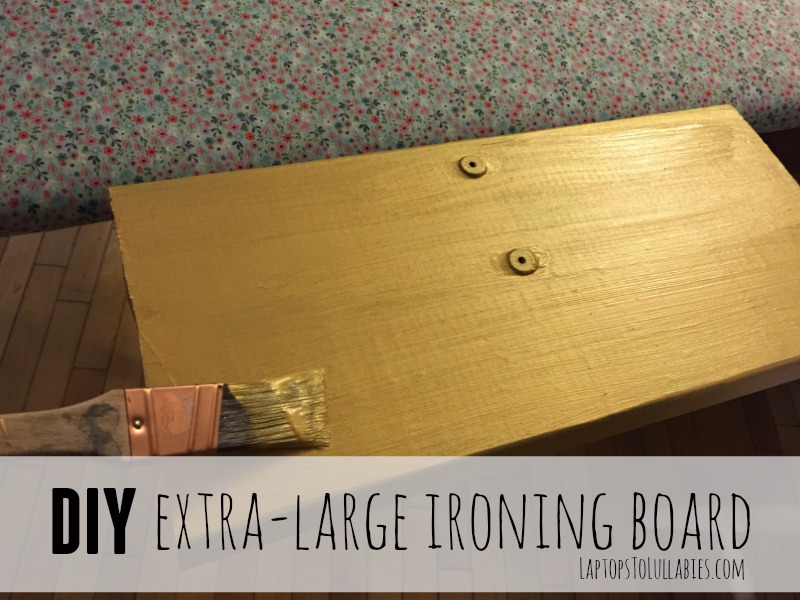 |
| I slapped on a couple of coats of glam gold paint (Fusion Mineral Paint) … |
 |
| … and then Mod Podged-on a little gold glitter for extra bling! (Notice the Christmas lights in the background? I told you this was a seriously old DIY.) |
 |
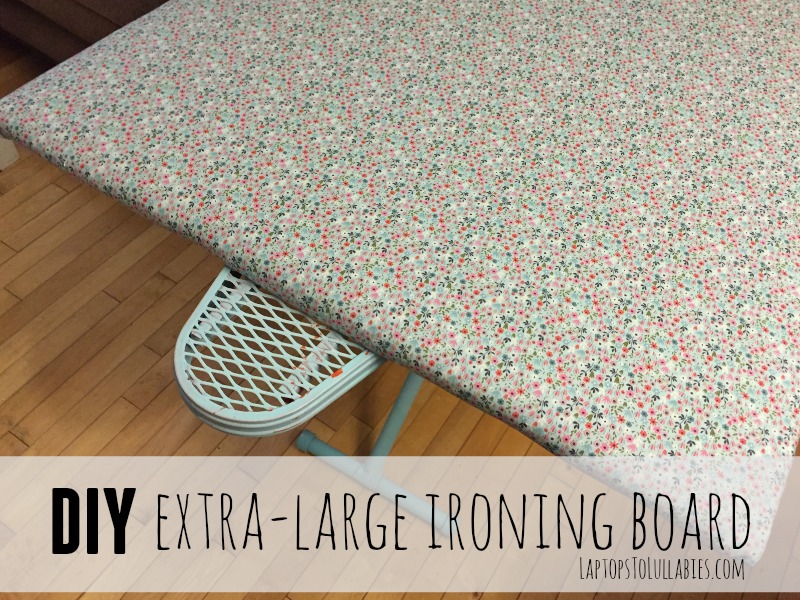
| The finished ironing board is HUGE and I can easily iron a yard/metre of fabric without having to shift it around a million times. It’s also amazing when I’m quilting. |
 |
| And even though it’s huge, it still folds down when I’m not using it just like a regular ironing board. |
Tell me this doesn’t make you want a GIGANTIC ironing board. Imagine the hair (fabric) you could iron on this sucker!
xo
10 Comments on “Oversized ironing board tutorial”
So what do you think?


As featured on …


Pingback: 15 Ironing Station Ideas for Every Space - The Most Viral collection of feel good stories & videos, delicious recipes and awesome DIY projects
I think it’s a wonderful idea especially since you can still for it down when not in use. I have very limited space, living in a small trailer so this might work perfectly. I am a quilter and the ironing is endless. D. Gramlin
LikeLike
Thanks, Donna! The ironing really is endless when you’re quilting, isn’t it? 😉
LikeLike
Hi, Heather – It must have been a happy fate that led me to your site today! I had a bunch of Pinterest tabs open from days ago when I was looking for an old chalk paint recipe I had misplaced. As I was shutting them down, one by one, I noticed on one page some pics of DIY large ironing boards that I wasn’t even looking for.
I was intrigued by that genius idea for my sewing projects, so I clicked on the first pic. It just led me to the home page of a blog about quilting. I have no time or patience to go digging through a blog to find the specific pin that led me there – I hate that! I clicked on another pin – same thing. Third pin – same damn thing. What the hell! Another pin was just a pic of the ironing board. That happens all too often too! That kind of frustration, which, sadly, happens all too often, is what I call Pinterest Hell!
At that point, I was ready to give up, but I decided to try just ONE MORE PIN . . . and that led me to your blog . . . on the actual page with the step-by-step instructions. YAY! And it turns out that your DIY ironing board is the best of all. I LOVE the innovative way you used a too-short piece of reclaimed wood (or faux wood LOL), plus another short piece for the iron stand. Genius, and oh-so-cute!
I, too, have a too-shortr melamime (IKEA Linnmon) table top lying around, plus a small scrap of wood that would be perfect for this project. Yay!
I am wondering, though, if I will still be able to hang my ironing board on the hook inside my foyer closet door, where it’s currently stored. Is that how you store yours? Any chance you could show a pic of the back of the DIY’d ironing board when it’s closed, so I can see how it looks after the redo? I literally have no place to store mine if I can’t hang it from the back of the closet door, so I will have to take that into account for this type of project.
Great job on this project. I’m so glad you finally got around to sharing it! And probably for the first time in the nearly 10 years I’ve been using Pinterest, I’m actually grateful that the first several clicks on pins led me to Pinterest Hell; otherwise, I might not have been led here, which is where I know I’m supposed to be! Of course, that doesn’t mean I’m okay with landing in Pint
erest Hell, ever LOL. But I’m happy to be here, no matter what path I had to take to find you. 🙂
Sorry for the long ramble. Bathroom reading mode off. 🙂
LikeLike
Thank you for the nice long note! 🙂 I actually no longer have the ironing board — took it apart and ended up making something different as my needs changed. I used to store it in a closet, but I think it could definitely hang on a hook if it was a strong one. The ironing board itself was completely in its original (hangable) condition.
LikeLike
Hi, Heather – Well, there you go again – cleverly reclaiming and repurposing items around the house. Nothing in your house is safe from your creative mind and hands LOL.
Thanks for the info about storing it. The hanging hooks I have on my closet door are pretty strong, so based on your comments, I’m optimistic that I’ll still be able to hang up the DIY’d oversize board. It’s about five spots down on my DIY To Do List, below some other more pressing projects. But I can’t wait to do this! Thanks again! 🙂
LikeLike
Great tutorial, thanks SO much for sharing! I do do quilting and other sewing when i have time, but the main reason I was drawn to this post, is that I run a holiday let, which every week gives me huge duvet covers that have to be ironed, and of course a normal ironing board is shaped to make ironing things like shirts and shaped items easily. For the laundry for the holiday let, it’s all straight pieces, so having seen your tutorial, I’m definitely going to try adjusting mine, and a much bigger straight board will make my ironing chore SO much quicker!
LikeLike
That’s such a good use for one of these, Judi! I have never ironed bedding but I can totally see its importance if you’re running a rental and want everything to look crisp and pretty. I’m so glad the tutorial helped! Please let me know if you run into any issues.
LikeLike
I’m trying to make my small space accomplish too many things, so this is brilliant. Would this work as a cutting table? Or as an extension table for machine quilting?
LikeLike
I used to use this as a cutting surface, too, actually! Now I prefer a harder surface for cutting. Could certainly try it as an extension table!
LikeLike